Monday, September 30, 2013

Design Wall Monday 9/30/2013: Table runner

I'm still working on my hand applique on the Dresden rows, but you've seen that project before so I'll refrain from showing it again until the top is finished. It's slow going.

But - Finally I'm back in the sewing room!  I need a table runner and placemats for the kitchen table. The wood is too pretty to hide under a tablecloth all the time, but it needs to be protected from spills & scratches. So, I think I'll make a table runner and at least two placemats. 

I had heard somewhere that you can use The Binding Tool by TQM products to make a French Braid.
The Binding Tool
by TQM Products

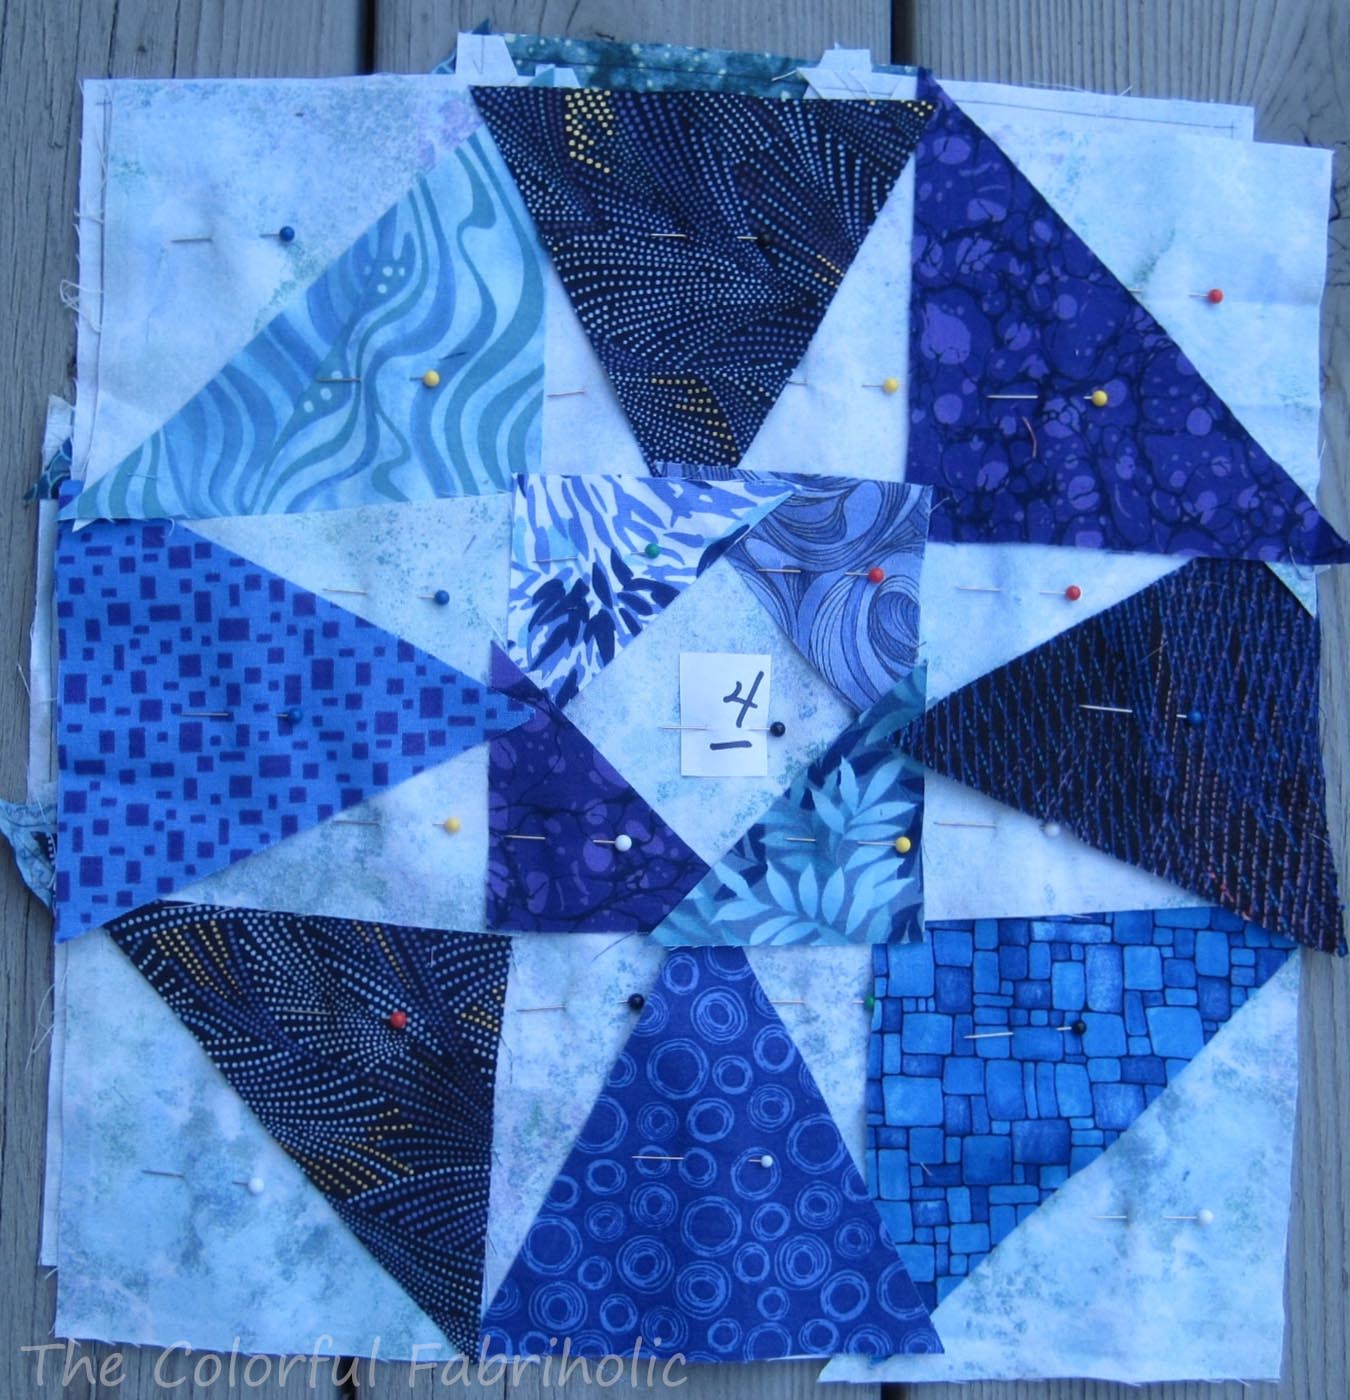
So, I pulled some fabrics that go with my kitchen and cut a 2-1/2" WOF strip or two of each, and cut the shapes using the binding tool.  I started with a square in the center and discovered it should be oblong; I'll fix it when I'm ready to sew.

Here's my design wall with pieces laid out:
Runner & placemat layout
 
I think I'll do this as a quilt-as-you-go project, using the sew-and-flip method.  That means I have to find backing and batting and prep them.  Once the French Braid units are all sewn down, I'll add end triangles to square it off and side strips to make it the right width.  I'm not sure yet what the finished dimensions will be, but when I post the finish, I'll give the dimensions & number of pieces. On the wall here it's about 6 feet long by one foot wide, but that's before the seam allowances consume some of it. 
 
Cutting these binding tool shapes from WOF strips yielded five pieces per strip (plus one 2-1/2" square).  There are enough cut pieces that are not on the wall for at least another placemat, plus probably a few extra. 
 
Then I think I'll use the extra squares to make some 9-patch potholders.  The potholders I have are from 10 years ago when we remodeled the kitchen, and they've certainly seen better days. Past due for replacements!
 
Linking up with Judy at Patchwork Times for Design Wall Monday - check out all the creative inspiration over there. 

Sunday, September 29, 2013

Stash Report for September; Losing and gaining friends

September Stash Report:

September In: 5.5 yards
September Out: 2.0 yards that I can count. (More was cut for projects that are not far enough along to count yet.)

YTD In: 102.5 yards 
YTD Out: 94.8 yards 
YTD Net Change: 7.7 yards in

Today I'm thinking about friends.

One passed away last week after battling brain cancer and the side effects of treatment.  She was creative, talented, generous, and a perfectionist.  Her quilts won awards at CSQ challenges and The Quintessential Quilt shows, and were exhibited at the Paducah AQS Show. She was very generous in sharing her techniques and expertise with us.  She was well organized and helpful; she quietly did whatever needed doing.  She used to produce the newsletter for CSQ; she set the bar high.  I took over the newsletter when she became ill.  I told her a couple months later that she unknowingly gave me a great gift: producing the newsletter has pushed me to grow and develop in ways I hadn't expected.  Another friend and I are going to the visitation later today and the memorial service tomorrow; other friends will be there, too.  I will miss her. 
 
Yesterday a relatively new bee I belong to got together to sew pillows for a charity project.  We hadn't gelled as a group yet because of being rushed for time at guild meetings, etc.  We took time out from sewing to get to know each other better and I enjoyed the conversation.  Some in the group put into words what I had been feeling: we just go to the guild meeting, sit & listen, but no one talks to each other except those cliques that already know each other.  I thought it was just me, my natural shyness.  I'm glad others felt the same way and that now our bee is planning to meet for lunch after the guild meetings and spend more time together.  Plus we have another pillow-sewing event planned.  I'm looking forward to growing friendships within this group.

Linking up with Sunday Stash Report at Patchwork Times. Check out how other quilters are managing their fabric collections there.

Friday, September 27, 2013

Friday Finish 9/27/13: first Saturday blocks

Sometimes you have to count the little finishes, right?

No big quilty projects completed this week, but it was good to get back in the sewing room after vacation and cleaning up from vacation....
However, I did get my September blocks done for my LQS's First Saturday project.  This year's theme is the Greek Isles and the fabrics are all batiks, yummy!
September main block

September alternate block
 
 
DH had a finish last week that's Whoop Whoop worthy: he took a glass blowing lesson at The Hot Shop in Orange Beach, AL, and made this ornament.  Pretty cool, huh!
Glass blowing lesson
 
Finished ornament
 
 
Linking up with Finish it up Friday over at Crazy Mom Quilts and Can I Get A Whoop Whoop over at Confessions of a Fabric Addict.  Check out everyone else's finishes over there!

Thursday, September 26, 2013

Gulf coast critters

More vacation pics today -

The most special - and unplanned - event of our recent vacation to Perdido Key was the turtles.  Endangered loggerhead sea turtles nest on this stretch of the Gulf coast.

A nest about a mile up the beach from where we stayed was dated 7/14. Gestation is about 60 days.
Heron at sea turtle nest
Every day we would walk up to the nest to see if they'd hatched yet.  The day we took this photo, we ran into the park ranger, who told us the baby turtles would be released that night and we could watch.

With all the rain the Gulf coast had this summer, the sand was packed too densely for the baby turtles to be able to dig themselves out of the nest, so the Florida state park biologist and turtle volunteers were watching the local nests and helping the babies out when the time came.
Listening to baby turtles
The babies hatch out of the eggs but stay in the nest for 2-3 days while their shells and flippers mature enough for them to come out. You can actually hear them moving around in the nest. That's DH in the orange shirt, listening. That heron could hear them, too, or feel vibrations under his feet.  The volunteers dug a trench through the sand to the water to guide the babies on their run to the sea.

When the biologist brushed the sand away from the nest and opened it, the turtles came out quickly and made their way down the trench to the water. They moved amazingly fast.  They're tiny, shells about 2" in diameter. Flash photography was prohibited because the light would blind them.  By instinct they go toward the brightest light, which should be the moonlit waves, but man-made light on buildings etc. confuses them.

71 babies made it from the nest to the water.  Two more babies were too immature so the biologist took them to allow them to mature for a couple more days.  One egg was cracked open but the turtle wasn't out of it yet; she took that too but she didn't know if it would actually hatch.  You can see the two babies and the egg in the bucket here. Only about one of every 1000 hatchlings lives to adulthood. I hope one of "our" babies makes it.
Immature baby turtles & egg
Seeing the baby turtles hatch and make it to the sea was one of those once-in-a lifetime experiences that we were fortunate to enjoy. We just happened to be in the right place at the right time.  My soul is richer for this experience; as Bob Seger sings, "Those are the memories that make me a wealthy soul."

By the way, that heron and his friends got breakfast. Fishermen on the beach throw unwanted catch to the herons and they eat well.
Heron with fish

We also visited an alligator farm in Foley AL while we were down there. They provide a refuge for nuisance alligators. They also raise alligators, but not for meat or hides, just for the tourists. They currently have 200 adults and they can eventually accommodate 600. They also have a lot of juveniles, ranging from this year's hatchlings to 5-6 footers almost ready for release into the swamp.
me with little gator
 
gator in the swamp
 
feeding time
 
All in all it was a great trip. Since we had two weeks this year we got to see and do more than we usually do with only one week, and we still had plenty of time on the beach and lots of opportunities to eat seafood. Can't wait to go back!
 
 
Linking up with Really Random Thursday over at Live a Colorful Life.

Wednesday, September 25, 2013

Tutorial: 24" Modern Medallion Pillow

Thanks to some helpful bloggers, I now know how to fix my tutorial tab so multiple projects can be shown, with links to each. Over the next few days I hope to have the changes in place.

This tutorial is for a Modern Medallion Pillow which has a hidden zipper, and I'll also post the tutorial for the zipper separately for easy reference.

This tutorial is copyright 2013 by The Colorful Fabriholic, for personal use only.  Please do not pin without attribution.
Modern Medallion Pillow
 
 
Finished Size: approximately 23 inches square; uses a 24" pillow form.
 
Block size: 4" finished
 
Materials:
  • Background Fabric, 5/8 yard
  • Featured print and pillow back, 3/4 yard
  • Fusible interfacing:  If 24" wide, need 3/4 yard. If narrower, need one yard.
  • 20-22" invisible zipper
  • Batting, 27" square
  • Lining, 26" square (muslin, etc.)
Cutting:
  • From featured print:
    • First cut one 24-1/2" square for pillow back.
    • Cut 8  4-1/2" squares
    • Cut 16  3-3/8" squares
  • From background fabric:
    • Cut 28  4-1/2" squares
    • Cut 8  3-3/8" squares

Block Construction: Use 1/4" seams.
Blocks A & B 

All blocks A & B:
  • On the wrong side of the 3-3/8" squares, draw a diagonal line from corner to corner. You will stitch on this line and cut the unneeded part away. (If you want bonus HSTs from the cut away part, mark another line 1/2" away from the first.)
  • Lay printed patches on solid squares, and solid patches on print, right sides together. Stitch on the diagonal from corner to corner. Chain piece all blocks.
Sewn Blocks
  • Cut between the lines of stitching (or 1/4" outside the seam if not making bonus HSTs). Use the bonus HSTs for another project.
  • Pressing seam allowances: This is important so your seams will nest together during assembly and yield nice points and well-matched seams.
    • Block A: Press seam allowances toward the print patch on 9 (nine) blocks and toward the background for the remainder of the blocks.
    • Block B: Press half the blocks toward the print and half toward the ground.
 Finished Blocks
  •  Plain blocks: you should have 12 plain 4-1/2" squares of background fabric.
Front Assembly: Use 1/4" seams except where noted.
  • Lay the blocks out as shown, starting in the center. Note the direction of seam allowances as shown by the arrows.
Layout showing direction of seam allowances
  •  Join blocks into rows. Rows 1, 3, 5: Press seam allowances to the left. Rows 2, 4, 6: Press seam allowances to the right.  
  • Join rows for completed top. Press seam allowances as desired.
Quilting the front:
  • Layer lining face down, batting, top face up, and pin baste.
  • Quilt in the ditch around the medallion.
  • Quilt remainder of medallion and background as desired.  Sample has straight-line quilting in the medallion, parallel to the edges of it, about 1/2" away using the walking foot as a guide.  Sample has a small meander (large stipple) quilted in the background.
  • Square up and trim top. After quilting it may measure slightly less than 24-1/2inches square. Note the actual measurement. (Sample measured 24".)
Quilted front

Pillow Back:
  • Fuse interfacing to wrong side of 24-1/2" back following manufacturer's directions for fusing. Piece interfacing if necessary.
  • Trim back to same size as pillow front if necessary.
Hidden Zipper:
  • Use 20-22" invisible zipper and instructions.
Invisible Zipper
  • If you do not have an Invisible Zipper foot, use your regular zipper foot and stitch as close to the coils as possible.
  • Open zipper and press coils flat as directed in the zipper instructions.
Press zipper
  •  Mark the right side of the pillow top 2" in from each side and mark the zipper to match, also right side up.
Mark pillow front and mark zipper
  • Pin zipper to top, right sides together, matching markings. Roll excess top out of the way as it will be to the right of the needle. Stitch the zipper, keeping the needle as close to the coil as possible. Backtack at both ends.
Stitch zipper
  • Mark the pillow back and the other side of the zipper like the front.
Mark back
  • Pin the zipper to the back, right sides together, matching marks.
Pin zipper to back
  • Stitch the zipper, again keeping the needle as close to the coil as possible. Backtack at both ends.
  • Holding the zipper tails out of the way, pin and sew the pillow front and back together from the edges to the end of the zipper stitching to complete the seam. The seam allowance will be about 1/2".
Sew remainder of seams from zipper to edge

  • Close the zipper. From the wrong side, press zipper seam allowances open. The right side will now look like this:
Hidden zipper, open above zipper pull, closed below.


Finishing:
  • Pin pillow back to pillow front, right sides together, zipper fully open. Sew, taking 1/2" seam allowances (approximately the same seam allowances as attaching the zipper) in order to keep the pillow square and symmetrical. Approaching the corners, shorten the stitch length and backtack on both sides of the corner.
  • Trim corners close to the stitching.
Trimming the corners
  • Turn pillow cover right side out, poking the corners out as sharp as possible.
  • Insert pillow form, pushing it well into the corners.
  • Zip closed (it will be a tight fit) and... DONE!
Finished pillow


Monday, September 23, 2013

Design Wall Monday 9/23/2013 and vacation pics

Nothing on my design wall today.  I've been on vacation and have only been doing hand work lately. I hope to get back into the sewing room this week.  First, though, gotta pay bills, take care of laundry, and bring Bax home from boarding.

One of the things we did on vacation was visit the Pensacola lighthouse. We've been to that area almost every year for 30 years, but never have visited the lighthouse before.
Pensacola Light
 
We climbed 179 stairs to the top. Going up was fine, no problem. Coming down hurt my knees and my muscles were sore for three days!
Stairs inside Pensacola Light
 
First order Fresnel lens
 
The view was spectacular from up there. From the light you can see the naval air station and the area where the Blue Angels are based.  Next time we go, it will be on a Wednesday when the Blue Angels are practicing for the public (they're not, now, due to the sequester). You can also see all of Pensacola Bay and much of Gulf Islands National Seashore.
Pensacola Naval Air Station from top of lighthouse
 
View to southwest from lighthouse
 

On the grounds, we saw these shrubs with these beautiful berries. Does anyone know what they are?  I've never seen anything like them before.  Each berry is about 1/4-3/8" diameter.  The shrubs were about 8-10 feet tall and were clustered together to make a hedge.
 
 
So even though I don't have anything on my design wall today, I'm linking up with Judy at Patchwork Times. I hope that's OK anyway!


Sunday, September 22, 2013

I'm back, and Stash Report 9/22/2013

The blogging's been a bit sparse lately, not much quilty stuff or sewing going on. Here's why:
How I spent my summer vacation
 
I've been on vacation, two weeks in Perdido Key FL. I spent much of it exactly as you see here.  We go there every year, usually in May or June.  This year it was tough to wait until September, but we had two weeks instead of one, so it was worth the wait. We were anxious all summer because of all the rain they had there this year, but the weather was perfect for us these last two weeks. We did lots of fun stuff and ate lots of seafood. More blog posts later about some of the things we did. 

Perdido Key is on the Florida side of the Florida/Alabama state line. We've been going there for 30 years, back to the same condo for the last ten. This is our beach:

Beach at Perdido Key, FL
 
The only sewing this week was hand work.  No yardage used and nothing bought.  I'll total the ins and outs at the end of the month, but there won't be much out this month!  Linking up with Judy at Patchwork Times for Stash Report Sunday; check out how everyone else is doing at managing their stash.

Wednesday, September 18, 2013

WIP Wed. 9/18/2013 and STLMQG Ohio Star project

Got my work cut out for me:

Ruth's Storm at Sea blocks ready for hand piecing
 
One of the groups I belong to does hand piecing. We usually do one block a month, sometimes two if they're small. Or we may do smaller parts that would later be combined into a larger block. This month is Ruth's turn and she has a deadline, so we're helping her progress faster by making two blocks each. That's a lot of hand piecing! These Storm at Sea blocks are complex, at 25 pieces each. Ruth handed them out all planned, cut, marked, and laid out as you see here.  My job is to assemble these two.
 
In other news, now that the Ohio Star Challenge projects have been revealed at the STLMQG meeting, I can show you my project.  I mentioned it here and here.  Now I can show it to you:

STLMQG Ohio Star Challenge
 
It's wall-hanging size, about 26" by 36".  To make my Ohio Star modern, I decided to go with wonky.  If you know me, you know that in my perpetual pursuit of perfect piecing, I don't do wonky well or easily; it just doesn't come naturally to me. So I challenged myself to make it wonky. I "exploded" the Ohio Star block and made the parts uneven - well, at least I tried to, they still came out more even than I would have liked.  I drew asymmetrical flying geese and paper pieced them (yes, perfectly pieced wonky!).  The border was added to meet the size requirement for the challenge, and because I liked the fabrics together. Note the mitered stripes in the corners.  My project kind of looks folkloric - is there such thing as folkloric modern?
 
 
Linking up today with Work in Progress Wednesday over at Freshly Pieced. Check out all the wonderful creativity over there.


Monday, September 16, 2013

Design Wall Monday 9/16/2013

Design Floor today, actually...
Making progress appliqueing the Dresden units to the background. There will be five rows of Dresdens altogether. It's slow going and I don't love applique. The "itises" in my hands don't love it, either, but it'll be worth it all when the top's done.

Linking up with Judy at Patchwork Times; check out all the creativity happening over there.

Sunday, September 15, 2013

Stash Report 9/15/2013

Some yardage in this week, none used that I can count.  I'll tally the total ins and outs at the end of the month.
Purchases were both purposeful and impulsive: The brown tone-on-tone is for a project that's in the design stages. The orange FQ is just because I liked it and I think it will harmonize with a lot of the other oranges in my stash. 

Linking up with Judy over at Patchwork Times; Check out how everyone else is managing their fabric addictions there.

Saturday, September 14, 2013

All solids quilt

Shruti over at 13 Woodhouse Road blog is hosting a giveaway of Bella Solids.

I love solid color fabrics, as you can see by the FQ's in my blog header!

Here's one that I finished earlier this year, before I started blogging. This is called Celebrate, because I think it looks like confetti and streamers.

Wednesday, September 11, 2013

WIP Wednesday 9/11/2013

Actually this whole blog thing is a work in progress. I am technology-challenged, and I have a hard time figuring out computer stuff.

You'll notice there's a tab above that says Free Tutorials.  My original intention was to occasionally post a tutorial for a project or a technique under this tab. I saw the tab as a kind of folder, with different projects within it.  But apparently that's not how these tabs in Blogger work. It seems to be just one page, kind of like an individual blog post but separated from the rest. Since it's all just one page, that doesn't work for multiple tutorials.

So, I need advice.  What's the best way to organize multiple tutorials?

The best thing I can think of is to post each tutorial as a regular blog post. Then in the Tutorial tab (page) I would show a picture of the project together with a link to the actual blog post.  I think I can update the Tutorial page periodically, and each link would take the reader to the individual post for that tutorial. What do you think?

If anyone has a better suggestion, I welcome it!

Here's a project I want to post a tutorial for; this is super easy and it includes how to insert a hidden zipper.
 
Linking up with WIP Wednesday over at Freshly Pieced, and hoping for some helpful advice! Thanks!

Tuesday, September 10, 2013

Another pillow

Remember the Drunkard's Path pillow here?
 
What would happen if you made the same layout, but with all straight seams instead of curves? 
 
It would look like this:
 
 
Super easy - no curved seams! I'll post a tutorial soon. 

Monday, September 9, 2013

Design Wall Monday 9/9/13

Lots of hand applique to work on this week:
Dresdens Ready for Applique

Four rows of Dresden blades, 34 points each counting top & bottom of each row.  Three background strips, and two end strips.  It'll take me weeks to get all that hand sewing done!

That stitching you can see is basting, to help align the points straight on the background.  It's regular thread in the needle and water-soluble thread in the bobbin, so when I'm done stitching down the points I can just wet the back and pull out the front thread.

Guess I better start stitching!

Linking up with Design Wall Monday over at Patchwork Times; check out al the creativity happening there.

Sunday, September 8, 2013

Stash Report 9/8/13

Just a quick note today -
Nothing in and nothing used that I can count this week.

Linking up with Judy at Patchwork Times; check out how everyone else is managing their stash over there.

Friday, September 6, 2013

Friday Finish 9/6/2013

UPDATED: The pattern for LINKED is available; see the Patterns tab above.  Please note that the pattern is for a one-sided version of this quilt, NOT for back-to-back construction.
 
 
The two-sided quilt is finished.  Turned out OK, not great. (All right, that's the perfectionist in me speaking!)  I'm calling it Linked and I'm now working on writing the pattern, which will not be two-sided.


I think I like the brown side better.  The color isn't very good in any of these pictures - sorry! The first one at the top is the closest to true color.
 
Linking up with Whoop Whoop Friday over at Confessions of a Fabric Addict and Finish it up Friday at Crazy Mom Quilts.