Pages

Friday, July 31, 2015

Gramercy & Friends Finished

Gramercy & Friends, finished, quilted, and bound
 
Tah-Done! Gramercy & Friends is finished and bound. I really like this quilt. It started as a value study, inspired by a FQ bundle of Gramercy by Leah Duncan for Art Gallery Fabrics. I added friends from my stash and a few new fabrics: coordinating lights, mediums, and darks. One of the fabrics came from Iran, a gift from a Paducah hostess friend.

Gramercy 12" blocks on design wall

The blocks are 12" and 24". Some are from EQ's block library; some are popular blocks from the Web such as Swoon and  x & +, and some are original.

Jane Coons of St. Louis MO quilted Gramercy and I couldn't be happier with her design. We talked about keeping it modern, geometric and masculine, and she nailed it. She uses a Stattler Stitcher and designs all her own motifs. Each of the 12" blocks has a unique quilting design. The swoon block and the other 24" block are the only two with the same quilting, for unity and cohesiveness. I love how she stitched the frames around the large blocks.
Gramercy & Friends, quilted
 
Gramercy & Friends is beautiful in real life (if I do say so myself) but it is extremely difficult to photograph. The actual colors in it are creams, taupes, and blacks, but it tends to look too grey in photos. The photo above was taken in bright sunlight which shows off the quilting but washes out the clarity of the block piecing. The photo of the unquilted top below was taken on an overcast day and looks too grey but shows the blocks. I'll have to keep trying for a better photo of the whole quilt.

Unquilted top

I gave Gramercy to my DH as a late Father's Day gift. Earlier this year he was whining commenting that baby grandson CJ has more quilts than he has, and he's been around longer. Gramercy was already in work and I knew I wanted to keep it, so I've given it to DH with the understanding that I'll enter it in a show in October and then he can cuddle in it after that.

Linking up with Whoop Whoop Friday at Confessions of a Fabric Addict and Friday Finish at Crazy Mom Quilts.

Monday, July 27, 2015

In Work This Week, 7/27/15

In work, yes. On my design wall, no.

First up, finish sewing the binding down on Gramercy. I still need to make the label, too. If I can get Gramercy finished this week, I'll be able to count out the backing and binding fabric this month, which will help out the stash report.
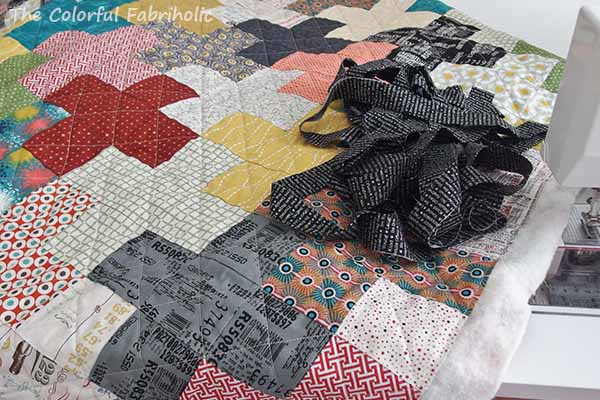
Binding in progress

You'll notice that the binding is not striped. After all the consideration of striped binding last week (this post and this post) I just couldn't bring myself to use that bold stripe on this quilt. Gramercy has a feeling of subtlety and serenity, probably due to the neutral color palette, even though it's a sampler quilt with lots of points and angles, high contrast, and varied scale.
Binding with piping

Instead, I'm using the taupe grunge fabric that's used in several of the blocks for a more subtle finish. And thanks to LeeAnna's suggestion, I'm adding a pop of orange piping. I'm using Susie's Magic Binding method; so far so good.

Also in work this week, packing up for "quilt camp," a little retreat with friends Friday & next weekend. I have my Flying Geese project organized for sewing the units into rows at camp, and maybe I'll be able to get the whole top sewn together. If I get tired of working on the geese, I have another WIP of simple squares packed and ready to stitch together. I like to have simple piecing that doesn't require too much heavy thinking at camp, because I've learned that I make mistakes if I try to follow a complicated pattern there. I'll pack up all the tools, equipment, etc. later in the week.
Flying Geese project & another WIP organized, labeled, and packed for quilt camp

So what are you working on this week?
Link ups:
Design Wall Monday at Patchwork Times
WIP Wednesday at Freshly Pieced
Let's Bee Social at Sew Fresh Quilts

Sunday, July 26, 2015

Stash Report 7/26/15

IN this week: 1-5/8 yards.  (1/4 yd prize for CSQ show ribbon; 5/8 yd orange & 1/2 yd taupe grunge for Gramercy binding)
OUT this week: 1/4 yard for binding test potholder
I'll tally up the totals for July next week.

If you've been following the Gramercy binding saga, you may recall that I auditioned several fabrics and tested a stripe that many commenters liked. After serious consideration, I just couldn't bring myself to use the stripe. Too bold and busy for the overall serene nature of Gramercy & Friends. I decided to go with taupe grunge, a fabric that's in several of the blocks that reads mostly solid and also doesn't fight with the backing. I do like LeeAnna's idea of orange piping, so I'm adding it using Susie's Magic Binding method.

If I get Gramercy bound this week, I'll be able to count out the backing and binding this month.

Linking up with Judy at Patchwork Times; check out the other stash reports over there.

Friday, July 24, 2015

Binding Test

A very little finish today:
In the previous post below I auditioned several options for binding for Gramercy & Friends (scroll down & check it out). By far the striped binding was preferred. LeeAnna suggested adding a pop of orange piping to the binding. I like the idea but haven't tried that technique, so I needed to test it.

Binding test with piping

I used the same stripe I'm considering for Gramercy and an orange print I found in my stash. I know I need a solid, not a print, for the piping in Gramercy, probably Kona School Bus, so I'll have to get some. I used Susie's Magic Binding method and it worked pretty well. I also used up the very last scrap of my Gramercy focus print.

Now another question for you:
Are striped bindings becoming cliché?  Why or why not?

Link ups:
Confessions of a Fabric Addict
Crazy Mom Quilts

Wednesday, July 22, 2015

Ready for Binding: Your Opinion Please

Gramercy & Friends came back from the quilter last night. I'm really pleased with the quilting - it's clean, geometric, modern, and masculine. Each 12" block is different but the two large blocks are the same, and are framed with the same "racetrack circles." Since the whole quilt fills my design wall, you can't see the quilting very well in this photo, but you can see it in the detail photos below.
Gramercy & Friends quilted & ready for binding

Now I'm auditioning binding and I 'd like your input. Here are four of my choices, in no particular order. The taupe geometric is also the backing fabric.
Binding fabric choices

Option 1: Stripe. I love striped bindings. This stripe is not used in the blocks.
Auditioning striped binding

Option 2: Brushstroke print (not in photo above). This print is also not used in the blocks but it's subtle and the colors in it work.
Auditioning brushstroke print binding

Option 3: Gramercy focus print. I will need to get more, but my LQS still has it in stock.
Auditioning focus print binding

Option 4: Backing fabric used as binding
Auditioning backing fabric as binding

Option 5: Crosshatch print, which is used in a few of the blocks
Auditioning crosshatch print binding

Option 6, not shown: For a more solid-ish binding, I could get more of the taupe grunge print. You can see it well in the Option 4 photo.

Which one do you think works best?

Linking up with Let's Bee Social at Sew Fresh Quilts and WIP Wednesday at Freshly Pieced.

Monday, July 20, 2015

Fidget Quilt

My guild is collecting Fidget Quilts for donation to a memory care unit at a local nursing home. Dementia patients often need something to do with their hands, and fidget quilts are offer tactile textures they can stroke, pick at, etc. Our fidget quilts are due at tomorrow's meeting for distribution later this month. Here's mine:

I made one for my dad last year and they tell me he likes it. This new one has some of the same elements but others as well. I assembled it improv-style, adding trims etc. into the seams as the top grew.

It measures 13-1/2" by 21", and I used a hand towel for the backing. I kept adding pieces to the top until it was as big as the towel, then sewed the top & towel together, turned it right side out, and edge-stitched. There's no batting. I quilted over the seam lines for added strength so the trims won't pull out of the seams. The towel provides enough bulk, an additional texture, and makes it non-slip so it won't fall off the user's lap. The size is good for someone sitting in a wheelchair or recliner.

Everything about a fidget quilt must be washable; it'll probably get washed often. When choosing fabrics and trims other than quilting cotton, look for trims and faux fur that are labeled washable. Minkee would be a good alternative to faux fur.

Here are detail shots of the textures and elements. This first one shows stretchy mesh (over cotton), rickrack, grosgrain ribbon with a plastic buckle, and ribbon with a plastic tube that spins around. The tube is part of a thread spool.
The next photo shows ball fringe, pleated ribbon, and buttons from an old shirt cuff.

Next photo shows faux fur, more rickrack, a grosgrain ribbon bow, and some narrow lace. The bow is hand sewn through the know so it won't come untied.

This last photo shows the pocket. Attached to that ribbon tucked into the pocket is a plastic ring, which can be pulled out of the pocket.

Hopefully this little fidget quilt will help keep someone's hands occupied. Since I don't have anything on my design wall today, this will have to suffice. I'm linking up with Judy at Patchwork Times. Check out the real design walls over there.

Sunday, July 19, 2015

Stash Report 7/119/15

IN this week: Nothing. YAY!
OUT this week: 5-1/2 yards. (Collection Challenge Plus: Backing 4-1/2 yards; Binding 5/8 yard.  Fidget Quilt: 3/8 yd.)

Finally moving in the right direction again!

Come back tomorrow and I'll tell you more about the fidget quilt. You can see the Collection Challenge Plus quilt in the post below.

Linking up with Judy at Patchwork Times.

Friday, July 17, 2015

Collection Challenge Plus Quilt & Tutorial

Ta-Da!!! My Collection Challenge Plus quilt is all finished, quilted and bound.
 
I quilted straight lines across the diagonal using a walking foot. I just eyeballed the lines across from point to point. The quilting came out to about a 2" bias grid.

The backing worked out great! I pieced it together and tried to match the pattern. While not a perfect match, you have to look for the piecing seam. I'm really pleased with this backing print for this quilt top and the intended recipients.
 
The crosshatch quilting left the quilt soft and flexible, great for snuggling on the sofa. 

 
Finished size 57" by 69".
Number of fabrics used: 21 different prints

Tutorial

Patch size: 3-1/2" cut square; finished patch 3" square. 5 squares make a Plus motif.

Fabric Notes:
- Fat Quarters are the most efficient size for the least waste.
- Choose at least 20 different fabrics, a mix of light/medium/dark and bold/busy or calm/subtle. Fewer prints mean that the same print will be too close to itself in the layout and will make it harder for you to get a pleasing layout. When in doubt, add more variety.
- You can get 30 patches from a fat quarter if the cuttable area is 21" excluding the selvage. 30 patches will yield six Plus motifs. You won't need to cut 30 patches from all of your prints, but plan to cut at least 15 patches from each of them.
- Choose a few of your fabrics to be featured more (5 or 6 Plus motifs) and some to be used in fewer Pluses. Use the whole FQ for the featured ones, and only part of it for the secondary ones.

Cutting:
- From FQ, cut 3-1/2" strips parallel to the selvage, then sub-cut 3-1/2" squares, 5 squares per strip. Each strip will yield enough squares for one Plus motif.
- From your less-featured fabrics, cut only 3 strips and sub-cut patches. From your focus fabrics, cut the whole FQ.
- You'll need 437 patches but you may want to cut a few more to allow for placement at edges, corners, etc.

Layout:
- Using a design wall or large surface, start in the center and lay out patches in plus motifs.
- Note that the next motif will be offset by one patch horizontally and one row vertically.
- There will be partial motifs at the edges and in the corners.
- Layout is 19 patches wide by 23 patches high for 57-1/2" by 69-1/2" top.
- Continue arranging patches until you're satisfied with the layout. It will help to take photos; you'll see in photos things you miss by eye, such as the same color too close to itself, or not enough contrast.

Piecing:
- All seams are 1/4".
- Sew patches together into rows.
- Press all the even rows to the right and odd rows to the left.
- Sew rows together, nesting seams. Press all in one direction.
 
Finishing:
- Piece backing to measure at least 64" by 75". (4-1/2 yards if all one fabric; piece lengthwise and trim away excess width.)
- Layer, baste, and quilt as desired.
- Square up and trim 1/8" outside top edge.
- Binding: from 3/4 yard, cut 8  2-1/2" strips. Join end-to-end, press in half lengthwise, and sew to quilt sandwich, mitering corners. Sew down by hand or machine, your preference.  
 
Be sure to label your quilt!


 Link ups: Confessions of a Fabric Addict, Crazy Mom Quilts

Wednesday, July 15, 2015

How Do We Handle Duplicate Pattern Names?

Throughout quilting history, the same block has had multiple names. For example, the Churn Dash block is also called Monkey Wrench. These old traditional blocks with multiple names are, mostly, in the public domain.

But with so many quilters/bloggers/pattern designers now, how should we handle it when two designers use the same name for a published for-sale pattern?

A regular reader brought to my attention that a quilt pattern named Plus Dash has been published by Samelia's Mum. Check out the link to see it.

Back in April I also published a pattern called Plus Dash. My pattern and Samelia's Mum's pattern look nothing alike, so I'm not concerned about similarity of design.


My Plus Dash quilt, published April 5, 2015

I left what I hope is considered a respectful comment on Samelia's Mum's blog. Here's what I said:
"There are many variations of the Churn Dash Block and Plus block, and this is certainly a lovely combination of these motifs.
But please be aware that I published a pattern called Plus Dash back in April, in which the Churn Dash motif is more easily recognizable, which you can see here: http://thecolorfulfabriholic.blogspot.com/2015/04/plus-dash-pattern.html.
Would you please consider changing the name of your pattern? Thank you. Jan O at The Colorful Fabriholic"


My question to the quilting community: How should we handle duplicate pattern names?

In order to get exposure for my question and get a wide range of responses, I'm linking up with WIP Wednesday at Freshly Pieced and with Let's Bee Social at Sew Fresh Quilts.

Monday, July 13, 2015

In work this week...

On tap for this week, trimming and binding the Collection Challenge Plus quilt.

I quilted it with a simple diagonal grid. I didn't want the quilting to detract from the fabrics and the plus motifs. At 58" by 70", this is intended to be a sofa quilt, maybe for a family with kids, so it may end up on the floor, being used as a fort, etc. I wanted to keep it soft, not so dense that the quilting adds stiffness.

Also to do this week, make a fidget quilt for donation. My guild is making them for a memory care unit at a local nursing home, and they're due at our meeting next week. A fidget quilt is a tactile lap mat for a dementia patient to stroke, pick at, play with, etc. Here's the one I made for my dad last year. I have different embellishments for the one I'll make this week, but some of the textured materials are the same, the faux fur and the stretchy mesh. The whole thing has to be washable. I use a hand towel for the backing, just the right size for across someone's lap without getting caught in wheelchair wheels, and handy for spills, etc.

So although these projects aren't technically on my design wall, I'm linking up with Judy at Patchwork Times. Check out everyone else's design walls over there.

Sunday, July 12, 2015

Stash Report 7/12/15

IN this week: 3-1/4 yards. (2-1/4 yds add'l backing; 1 yd black text for binding, all for Collection Challenge Plus quilt.)
OUT this week: 1/4 yard (all from scraps) for fidget quilt.

I'll tally up the totals at the end of the month.

Collection Challenge Plus Top
 
I was able to get the backing for the Collection Challenge Plus quilt pieced together and got it all sandwiched and pin-basted. I'm in the process of quilting it, so I hope to get it finished and bound this week.
 
Linking up with Judy at Patchwork Times; check out everyone else's stash management efforts over there.

Friday, July 10, 2015

Backing Dilemma Resolved

In Monday's post (below) I was whining about my backing dilemma. Great fabric but not enough of it. Nothing else in my stash that would work. I was going to have to buy something to solve the problem. The print is an older line called Bailey by Maude Asbury from Blend Fabrics.


Yvonne at Quilting Jetgirl sent me a link to an on-line source for more of the same fabric. Thanks, Yvonne! As long as I was going to have to buy fabric anyway, I might as well get more of what I liked to supplement what I already had and make it work. It arrived yesterday. 

Since the print background was white and my quilt top has darker ecru & ivory tones, I was debating whether to overdye the backing. A search for binding helped make the decision: white in the binding would coordinate with the back but look bad on the front, and vice versa. So I overdyed the backing print and I'm happy with the result. I have a black tiny text print for the binding. It started out with white so I threw that into the dye at the same time and now it's perfect.
 
Whoo-hoo! Perfect color combo!
 
I used bottled Rit dye in color Tan, 1/2 cup in a whole washer full of water. There were 6-1/4 yards total of cotton fabric. I was careful not to go too dark; I could always dye it again if it came out too light. The result is like a tea-dyed shade. You can see here how well it coordinates now with the print that inspired this collection:

Dilemma resolved. That's whoop-worthy, so I'm linking up with Whoop Whoop Friday over at Confessions of a Fabric Addict. Check out everyone else's whoop-worthy stories over there.

Monday, July 6, 2015

Collection Challenge: Backing dilemma

Remember the Collection Challenge I was working on back in April? You can read more about it via the link. The top has been finished for awhile, and one of my goals this month is to quilt it. Here it is today, back on my design wall so I could measure it:

This is the inspiration fabric and the collection fabrics my swap partner chose for me:

My dilemma is what to do about the backing. I love this print with this top; this print is Bailey by Maude Asbury for Blend Fabrics.

First issue: I don't have enough. I have about 2/3 what I need so I'll have to piece something into the backing to make it large enough. Where I seam the big print, it won't match up. Those tiles in the print measure about 4" in diameter and the repeat is huge. The only thing I have in my stash that could work is a mottled yellow-gold blender. It's OK and I have enough, but I don't love it. But I don't know what else I would use, unless I could find more of the original inspiration fabric.

Second issue: The white in the backing print is whiter than the ivory shades in the top. You can see them together in the top photo. I'm debating whether I should overdye the backing fabric to make the white look more ecru. What do you think? I guess it depends on what else I use with the big print for the backing. If I get more of the inspiration print, I'll definitely have to overdye the backing print.

Does anyone know the name & maker of that inspiration print? I only had a fat quarter of it to start with, and it didn't have any info on the selvage.

Linking up today with Judy at Patchwork Times; check out all the other design wall inspiration over there.

Sunday, July 5, 2015

Stash Report 7/5/15

Nothing in this week - yay!
OUT: 1/4 yard for show ribbon
Linking up with Judy at Patchwork Times; check out everyone else's stash management efforts over there.

Someone asked, so here's the scoop about the show ribbons:
They're all built using old computer CDs. Everyone is free to make theirs as creative as they like. Some have tiny piecing, exquisite thread work, applique, etc. Some are works of art in themselves. Only the first place (blue) and best of show (purple) get ruffles. I chose red so I wouldn't have to deal with a ruffle.
 
For the front of mine, I made a series of giant yo-yos, using the disc for the largest one, and going  smaller for the 2nd and 3rd. The disc and the cardboard templates remain inside to make nice circles. I cut fabric a little less than twice the diameter of each template, gathered around the edge, and drew it up as tight as possible. I stacked them up on the front, held together with glue, and topped it off with a covered button to hide the center.
The piping is hand-sewn around the edge, with a little help from glue basting. The ribbons are glued to the back of the front disc.
The back disc is covered in the same way in the same floral print, but it's mounted smooth side out (gathers sandwiched inside). I glued the back disc onto the back of the front disc, and clamped the whole thing until it dried.
A ribbon is attached to the back for pinning the award to the quilt.

Friday, July 3, 2015

Show Ribbon

My guild produces a month-long quilt show every other year called The Quintessential Quilt. It's a juried and judged show with prizes. Award-winning quilts also get show ribbons, which our members make.

I signed up to make a red one this year. It's due at our July meeting.
Show Award Ribbon
 
It's just a little finish this week (the glue is still drying, that's why the clips are still there). We use old computer discs to build these show ribbons. You should see how creative some of them are, with thread work or applique or tiny piecing. Only the first place (blue) and best of show (purple) get ruffles around the edge, so to finish off mine, I added a little touch of piping.

In other happenings around here, I finally decided that the placement of all my geese on the wall was good enough. Scroll down to the previous post below to see them on the wall. I packed them all up in a batch for each row and labeled them so I can piece them together at quilt camp at the end of the month. Here's what 390 flying geese look like all stacked together:
Rows of Flying Geese, Bundled and Packed
 
I guess this will keep me busy at quilt camp! 
 
Link ups today:
Whoop Whoop Friday at Confessions of a Fabric Addict
Friday Finish at Crazy Mom Quilts