Pages

Monday, September 28, 2015

DWM, QQ15, and misc. updates

Nothing new on my design wall today. I have to unpack from vacation and regroup. I took my travel machine and several piecing projects with me and made progress on all of them:
  • Sashing parts made and rows assembled for my QF main block top.  
  • Borders added & flimsy finished for QF alternate block top
  • Parts cut and piecing started for Antler Dance
We pushed hard to get home in time for me to go to my guild's show opening. We left Pensacola at 6am Saturday, drove four hours to New Orleans, took an airboat tour, then drove 11 hours home, arriving at 2am Sunday. Way past my bedtime! But so worth it. I enjoyed the tour immensely, and I'm very glad we were able to get home in time for me to go to my guild's event.

The show is the Quintessential Quilt 2015 at the University MO public library, through October. Free and open to the public during regular library hours. If you're anywhere near the St. Louis area, I encourage you to visit the show. There are some awesome quilts in a great variety of styles, including traditional, art, innovative, modern, and embellished crazy quilting.

I'm thrilled that Gramercy & Friends won a red ribbon! Here's Gramercy hanging in the library:
Gramercy & Friends at The Quintessential Quilt 2015

The Quintessential Quilt is a juried & judged show with very limited space for large quilts, so the fact that Gramercy was juried in is already special. That it won a ribbon is icing on the cake, and due, I'm sure, to the inspired and excellent quilting of Jane Coons. I'll share the judges' comments with her when I get them after the show ends.

(Aside - Gramercy has to be the most un-photogenic quilt I've ever seen. I just cannot get a good photo of it that shows both the fabrics and the quilting. ...sigh... I'll have to keep trying.)

Our show opening yesterday was well attended, due to the lecture & trunk show by Bonnie Hunter. She's delightfully personable and down to earth. I'll have to edit photos to share the experience in another post later.

Meanwhile, the post-vacation to-do list awaits. Laundry, groceries, bills, housework, errands... no sewing for me for a few days, I'm afraid.
Linking up with Judy at Patchwork Times.

Sunday, September 27, 2015

September Stash Report & Goals Update

OK, so it's not technically the end of September today, but I have so much non-quilty household stuff going on that I don't expect to even get into the sewing room for a few days, so I might as well do the stash & goals report today.

The non-quilty stuff has to do with catching up at home because I was on vacation for two weeks. I was in Perdido Key FL (near Pensacola):

Yesterday we left Pensacola early and drove to New Orleans. A bit SW of New Orleans in Des Allemandes we took an airboat tour of a wetlands area including marshlands, bayous and swamps.
 
 
It was a fantastic tour and I highly recommend it. I made a new friend. Doesn't he look happy?


After the tour yesterday we drove all the way home to St. Louis, arriving at 2:00am, so I can attend my guild's show opening today featuring a trunk show by Bonnie Hunter. I'm so glad I'm not missing it!

Anyway, back to the monthly reports:

Stash Report:

September IN: 3 yards (Kona Bone for Antler Dance)
September OUT: 3-3/8 (1/2 yd for blue Wonky Stars; 1/2 yd inner border & 1-7/8 yds for outer border of QF Alt blocks top; 1/2 yd for red Wonky Stars;)
September change: 3/8 yard out

YTD IN: 128-1/4
YTD OUT: 116-1/4
YTD Net Change: 12 yards in
Still hoping to break even for the year. I just need some finishes.

Goals:

September Update:
1. Write tutorial for piecing a quilt top using my Fabri-Quilt block. Post on 9/4. DONE
2. Start prepping demo materials for teaching Cut & Shuffle workshop in October. Supply list due 9/4. Supply list done. Cut all the parts for new quilt "Antler Dance" using Block Mama method. These blocks will be demo blocks and step-outs for workshop. 
3. Piece QF Alt. Block top including borders to a finished flimsy. DONE
4. If time permits, piece sashing for QF main blocks and assemble top w/ borders to a finished flimsy. Made sashing components, sewed blocks & sashing into rows but still need to join rows together.
5. Keep up with bee blocks. DONE

Other: Made six Wonky Star blocks for Alycia's QOV block drive.
           Started piecing Antler Dance blocks.

October Goals:
1. Book signing at The Quilted Fox on October 4
2. Prep for teaching workshop
3. Finish piecing QF Main BOM Blocks flimsy including borders
4. Continue piecing Antler Dance
5. Layer and pin baste one WIP
6. Query from Quilt Pattern Magazine about submitting a pattern: Investigate their requirements and plan to submit something.
7. Sew Me STL retreat Oct 24-25
8. Teach Cut & Shuffle workshop Oct 24
9. Keep up with Bee Blocks

That ought to keep me busy!

Linking up with Judy at Patchwork Times


Friday, September 25, 2015

Test Blocks for Antler Dance

Whoo-hoo! All the seams nest nicely!
Antler Dance test blocks
 
Also accomplished: more Wonky Star blocks for Alycia's QOV block drive:


Linking up with Whoop Whoop Friday at Confessions of a Fabric Addict.
 

Wednesday, September 23, 2015

Not in progress...

...can mean "lack of progress," or can mean "done," and I have both to share today.

Lack of progress:
Bad tension
 
This pile of block parts was chain pieced. Half a quilt's worth of blocks. When I started cutting them apart, I realized there was a tension problem. So, lack of progress, time out to unstitch and pull out the threads, and fiddle with the tension on my machine. Yeesh!

I'm using my travel machine (my Bernina is at the spa) and it really likes Connecting Threads 100% cotton 50 weight thread. It doesn't like finer Aurifil 50 wt. thread so much, as you can see, without a major tightening of the upper tension. So, several sample seams later and about an hour wasted with no progress to show for it, I finally got to the point where I could begin chain sewing these seams again with good tension.


Done:

My book Cut and Shuffle Quilts is finally published!

Cut and Shuffle Quilts is now available from AQS or from Amazon. I haven't seen it in print yet - I'll get my copies next week - but I'm excited it's finally published!

Start with a simple square called the Block Mama. Cut it into pieces, shuffle the parts, and reassemble them nine-patch style. Create easy, unique blocks with endless creative possibilities! Cut and Shuffle Quilts features the Block Mama, four blocks, and six quilts made from them. Complete instructions are given for the blocks and the quilts. For added creative inspiration, all the quilts are illustrated in additional fabrics and colorways. Cut and shuffle your way to creatively satisfying quilts using the easy Block Mama method.
So even though these projects aren't technically "in progress," I'm linking up with WIP Wednesday at Freshly Pieced and Let's Bee Social at Sew Fresh Quilts.

Monday, September 21, 2015

DWM: More QF BOM quilt progress and starting Antler Dance

Regular readers may recall that I'm using the 2014-15 Quilted Fox BOM blocks for two sofa-throw quilts rather than one ginormous 105" quilt. You can see the blocks and the plans for these tops here. Since I finished the flimsy using the alternate BOM blocks last week, this week I'm working on the other project using the main BOM blocks.

Here are the main blocks, not in any particular layout:
QF Main BOM Blocks

I'm working on sashing:
Sashing strips in work
 
And cornerstones:
Pile of itty bitty nine-patch cornerstones

Next up: joining the blocks with the sashing into rows. Here they are on my design floor. The sashing strips are attached to the sides of the blocks but they're not joined together into rows yet.

It's slow going - those little nine patches took a lot of time! I'm hoping to get the top together this week, ready for borders. The borders require some planning to miter the corners and match the paisley print, so I may not get to them this week.
 
Also this week I need to start working on the blocks for Antler Dance, a new quilt using my Block Mama method from Cut and Shuffle Quilts (see yesterday's post below). I'll use the blocks as class samples for a workshop I'm teaching in October. Here's the plan for Antler Dance:
Antler Dance rendering from EQ
 
That should keep me busy for awhile.
 
Look for more quilty inspiration over at Patchwork Times.


Sunday, September 20, 2015

Stash Report and other stuff, 9/20/15

IN this week: 3 yards
OUT this week: 2-3/8 yards (1/2 yd inner border & 1-7/8 yds outer border for QF Alt. BOM top)
I'll tally the totals & net stash change at the end of the month.

One of my goals this month is to prepare to teach a workshop from Cut & Shuffle Quilts in late October. So I decided to start a new project using my Block Mama method (in the book) to make the blocks. I can use them for workshop samples. The new project will use the fabrics below. The dark print was from stash, but I didn't have enough of the light solid, so I had to buy three yards of Kona Bone, thus my yardage added this week.
Fabrics for Antler Dance
 
The dark print actually has tan in it which shows up better in real life. It just looks grey in this photo.
The name of the new quilt will be Antler Dance. It was in the book proposal but wasn't included in the book due to space. It's another tessellated design like the aqua one on the book's cover.

Speaking of Cut and Shuffle Quilts, I'm thrilled that it's actually - finally - published! I haven't seen it yet in print but my copies are scheduled to arrive next week. Meanwhile, it's available through AQS.
Their description is horribly inaccurate so here's a better one:
Start with a simple square called the Block Mama. Cut it into pieces, shuffle the parts, and reassemble them nine-patch style. Create easy, unique blocks with endless creative possibilities! Cut and Shuffle Quilts features the Block Mama, four blocks, and six quilts made with them. Complete instructions are given for the blocks and the quilts. For added creative inspiration, all the quilts are illustrated in additional fabrics and colorways. Cut and shuffle your way to creatively satisfying quilts using the easy Block Mama method.


Anyway, back to the stash - does the print I'm using in Antler Dance look familiar? I used a little of it in Gramercy & Friends. It's in the block on the left in the photo below, and in a couple of other blocks.
 
Gramercy & Friends will be hanging in The Quintessential Quilt 2015 show at the University City MO public library beginning next Saturday and through October. If you're in the St. Louis area, I highly recommend you check out the show. It's free and open to the public during library hours.

This is the only photo I have of Gramercy & Friends finished. It shows off the quilting well, but the colors look too grey and it's a lousy photo. I'll have to get a better photo later.

So that's my exciting news for now....
Check out the stash reports and other quilty news at Patchwork Times.

Saturday, September 19, 2015

It's published!

One of my readers, Libby from Life on the Hill, visited the AQS Chattanooga show and saw my book Cut and Shuffle Quilts in the booth. Libby sent me this photo; there it is, front and center:
Cut and Shuffle Quilts at AQS Chattanooga,
photo courtesy of Libby from Life on the Hill

I haven't actually seen the book in print yet (my copies are scheduled to arrive next week) but it's so exciting to see that it's finally published.

Thanks, Libby!

Friday, September 18, 2015

A Finished Flimsy: QF BOM-Alt. Blocks

With a little help from the wind...
 
These blocks are the alternate blocks from last year's Quilted Fox BOM series. I edited a few out and added a couple made from stash fabrics to balance the colors to emphasize the greens to harmonize better with the border print.
 
For the outer border, I cut all the strips on the lengthwise grain and I was able to use the print repeat as a guide for the cut width. The corners are not mitered, but since the same side of the print abuts the inner border all the way around, it looks like the print frames the quilt. You can see it at the lower left corner. I'll try to get a better photo later with less help from the wind.
 
I never counted the blocks as fabric into the stash because they were kits each month, with just barely enough fabric to make each block, and the blocks had to be finished each month. I can count out the fabric for the inner border (1/2 yard) and outer border (1-7/8 yards) because I purchased these fabrics specifically for this quilt and counted them into the stash last month.
 
Linking up with Whoop Whoop Friday at Confessions of a Fabric Addict and Friday Finish at Crazy Mom Quilts.

Monday, September 14, 2015

QF BOM BLocks

My LQS starts their BOM series in August each year and once again I'm participating. Each month there is a main block and an optional alternate block. In the photo below, the main block is at the upper right and lower left. It's a challenging block this year, with lots of bias seams.

The solid black and the off-white grunge background are constant. The placement of the dark brown, taupes/greys, rust, and light brown will be the same each month, but the fabric prints will be different.

So what will these blocks become? I couldn't resist a preview in EQ. I like the diagonal effect this layout creates.
 
I have to say, I was very unenthused about this BOM series after struggling to make the first block. I'm an experienced piecer and I should be able to handle this. But those bias seams drove me nuts.

The second month's block went together MUCH more easily, and I didn't even have to break out the seam ripper. The alternate block is a piece of cake; I used triangle paper for the center and corners and it came together perfectly.

My design wall hasn't changed this week, but I'm hoping I'll get a chance sew these blocks together this week. And maybe even get the borders added. These blocks are actually last year's QF BOM alternate blocks.

Linking up with Judy at Patchwork Times; check out everyone else's design walls over there.

Sunday, September 13, 2015

Stash Report 9/16/15

Nothing in this week, yay!
Used this week, 1/2 yard for three wonky star blocks (scroll down for photo). Nice to use up some small chunks of stash!

Linking up with Judy at Patchwork Times.

Friday, September 11, 2015

Wonky Stars

Just a little finish this week - time for sewing has been in short supply lately. I made some wonky stars for Alycia's Quilt of Valor block drive.

These are so fun to make, and they go together quickly. I may have to make a few more of these! Check out the link above for Alycia's tutorial.

Linking up with Whoop Whoop Friday at Confessions of a Fabric Addict, and Friday Finish at Crazy Mom Quilts.

Wednesday, September 9, 2015

Seeking recommendations for a new sewing machine

Readers, I'm sure you can help me decide if I want a new sewing machine and if so, what kind I should get.


I currently use a Bernina 1090 which I got in 1996. It's halfway between mechanical and computerized because when I got it, I wanted something where I could sit down and sew, not have to take programming lessons to operate it. While I like my Bernina, I'm not married to the brand.

I use it mostly for piecing and walking-foot quilting. Also alterations and occasional garment or handbag sewing. I do some very basic FMQ, but my skills are limited to a simple stipple, although I'd like to improve and expand my repertoire.

I'm looking for a model with a large throat space, nice even straight stitch, basic stitches (zigzag, blind hem, etc.) and buttonholes, good tension, walking foot, maybe a stitch regulator for FMQ. I don't want embroidery and I don't need a lot of fancy bells and whistles. I'm tech-challenged so the simpler it is to operate, the better.

I test-drove a Pfaff at AQS Paducah that was much easier to FMQ on than my current machine. I want to test drive as many brands/models as I can before I make my final selection. I want to buy locally in the St. Louis area so I can get the lessons/training that sellers usually offer with new machines. I also want local service for tune-ups, etc.

I'm content with my current Bernina. I have a cheap lightweight travel machine for retreats, etc. so I don't have to haul my heavy Bernina around and subject it to the rigors of travel. So I really don't need a new machine....

But DH keeps telling me I should get one sooner rather than later. He wants me to get my "rest of my life dream machine" before he retires. Better to get a big ticket item like that while he's still bringing in a paycheck.

So, what advice do you have for me?  Let me know in the comments what brand/model you like and why. Also, if you know of a problem I should avoid, please tell me about that, too. Thank you.


Linking up with Lee at Freshly Pieced and Lorna at Sew Fresh Quilts.

Monday, September 7, 2015

DWM & Stash Update 9/7/15

Just a quick note -

Nothing new on my design wall this week. Not much sewing going on; last week was about writing, not sewing. Check out my PlusBalls Summer Fun tutorial in Friday's post.
PlusBalls Summer Fun

Stash update: Nothing in and nothing out so far this month.

Lots of family & life events are front & center now, so not much sewing will be happening this week, either. DS and baby CJ are visiting, so I'm playing with the baby!

Visit everyone else's actual design walls for inspiration at Patchwork Times.

Friday, September 4, 2015

Quilt Tutorial using my Fabri-Quilt Block Design "PlusBalls" Block


PlusBalls Summer Fun

© 2015 Jan Ochterbeck
TheColorfulFabriholic.blogspot.com
 
62” by 74” throw size
Skill Level: Easy
Fabric Requirements:
Prewashing all fabrics with like colors is recommended.
Color 1 (illustrated as green): 1/2 yard
Color 2 (illustrated as blue): 3/8 yard
Aqua: 2-1/2 yards
White: 3-3/4 yards
Binding: 5/8 yard (aqua)
 
Cutting:
Specific cutting requirements are given for each block component and color, below. Before cutting the white, cut the outer border pieces on the lengthwise grain (parallel to the selvage) as follows:
o   White top & bottom borders: Cut 2 strips 2-1/2” wide by at least 64” long. Will be trimmed to length later.
o   White side borders: Cut 2 strips 2-1/2” wide by at least 72” long. Will be trimmed to length later.


Block Components:

o   All seams are ¼” unless otherwise noted.

o   Block instructions are in this post (Or just scroll down)
      If you want a printable pdf of the block instructions, please leave a comment with your e-mail address and I will send one to you.
o   The total number of pieces to be cut for the number of units required is given below. 
o   For this tutorial, first make the block quadrants, referred to here as plus units or snowballs. Do not sew them together into blocks yet.
 
1.      Make 20 green plus units.
Cutting:
Green: Cut 40  2-1/2” squares;  and cut 20  2-1/2” x 6-1/2” rectangles
Aqua: Cut 80  2-1/2” squares
Color 1 (green) Plus Unit
2.      Make 14 blue plus units.
Cutting:
    Blue: Cut 28  2-1/2” squares;  and cut 14  2-1/2” x 6-1/2” rectangles
     Aqua: Cut 56  2-1/2” squares
Color 2 (blue) Plus unit

 
3.      Make 18 white plus units.
Cutting:
White: Cut 36  2-1/2” squares;  and cut 18  2-1/2” x 6-1/2” rectangles
Aqua: Cut 72  2-1/2” squares
White Plus Unit
 
4.      Make 49 snowballs.
Cutting:
White: Cut 49  6-1/2” squares
Aqua: Cut 196  2-1/2” squares. Mark each on the diagonal on the wrong side.
Assemble snowballs as shown in the block tutorial.

Snowball Unit

Top Assembly:
We will use the row method rather than assembling the plus and snowball units in to blocks, for more flexibility in laying out colors and better seam allowance management.
5.      Lay out plus units and snowballs according to the layout diagram below, 11 rows, 9 units in each row.
Plus & Snowball Layout
 
6.      Sew units into rows. Press all seams toward the snowballs. Trim away any stray threads or heavy seam allowances so they don’t show through the white.
 
7.      Sew rows together. Press seams all in one direction or open, your choice. Trim seam allowances & threads to prevent show-through.
 
Borders:
A pieced inner border and plain outer border complete this quilt top.
The outer border enables the quilt to float against the background and assures that no points will be cut off when binding. 
The inner border is made of units like partial snowballs and partial pluses, resulting in the continued appearance of aqua X’s around the edge of the quilt.
Make the inner border units:
8.      Border Unit 1, partial snowball: Make 22 units.
Cutting:
White: Cut 22  2-1/2” x 6-1/2” rectangles
Aqua: Cut 44  2-1/2” squares and mark each on the diagonal on the wrong side.

Assembly:  Align the aqua squares with the white rectangle and sew on the marked lines the same as for the snowballs. Press, trim away the excess, and repress, the same as for the snowballs.
Border Unit 1
 

9.      Border Unit 2, three patch: Make 18 units
Cutting:
White: Cut 18  2-1/2” squares
Aqua: Cut 36  2-1/2” squares

Assembly: Sew an aqua square to opposite sides of each white square. Press seams toward the white.

Border Unit 2
 
10.      Cut 4 aqua 2-1/2” squares for the corners of the border.
11.      Inner Border Assembly:
o   Note that the side borders will be attached before the top and bottom.
o   Arrange border units around the quilt center as shown in the assembly diagram below. Note that the three patch unit aligns with snowballs in the top, and the partial snowball unit aligns with pluses in the top.
o   Sew the units together to form the side borders.
o   Attach the side borders to the quilt center, matching seams. Press open or toward the border, your preference.
o   Sew the units together and sew a corner square to each end to form the top and bottom borders.
o   Attach the top and bottom borders to the quilt center, matching seams. Press open or toward the border.
12.      Outer Border Assembly:
o   Measure the length of the quilt top with borders. It should be 70-1/2”.
o   Cut your longer white border strips to this length.
o   Sew the border strips to the sides of the quilt top, matching at centers and quarters. Press toward the border.
o   Measure the width of the top with borders. It should now measure 62-1/2”.
o   Cut your remaining white border strips to this length.
o   Sew the border strips to the top & bottom of the quilt top, matching at centers and quarters. Press toward the border.
 
Border Assembly Diagram
 

Finishing:
13.      Piece backing to at least 70 x 80” (requires 4 yards of 41” width fabric).
14.      Layer, baste, and quilt as desired. Trim excess batting and backing 1/8” outside top.
15.      Binding:
o   From aqua fabric, cut 8  2-1/2” by width of fabric strips
o   Join end-to-end and press in half lengthwise, wrong sides together
o   Attach to quilt with heavy 1/4” seam and sew down as desired.
16.      Be sure to label your quilt!

My apologies for the bizarre formatting - Blogger doesn't like to let me copy & paste from a Word document. If you want a printable pdf of these quilt instructions, please leave a comment including your email and I'll send you one.

Disclaimer: This pattern has not yet been tested. Please let me know of any errors you may find.

If you make this quilt, I’d love to see photos. Please send me a link to you IG or blog post.
Here's what it will look like finished, without the seam lines showing.  I like how the white shapes look like spoons, and the aqua parts form Xs!
 
Here are other possible colorways using the Fabri-Quilt Watermelon Summer palette, but don't feel limited to these colors. The possibilities are endless! I like how aqua is the new neutral - it goes with everything.
Spring Colorway

Christmas Colorway

Quilt of Valor Colorway


Tuesday, September 1, 2015

Fabri-Quilt Block Design Blog Hop: My Block, PlusBalls

I'm participating in the Fabri-Quilt Block design blog hop. Fabri-Quilt and Inspired by Fabric generously donated six fat eights to the blog hop participants for use in their new block designs. Special thanks to our blog hop hosts/facilitators; check out their posts and the links to their participants.
Monday, August 31st – Hosted by Yvonne of Quilting Jetgirl
Tuesday, September 1st – Hosted by Cheryl of Meadow Mist Designs
Wednesday, September 2nd – Hosted by Stephanie of Late Night Quilter
Thursday, September 3rd – Hosted by Terri Ann of Childlike Fascination

As an added bonus, the blocks created for this blog hop will be used to make three quilts for charity. Win-win-win!

Speaking of winning, visit the hosts above for chances to win your own Fabri-Quilt fabric bundle.

Today is my day to introduce my block and tutorial, so let's get to it.

Presenting (drum roll) ...

PlusBalls

A modern variation on the traditional combination of snowball and nine-patch,
using the hugely popular Plus motif. 
Skill level: easy.  

Each participant was given a fat-eighth fabric bundle from Fabri-Quilt of six solid colors in the Watermelon Summer palette. The fabrics provided in this summery grouping are Chartreuse, Turquoise, Coral, Light Aqua, Lapis Blue, and White.
 
Fabri-Quilt Watermelon Summer Palette
 
Please visit my fellow bloggers and check out their block designs as well.

Today's featured bloggers:


PlusBalls Block Tutorial

© 2015 Jan Ochterbeck

 
Finished block size 12”.    All seams 1/4".    Skill level: Easy.
Pre-wash all fabrics with like colors before using.

Cutting, for each block:
White:

·        Cut 2 (two) 6-1/2” squares

Aqua:

·        Cut 16 (sixteen) 2-1/2” squares

Color #1: (illustrated in green)

·        Cut 2 (two) 2-1/2” squares

·        Cut 1 (one) 2-1/2” x 6-1/2” piece

Color #2: (illustrated in blue)

·        Cut 2 (two) 2-1/2” squares

·        Cut 1 (one) 2-1/2” x 6-1/2” piece


Block Assembly:
·        Snowball Quadrants:

o   Mark 8 aqua squares on the diagonal.

o   Position aqua squares at the corners of each White 6-1/2” square with the marked diagonals as shown. Sew on the diagonal lines.


o   Press the aqua corners outward.

o   Fold back the corners and trim away excess leaving ¼” seam allowance.  Note: Pressing before trimming improves accuracy and helps to assure that your 6-1/2” square remains square because you can align the folded corners with the original corners of the white square.
 
o   Press the corners back out.


·        Plus Quadrants:
 
o   Lay out colored and aqua patches as shown.
 
o   Sew patches into rows.
 
o   Press top and bottom row toward center, toward the color.
 
o   Sew rows together.
 
o   Press rows toward center.


·        Block:

o   Arrange Plus and Snowball quadrants as shown.


o   Sew top row together and bottom row together.

o   Press each row toward the Plus.
 
o   Sew rows together.
 
o   Spin seam allowances at center and press seams toward Snowballs.*
 
o   Trim away any threads or seam allowances that show through the white
* To spin seam allowances, unpick one or two stitches and press the seams in opposite directions so that you can see a tiny four-patch at the seam intersection.
If anyone would like a printable PDF of the tutorial, please leave a comment.
 

Suggested colorways and quilt layouts using the PlusBalls Block:

Simple layout, no borders:

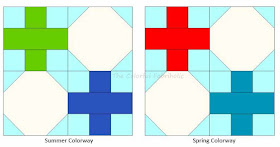
Alternating blocks in Summer and Spring colorways;
5 x 6 block layout; 60" x 72"  throw size

Modern fun block layout with additional half-blocks and borders:

Shown with piecing seams, left, and without visible seams as finished top would appear, right. 
          
Layout is 4-1/2 blocks wide x 5-1/2 blocks high;
Pieced inner border; solid outer border. 
62” x 74” throw size.
 

The following colorways are the same modern fun layout as above:

Summer Colorway
 
Spring Colorway
 
Modern Christmas Colorway
 
Modern Quilt of Valor Colorway
 
Come back Friday, Sept. 4 for a tutorial on piecing the fun modern quilt layout.
 
Be sure to visit the other bloggers whose block designs are featured today.
  • Host – Stephanie @Late Night Quilter
  • Hannah @Modern Magnolia Studio
  • Cindy @Stitchin At Home
  • Abby @Hashtag Quilt
  • Lisa @Sunlight in Winter Quilts
  • Carrie @Chopping Block Quilts
  • Eleanor @Cat Approved Quilting
  • Brianna @The Iron and Needle
  • Tish @Tish’s Adventures in Wonderland
  • Jan @The Colorful Fabriholic (you are here)
  • Sarah @Smiles Too Loudly
  • Beth @Cooking Up Quilts
  • Leanne @Devoted Quilter
  • Liz @LizzyClips Design
  • Kim @Leland Ave Studios
  • Kitty @Night Quilter
  •