Pages

Friday, September 29, 2017

The Red Project: Inspiration

If you've seen some of my earlier posts this month, I've kind of teased about a new project using red fabrics and involving Dresden Plates. Let's back up and see where that came from.

One of my goals this month is to prep something to work on at retreat next month. So it's okay to start a new project, right? It's not really totally new; it's been percolating in my mind and in several iterations in EQ for months.

Inspiration: Back in April at the Paducah Spring AQS show I was quite taken by a rich mostly red quilt that was made by Carol Sloan Brix of Byron IL.  She used a pattern called Chippewa Nine Patch by Minick & Simpson. Here's what the pattern looks like, and the quilt in the AQS show looked just like this, same palette.

The quilt was huge, and in the lighting of the show, the reds were very rich and deep. Very luxurious. What I particularly like, in addition to the palette, is the combination of diagonal and vertical movement around the quilt. I like the checkerboard blocks, too - that's a lot of piecing!!! - and the snowballed corners of the alternate blocks. Because I was so struck by the palette and the piecing, I honestly don't remember how it was quilted.

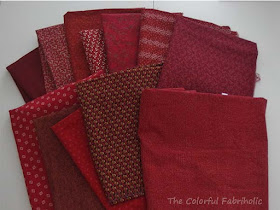
While in Paducah I started collecting red fabrics, mostly Civil War era reproductions, and a few blues and neutral prints to go with them.

I thought about ordering the pattern and making it as is. And I played in EQ. And I came up with this:

This is huge, 102" wide x 96" high, a large bedspread for a queen bed. What I like about it: the checkerboard blocks, the strong diagonals created by the alternate blocks with snowballed corners, the dark rich palette, and the simple construction with no on-point setting required. Special thanks to Minick and Simpson and to Carol Sloane Brix for the inspiration.

So now I've collected more fabrics (my stash report this month will take a hit!) and I've made test blocks. This will be sort of a BOM project; my plan is to make one checkerboard block and one Dresden Plate block a month.

I mentioned in an earlier post that I'm getting together with friends on the first Saturday of each month and we're doing our own BOM thing. Since I'll have to miss the October meeting, this post and the earlier ones this month about the red project will have to suffice.

This project needs a name other than just "the red project." Any suggestions?

Linking up with Whoop-Whoop Friday at Confessions of a Fabric Addict because having a plan and starting a new project is always whoop-worthy, right?!

Tuesday, September 26, 2017

The Red Project: Prep

A number of influences have converged to prompt a new project. Inspiration and color palette - more about that in another post. Suffice it to say it's very different from my usual. For now I'll call it the red project.

Another influence is a group of friends. We all participated in a LQS's BOM series this past year (Emerald Isle), and the year before, and the year before that, etc. We go out for coffee and conversation after the BOM meeting on the first Saturday of the month. The new BOM series starts next month, but we're kind of burnt out, so we decided to just get together for coffee on First Saturday and do our own projects. The thing is, we agreed we have to bring some kind of project progress to show and share each month.

So the red project will be my new First Saturday project. With 13 main blocks and 12 alternate blocks, it's perfect, I can do one of each per month and make good progress.

So far preparations this month have included prewashing the red fabrics and resolving the bleeding issues. Thank you to the readers who suggested Synthrapol and Retayne. I've prewashed all the other fabrics as well.

I tested Dresden plate blocks. These will be the alternate blocks.

And I cut fabrics for the main block. I cut three WOF strips from each fabric, and I think I may have cut too much. There'll be plenty left over for binding, already cut. Just for a little variety, there will be an occasional pop of very dark blue, but this will be mostly a red and neutral quilt.

So I have a project planned and much of the prep started in time for October First Saturday. Unfortunately I have something going on and I'll have to miss our coffee gathering, so this post and Friday's post will have to suffice. Come back Friday and I'll tell you about the inspiration for this project.

Linking up with Let's Bee Social at Sew Fresh Quilts

Monday, September 25, 2017

Points or V's?

Last week I made a couple of test Dresden Plate blocks. 
I think I got everything worked out for my project 
except for the alignment of the points. 

Here are photos of an unfinished block to compare the alignment.
The question is, should the points be oriented at 12, 3, 6, and 9? 
Or should the V's? 

Points: 

V's:

Side by side comparison:

These blocks will have snowballed corners in the actual project. Here's a mock-up:

These blocks will not be next to each other; 
they'll be separated by alternate blocks in a checkerboard pattern. 

Do you have a preference? Why? 

I want the light backgrounds to look round-ish in the actual quilt. 
Does one of these layouts achieve that better than the other? 

Thanks for your input. 


Link Ups: 

Thursday, September 21, 2017

Bloggers Quilt Festival: Seasonal Migration

Amy Ellis is once again hosting Bloggers Quilt Festival over at Amy's Creative Side. Check out all the quilty eye candy over there!

For my second entry I'm featuring Seasonal Migration. 

Formerly referred to as KBFG (Kaffe & Batik Flying Geese), this quilt has been in the making for about two and a half years, but came back from the quilter in late July. I was able to get it finished in time for my guild's show which will start September 30.

Lots of flying geese: 

I worked on it at camp: 


I finished the flimsy more than a year ago, but then it had to wait until its turn came up on my quilter friend Sandy's waiting list. She's very good and very popular.

Sandy quilted it lightly per my request, using bamboo batting, so it would remain soft and drapey.

46 different fabrics  were used in the top, plus the backing, plus the binding.

The backing is perfect for me: Names of colors in huge script. Before I retired, I worked as a color specialist in apparel, textiles and footwear, and one of my responsibilities was naming colors. 


I'm keeping this quilt for myself.


Link Ups: 

Wednesday, September 20, 2017

Bloggers Quilt Festival: Christmas Tree

It's time once again for Bloggers Quilt festival, hosted by Amy from Amy's Creative Side.


My first entry is the Christmas Tree hanging I made for my son. It's almost life size, and it's made so that real ornaments can be hung on it.
Christmas Tree Wall Hanging with Real Ornaments

This project came about because my son requested something for the home he shares with two friends, 3 cats, and a two-year-old. They just don't have space for a real Christmas tree.

Quilted Tree with Star Ornament Used as a Topper

This was easy to make, pieced with just triangles and strips.  Great way to use up a variety of green prints and low volume fabrics.
Pieced with 3" Triangles and Strips

I quilted it in the ditch around the triangles and added straight line quilting to the background. To attach the ornaments, I stitched thread loops that the ornaments can hook into at all the triangle intersections. You can see the pickle hooked below, and the star topper in the photo above.
Ornaments Hanging from Thread Loops

Although the photo at top shows this wall hanging attached to a door with magnets, it will actually be hung on a wall. It has two sleeves on the back, top and bottom, and pieces of wood sanded smooth for hanging. By adding an extra sleeve at the bottom, the tree can be firmly attached to the wall so cats and kids can't do too much harm.

This will be an early Christmas gift, to be presented at Thanksgiving, so I made a pillowcase-style bag that the rolled up tree can be stored in which also serves as a gift bag.
Gift Bag / Storage Bag / Dust Cover

For more about this Christmas Tree wall hanging, visit my earlier posts  O Tannenbaum  and the tutorial at  O Tannenbaum Tutorial.

Check out all the other quilty inspiration at Bloggers Quilt Festival over at Amy's Creative Side.

Also linking up with:
Sew Fresh Quilts,
My Quilt Infatuation


Monday, September 18, 2017

Testing, Testing

I have a new project in mind. It will be a long term project, probably a couple blocks a month for a year after I get it planned and some of the cutting and prep done.

As part of the planning, I made a test block. No, these are not the project fabrics, just a leftover partial charm pack I had on hand, and a FQ for background.
Test Block 

What I learned from this test block: 
  1. The finished block size should be 14" so I cut my background 14-1/2" square before making the block. I should make the block oversized, then square up and trim down as needed after the block is finished. This block is a scant 1/8" too small. 
  2. I used the Easy Dresden tool, followed the instructions for the 5" line, and used their pattern for the 3-1/2" center circle. This Dresden looks "chubby" to me. I want longer blades with a smaller center circle for my project so I'll have to adapt accordingly.  
  3. Glue basting worked great; a tiny dot at each point was perfect. The edges are machine stitched down, as is the circle. 
  4. The blades point to 12, 3, 6, and 9 but in my EQ drawing the Vs are at those positions. Does it matter?
  5. My friend Suzanne Marshall, award winning applique artist, recommends cutting away the background behind applique so the batting will fill out all the shapes. I cut away the backing behind the blades and within the circle, leaving seam allowance where the circle was attached. The center looks like it caves in, although that could fill out with batting. Or it may not be an issue with a smaller circle.
With so many concerns about this test block, I needed to make another to get it right before I cut them all for my project. No, these aren't the project fabrics either, just scraps from my scrap drawer and background quadrants cut from stash. 
Test Block #2

  What I learned from test block #2:
  1. Making the background oversized and then trimming down worked much better. I'm planning a scrappy background so assembling the background in quadrants worked well. Bonus, the intersection of the seams at the center was very helpful for centering the wreath.
  2. Still using the Easy Dresden at the 5" line, I extended the length at the narrow end for a total length of 6 inches. When I sewed the blades together and pressed the seams open, the seam allowances overlapped, and the center opening came out too tiny. I think 5-3/4" would work better. 
  3. The center circle here finishes at 2-1/2" diameter, and I like this proportion better. 
  4. The Vs are at 12, 3, 6, and 9. My project will actually have snowballed corners, and I think I'll try adding corner pieces to these two blocks to decide which alignment I like better. 
  5. I trimmed away the background from behind the blades but not from behind the center circle. The layers there seem to give it some dimension. 
  6. Even though this is just a test block, I should pay attention to value contrast. There isn't enough contrast between the blades and the background here. (Contrast won't be a problem in my new project). 

I'm glad I took the time to make test blocks. I have no other purpose for them so they'll go in my "spare parts" drawer for now, but they served their purpose well as tests and learning exercises. 


Friday, September 15, 2017

These Bleeding Reds

Help!

I'm planning a project that uses several dark red prints. They'll be combined with ecru/beige/ivory neutrals.

I ran them through a warm water wash & rinse cycle (no detergent) with a color catcher and they bled a lot.  So I did it again.  And again.  Still bleeding.

Does anyone have a recommendation for how to handle this? A product to set the color to keep them from bleeding any more? Overnight soak? Or just more cycles in the washer? Detergent? Any advice or suggestions would be welcome, thanks.

Link up: Confessions of a Fabric Addict

Wednesday, September 13, 2017

Cherie's Block

My friend Cherie saw a block somewhere that she likes, so I helped her figure out how to make it. Here's my version, 15" square.

This was not an easy block to make, mostly because the fabrics are soft shirtings, many times washed, and I didn't use starch. Lots of bias in this block, and very stretchy fabrics!

I don't usually use starch. Fabric is very forgiving of minor seam inconsistencies, etc. if you don't starch the heck out of it. Cherie uses starch a lot, but she works with shirtings a lot too, so now I understand her love of starch. She finds shirtings at local thrift stores and has quite a collection to work from, which is why I made the test block for her in shirtings.

Do you use starch? Any recommendations? Do you use it only for prewashed fabrics that no longer have their original sizing, or do you use it on new fabrics too?


Linking up with Lets Bee Social at Sew Fresh Quilts

Friday, September 8, 2017

Emerald Isle Flimsy

Yes, I've decided to keep the name Emerald Isle, and yes, it's a finished flimsy. Here it is on my design wall; I hope to get some better outdoor photos later. I like how the Irish Chain effect continues through the sashing and creates movement, but I also like how the chain is broken up by the alternate blocks - more interesting that way.

This is the fabric I chose for the binding: a tiny geometric which is in one of the blocks and one of the alternate block frames. I like how it contrasts with the sashing but it's still dark.


In other news, I'm whooping it up today because my new washing machine is being delivered this morning. Whoo-hoo!!! The old one is over 25 years old and for a long time now has been giving me trouble. It's been rocking and banging around so much that I have to open it and redistribute the load several times every spin cycle, even though we've worked on leveling it and balancing the drum. Last week it leaked a little onto the floor. Enough already, it lasted longer than the average washer, but the time has come to replace it. We decided to shop for a new one while the stores all had their Labor Day sales. Now I won't have to stay nearby all the time to rebalance the load, and I expect the new one will be a lot quieter. Whoo-hoo!


Linking up with Confessions of a Fabric Addict 

Wednesday, September 6, 2017

Pillowcases

Sarah over at Confessions of a Fabric Addict is collecting pillowcases for displaced Hurricane Harvey victims staying in shelters. I made a few:


What I didn't realize is that they wanted them for children. I have almost no juvenile prints in my stash and very few 3/4 yard or larger fabric cuts. I used what I had enough of. I hope some of these pillowcases can go to adults or seniors who are as much in need as kids are.

Most of these fabrics were picked up at the Eleanor Burns tent or warehouse in Paducah over the years. They were originally intended for projects that never happened, or as backings for something else, or merely stash enhancement at the time. Anyway, these have been aging in my stash long enough and it's better to use them for pillowcases now.


So they're on their way to Sarah and should arrive tomorrow. Most of them, that is. Somehow I left two of them out of the package. I found them still in my sewing room when I got home from the post office. Yeesh!


Linking up with Let's Bee Social at Sew Fresh Quilts

Monday, September 4, 2017

Belated August Stash Report & Goals Update

Wow, August kind of got away from me. My goals all went by the wayside when I decided to quickly make my ailing brother a quilt. Then we were on vacation for over a week, so no sewing got done on those days.  Let's see if I can catch up.

August Stash Report: 
IN this month: 7-5/8 yards (4 yds backing for Marty's quilt; 1-3/8 yds for Emerald Isle Sashing; 1/4 yd for Emerald Isle cornerstones; 2 yds from Stitchin' Post, Sisters OR)
OUT this month: 12-3/4 yards (Marty's Quilt - 8-1/4 yds for top; 3-3/4 yds for backing; 3/4 yd for binding)
IN YTD: 81-1/8 yards
OUT YTD: 94 yards
YTD Net Change: 12-7/8 yards OUT

Backing for Marty's Quilt

Sashing for Emerald Isle

Still doing well with stash reduction for the year, so no guilt when I acquire some stash enhancements. I plan on some shopping in September at a shop that I only get to once or twice a year.

Goals Update: 

August Recap:
1. Bind, label, add sleeve and photograph KBFG quilt to enter into guild show. Partially done; still need to attach label & sleeve. 
2. Finish making blocks for Emerald Isle. DONE, and also added sashing. 
3. Post Snake Quilt tutorial. DONE
4. Find suitable sashing fabric for Solstice Challenge blocks; cut and kit up sashing pieces for future retreats, etc. Not touched.
5. Make progress on Roman Road UFO. Not touched.
6. Work on WIVSP hand piecing project. Not touched.
7. Keep up with bee blocks. DONE

Other: Started, completely finished, and mailed a comfort quilt for Marty.
Marty's Quilt, 60 x 84", Four Corners from Cut and Shuffle Quilts

OK, so some of August the goals had to fall by the wayside when I dropped everything to make my brother a quilt. He's out of rehab now and staying with one of his daughters for a couple weeks, and doing outpatient PT. He really likes his quilt and he was blown away that I made it for him. Again, it was more about the gesture - no one really needs a quilt in Phoenix in August.

September Goals:
1. Finish Emerald Isle flimsy
2. Make pillowcases for Harvey victims (Sarah at Confessions of a Fabric Addict is collecting them)
3. Find suitable sashing fabric for Solstice Challenge blocks; cut and kit up sashing pieces for future retreats, etc.
4. Assemble QOV top
5. Work on WIVSP hand piecing project.
6. Plan and prep projects for retreat in October
7. Keep up with bee blocks.
8. Stretch Goal: plan &/or work on improv project from Jean Wells's book Intuitive Color & Design

When we were in Oregon I was able to visit the Stitchin' Post in Sisters. What a beautiful shop! Lots of books and patterns not carried at my local shops, and gorgeous fabrics, including some collections I hadn't seen yet. I got the license plate as a souvenir. I also got this wonderful book by shop owner Jean Wells. Many of the photos in it are local to her area and remind me of our trip, with scenes of the Oregon coast and central Oregon. I picked up a couple of prints because I like the deep russet and bronze colors.

If you know me or you've been reading my blog for awhile, you know that I'm pretty precise in my piecing, and improv or string piecing are so not my thing. Set in my ways? Inflexible? Rigid? In a rut?  Yes, yes, and yes...

I'm going to try some of the assignments in Jean Wells's book to force myself to loosen up. I'll try them on a small scale, maybe 12" square, so it won't be too overwhelming. Some of the exercises are about journaling and that'll be new to me, but if it's inspirational, I'll give it a go. So I've added a stretch goal to my September goals to start working on this, and I plan to continue in future months. Wish me luck!


Link-ups: Small Quilts and Doll Quilts, Em's Scrapbag, Love Laugh Quilt

Friday, September 1, 2017

Emerald Isle Progress

Coming along... It's been nice to get back into the sewing room this week after travelling last week.

All the blocks have sashing and this is the final layout. By this time next week they'll all be sewn together into a finished flimsy.

The navy sashing enhances the Irish chain effect nicely.

Now to choose binding... I have to buy something because I have nothing suitable in my stash. I'll be at the LQS that hosted this BOM tomorrow and there are a couple of prints I like that were in the BOM kits. The shop should still have enough yardage left of one or another of them that I can pick up enough for binding. Even though I have no immediate plans for this quilt, and haven't thought about backing and quilting yet, I want to get the binding fabric and put it away with the project so I'll have it when I need it.

The shop's name for this BOM series is Emerald Isle, but I see a blue quilt more than a green quilt. Does this quilt need a new name? Any suggestions? Or should I just keep it Emerald Isle due to the history of the project?


Linking up with Confessions of a Fabric Addict