Pages

Monday, January 30, 2023

Mindless Sewing, without Cutting

I've been doing a lot of cutting lately for kits for charity quilts (see this post). So much so that the tendon problem in my hands has flared up. Time to give my hands a rest from cutting. 

I was in the mood for some mindless sewing the other day, so I pulled out a jelly roll I won at STLMQG's ticket raffle a long time ago. I don't really like jelly rolls, and this one's been languishing for years. The fabrics are very pretty Provincial prints from American Jane. I figured I could just sew it into a jelly roll race, no cutting required, and make a charity quilt. 

Jelly roll race quilts are what they are - since there's no control over where the prints land next to each other, sometimes the colors and prints aren't spread out evenly over the quilt. If you want this kind of mindless sewing, you don't get a perfectly planned top. We'll see how this one ends up. 

What I'm more excited about is the back. Here are the fabrics: 

There's one yard of the white print and two yards of the blue. These are also American Jane, from a different collection than the jelly roll. The blue here is darker and all the colors are slightly brighter. 

The one yard of white is from before 2012. I bought it when I was still working because I thought it was pretty and I was going to make a simple skirt. That never got made. The blue came from someone's estate sale here in PC a few months ago. When I saw it I knew it was the same as the white version I already had and I could use them together. 

I got lucky. I needed to piece the one yard length of white into a two-yard length by 1/2 WOF. The print repeat was such that I could match the pattern precisely and unless you know there's a seam, you can't tell it was pieced. I split the blue into 1/2 WOF and added it to both sides of the white for a large enough backing. 

I scored an unbooked time slot on PCQ's long arm over the weekend and got this quilted. I'll bind it this week and post photos Friday. The front is ~ meh; the back is really cool. 


Linking up with Small Quilts and Doll Quilts


Monday, January 23, 2023

Four Patch Shuffle Tutorial


My Four Patch Shuffle top is done and may become a teaching sample and later a donation quilt. Here it's shown sideways because it's too long to fit on the wall.  

As promised, I'm offering a tutorial, and here it is. Text and images copyright Jan Ochterbeck 2023.


Four Patch Shuffle
Finished Size 56” x 72”      Block finished size 8”


The blocks for this quilt are created by making simple framed square parent blocks, cutting them into fourths, shuffling the parts, and reassembling the blocks four at a time.

Fabric Requirements

White: 1-5/8 yards

Black: 1-3/8 yards

Four Colors, each: 1/2 yard.  Shown here as Yellow, Blue, Green, Orange.


Cutting

WOF (width of fabric) strips are based on 40” width and yield 4 pieces cut 9” long, or 8 pieces cut 5” long.

·        White:

o   Cut 5   5” WOF strips.
Sub cut them into 5” squares. Total 40 squares.

o   Cut 12   2-1/2” WOF strips.
Sub cut 8 WOF strips into 9” pieces, total 32   9” pieces.
Sub cut 4 WOF strips into 5” pieces, total 32   5” pieces.

·        Black:

o   Cut 2   5” WOF strips. Sub cut them into 5” squares. Total 16 squares.

o   Cut 12   2-1/2” WOF strips.
Sub cut 8 WOF strips into 9” pieces, total 32   9” pieces.
Sub cut 4 WOF strips into 5” pieces, total 32   5” pieces.

·        Each Color:

o   Cut 6   2-1/2” WOF strips.
Sub cut 4 WOF strips into 9” pieces, total 16   9” pieces. 
Sub cut 2 WOF strips into 5” pieces, total 16   5” pieces. 


Making the parent blocks:  There are two types of parent blocks to make two sets of final blocks.

All seams right sides together, 1/4” seam allowance. 

Parent blocks should measure 9” square including seam allowances when sewn. Accuracy in making the parent blocks will ensure better results in the final blocks.

·        Primary parent blocks

o   Sew 5” colored or black pieces to the top and bottom of a white square. Press seams toward the color.

o   Sew 9” pieces of the same color to the sides to complete the parent block. Press seams toward the color.

o   Make 16 black-framed parent blocks.

o   Make 8 of each color parent blocks.


·        Secondary Parent Blocks

o   Sew 5” white pieces to the top and bottom of a black square. Press seams toward the black.

o   Sew 9” white pieces to the sides to complete the secondary parent block. Press seams toward the black.

o   Make 16 black-centered white-framed parent blocks.


Cutting the Parent Blocks: Each parent block should measure 9” square.

·        Cut each one in half vertically at the center, 4-1/2” away from the edge.

·        Then cut each one across horizontally at the center, again 4-1/2” from the edge.

·        Resulting quadrants measure 4-1/2” square.

·       Cut all the parent blocks into fourths. 


Making the Final Blocks:

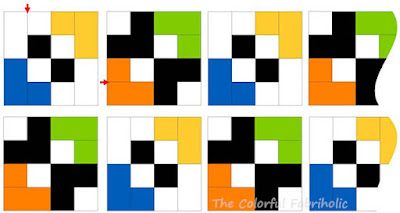
Block A Yellow/Blue: Each sewn block should measure 8-1/2” square including seam allowance.

Chain piecing is recommended. Make four of the same block at a time from one yellow and one blue parent block and two black and white parent blocks.

·       Lay out block quadrants as shown.

o   Note direction of frame seams (red arrows); make frame seams go the same direction within each block.

o  Half of the blocks will have vertical frame seams and half will have horizontal frame seams. 


·        Matching frame seams where needed, sew top two block quadrants together; frame seams should nest. Press seam toward the color.

·        Likewise, sew bottom two block quadrants together.

·        Matching centers and frame seams, sew top and bottom halves of block together four patch style.

·        Press and if desired, spin seams.

·        Repeat using all yellow and blue block quadrants to result in 32 Block A’s. 


Block B, Green/Orange: Each block should measure 8-1/2” square including seam allowance.

Chain piecing is recommended. Make four of the same block at a time from one green and one orange parent block and two black and white parent blocks.

·       Lay out block quadrants as shown.

o   Note direction of frame seams; make frame seams go the same direction within each block.

o   Half the blocks will have vertical frame seams and half will have horizontal frame seams. 

·        Matching frame seams where needed, sew top two block quadrants together. Frame seams should nest.  Press seam toward the black.

·        Likewise, sew bottom two block quadrants together.

·        Matching centers and frame seams, sew top and bottom halves of block together four patch style.

·        Press and if desired, spin seams.

·        Repeat using all block quadrants to result in 32 Block B’s. There will be one extra Block B left over after top is assembled.


Quilt top assembly:

·     Lay out Blocks A and B in rows of seven. Make 9 rows.

o  For best seam nesting, alternate blocks with vertical and horizontal frame seams. 

·        Alternate placement of Blocks A and B to create light and dark visual diagonals.

·        Sew blocks into rows; press all seams toward Block B.

·        Sew rows together; seams should nest. Press row seams all in one direction. 


Quilting and finishing:

Backing: If pieced horizontally, 3-1/2 yards of fabric are needed. If pieced vertically, 4-1/2 yards of fabric are needed.

Batting: at least 64” x 80”

Quilting: Quilt as desired. Because of the strong diagonal stripe effect created by the placement of light and dark, avoid a pantograph that features a strong diagonal repeat which could fight with the visual diagonal.

Binding: If cut 2-1/4” wide, need 5/8 yard. If cut 2-1/2” wide, need 3/4 yard. Cut 8 WOF strips.


Alternate layouts:

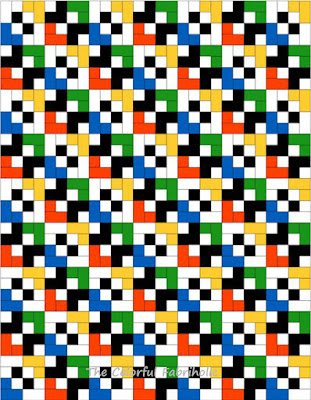
Original Layout: 
Each color is separated from the others.

Alternate Layout:
The four colors come together. This results in
more prominent diagonals.


Quilt of Valor variation, original layout:


  • Substitute dark navy or deep charcoal grey for black.

  • Substitute red for both yellow and orange. Total 1 yard needed or go scrappy. 

  • Substitute medium blue for both blue and green. Total 1 yard needed or go scrappy.

Note: Be sure there is strong value contrast between the navy or charcoal grey and the medium blue. Choose a bright red rather than a dark red.

Size as shown is 56 x 72”. Option: Add 4” borders to enlarge top to 64” x 80”. Borders will require 1-1/8 yards of fabric. Cut 8  4-1/2” WOF strips. 


I had fun with this Four Patch Shuffle, which is similar to my Cut and Shuffle method, and I hope if you like the tutorial, you'll have fun with it too. (Book is out of print) If you'd like a PDF of this tutorial, leave a comment and be sure to include your first name and email address in the text of the comment. 

My top will eventually be quilted and will be donated to the local family services agency. 


PS - Pardon the formatting irregularities. Blogger doesn't cooperate when I copy and paste from a Word document and add pictures. 


Link ups: Small Quilts and Doll Quilts, Quilt Fabrication, My Quilt Infatuation, Alycia Quilts, Confessions of  Fabric Addict, Wendy's Quilts and More


Friday, January 20, 2023

Divide and Conquer

Whoo-hoo! I'm getting closer to finishing the quilting on Candy Land. Final pass and less than half of the quilt to go! 


So many stops and starts. No, I'm not burying all those thread tails. The quilt police would not be happy, but I don't care. This quilt's for me, and I'm just reducing my stitch length and taking a couple of back stitches at every stop and start. 

So, not a finish today, but I'm definitely getting closer. 


Linking up with Alycia Quilts and Confessions of a Fabric Addict

Monday, January 16, 2023

Kits

The PCQ comminity service committee is prepping kits for twin size quilts for club members to work on at the next Sew Day. My role on the committee is to come up with a plan for the project, put together a simplified pattern, organize the prepping and kitting, and lead the Sew Day. 

At the February sew day we'll be making this pattern, a simple four patch with borders: 


We found some fabrics in PCQ's stash, with suitable prints and enough yardage for the borders, as the starting point for kits. I cut the borders, in some cases piecing them, mindful of directional prints. Here are the first 10 kits started. 

At the work day recently, members of the committee each took one of the kits pictured above and pulled coordinating fabrics from the club's stash. See those selvage dots? Helpful in finding coordinating fabrics. 

Each of these kits needs 8 FQs or quarter-yard cuts plus 1-1/8 yards each of a dark and a light fabric. These fabrics are for the large and small squares in the pattern.  Some of the members took their coordinating fabrics home to cut; others pulled fabrics but left the cutting for someone else. 

There were several more prints in the club's stash with enough yardage for borders, so I took those to cut. I asked team members to pull companion fabrics for them. I've been working on cutting them and packing up kits. 

These four kits are complete or almost complete.  A couple of them need white squares for their four-patches, and one needs ivory squares. We have bulk yardage of white and ivory fabric on order and someone will cut some of the squares using a die cutter. I'll continue cutting borders and large squares for the remaining kits. 

Three of our charities need twin size quilts. I hope by kitting them up we can encourage members of PCQ to attend the Sew Day and help fill the needs of these groups. One is a home for girls 7-16 entering foster care. One is a shelter for women and families fleeing domestic violence. And one is a halfway house for women being released from prison. Together PCQuilters can make a difference.

And now back to cutting for kits...


Wednesday, January 11, 2023

What's Wrong with This Picture?


My Four Patch Shuffle top is completely sewn. Not until I laid it on the table with the pattern did I see the error. Grrrrr...

Do I rip out every seam in the entire top to rotate the blocks that are turned the wrong way? Or do I redo all the graphics in the tutorial, all of which are based on the layout in the EQ image?

Monday, January 9, 2023

New Charity Quilt Pattern

Last week the PCQ Community Service committee met and we scheduled the sew day projects through the spring. Several of the agencies we give quilts to need twin bed size which they use as actual bedspreads, so this year we're focusing on twin size quilts. For February we will be kitting up and sewing the new Four Patch pattern I've developed. My top will be the teaching sample for the sew day. 

We've been setting aside fabrics from the club's stash that are large enough cuts for borders. With the one shown here, we got lucky and it was an actual border print stripe. Most of the fabrics we've set aside are just random larger scale prints. The committee will pull coordinating fabrics to go with the borders and cut the squares for the kits. 

I've also been spending a lot of time writing the patterns for the projects we'll work on this year. Each kit will have the pattern included. I'll update the Free Charity Patterns tab above when I get a chance, once I'm sure the pattern is complete and correct. One of the committee members is currently testing it.


Link up: Small Quilts and Doll Quilts


Friday, January 6, 2023

Shards

This quilt - Shards - is named for the focus print, which looks to me like broken pieces of colored glass. I always thought this fabric would be good for a donation quilt for a guy because the colors are so masculine. 


It's just a simple double four patch. The fabrics do all the work. The quilting is a simple meander - I was able to get a time slot on PCQ's long arm last week and knock this one out. 

Shards will be a donation quilt for Hospice. It's 60 x 76", big enough for most men. 

A slightly overcast day with weak winter sun was perfect for taking photos, such a rarity here in sunny Arizona. The colors came out really good in these's photos. 


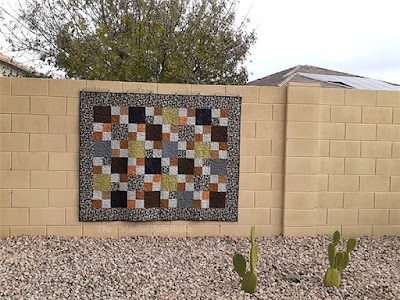
I rarely have a chance to use this section of wall for photos due to the shadows on it most of the time.  That Shards print almost matches the landscape rocks.  


Monday, January 2, 2023

Four Patch Variation

I met with PCQ's charity committee chair in December, and we've decided on the first pattern to kit up for Community Sew Days. See this post for more about the requirements. Several of the organizations we donate quilts to need twin bed size for their clients' beds, so we're focusing on larger quilts now. 

The first pattern will be a Four Patch Variation. We found several bolts and large cuts of fabric in the club's stash that we set aside for this project, and I'm making the prototype and writing the pattern. One of the fabrics was an actual border print with just exactly enough yardage for the borders of a twin size quilt. Based on the colors in the border print, I pulled other fabrics to coordinate. Here's my palette: 


The large squares will alternate with four patches. 


And here are the blocks on my design wall. 


Easy-peasy. This should be simple to kit up; 2-1/4 yards of featured fabric for the border and 8 or 9 coordinating FQs or quarter yard pieces, plus 1-1/8 yards each of light and dark for the four patches. Or the four patches can be scrappy. 

Members of the committee will have a Prep day in early February to make kits, then we'll have a Sew Day open to all club members later in the month. By then this will be a finished top that will be used as the teaching sample for the sew day. 


Linking up with Design Wall Monday at Small Quilts and Doll Quilts