Wednesday, October 30, 2013

My MQU Block

As promised, here's my entry, Running Around, from Modern Quilts Unlimited magazine's block design challenge, and my tutorial for it.
Running Around
copyright July 2013 Jan Ochterbeck

12" finished block (12-1/2" unfinished) 
 
Jelly-roll and Charm friendly.
Recommended: low-volume print for center, bold print for arrows, and light neutral ground.
 
Cutting: 
-        From low-volume print or Charm cut one 4-1/2” square. 
-        From bold print cut one 2-1/2” WOF strip (or use Jelly Roll strip) then cut into four 8-1/2” rectangles. 
-        From neutral ground, cut one 2-1/2” WOF strip then cut into four 8-1/2” rectangles. From the remainder, cut eight 1-1/2” squares.
Assembly: Use scant ¼” seams.
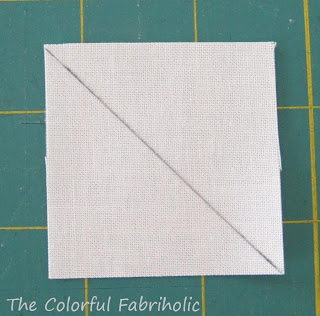
1.      Mark the small background squares on the diagonal on the back side.
2.      Position a square on the print, right sides together; sew on the marked line.
 
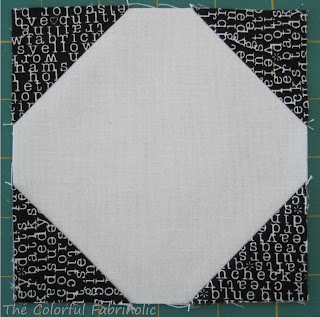
3.      Press point open, then trim away excess from seam allowance. Pressing before trimming assures less distortion.  Repeat for all four arrows.
 
4.      Attach another small square, press, and trim in the same manner to form arrow point.  Repeat for all four arrows.

5.      Join background strips to upper edges of arrows.

6.      Partially join one arrow unit to center square, stopping about an inch away from the edge.

7.      Working counter-clockwise, sew remaining arrow units to center unit. Then complete the partial seam for finished block.

Here are some suggested layouts:
40" by 40"
Yardage, per EQ7:
Pale background, 1 yard
Text print, 1/4 yard
Featured Print, 5/8 yard
 
 
72" by 84"
Yardage, per EQ7:
Pale ground, 5 yards
Text print, 3/8 yard
Featured prints, 1/4 yard each (5 prints shown)
 
I hope you enjoy it! If you have any questions, please ask in the comments.  If you make my block or use it in a project, I'd love to see it!
 
 
Linking up with WIP Wednesday over at Freshly Pieced - check out all the inspiring projects over there!


Monday, October 28, 2013

DWM 10/28/2013: My MQU Block

Remember when I was so excited that my block design had been chosen as one of twelve finalists in Modern Quilts Unlimited's  Fresh Designer 2013 Block Challenge?

I can show you my block now! The winning block & quilt were featured in the Fall 2013 issue of Modern Quilts Unlimited magazine. The two runners up will be featured in the winter and spring issues.  My block is not a winner, but I'm honored to have been selected as a finalist, and I'm enjoying my subscription to the magazine.  Thank you, MQU!

And now  - Ta-da! I can show you my block, called Running Around:
Running Around
(c) 2013 Jan Ochterbeck

As soon as I get a chance, I'll post the tutorial for it. 

Nothing on my design wall today; the designing going on around here right now is for bathroom remodeling. Someone is coming out to measure later this morning, and another company is coming Wednesday, so they can give us quotes. So I'm busy cleaning and can't spend much time on the computer this morning. Wish me luck with this whole bathroom project!

Linking up with Judy at Patchwork Times; check out what everyone has on their design walls.

Sunday, October 27, 2013

Stash Report Sunday 10/27/13

I went to Paducah this week and I shopped for fabric. I bought a lot.  

But in my defense I had a list and I pretty much stuck to it except for a couple of remnants from the sale table. I even found enough yardage of one of my list items on the sale table. So, two backings, a border, an accent, some pale ground, half-yards of three green prints, and several other pieces on my list came home with me.  I haven't totaled up the yards; the dollars were bad enough. But it's all good and I have plans for what I got.

I scored THE PERFECT backing for my Dresden project:
The Dresden project & backing
 
It couldn't be better if the project were inspired by this fabric!  The Dresden project isn't coming along very well because it involves hand applique and my left hand is really bothering me these days. I can only manage stitching one length of thread every couple of days, and one length of thread is about four of those points. But that chevron backing fabric is so perfect - I love it!

So - the stash report: Lots of yardage in this week! I'll total up the amounts in and out for October and post the numbers next week.  It will definitely be way more in than used this month!

Check out how others are managing their stashes over at Patchwork Times.

Friday, October 25, 2013

Friday Finish 10/25/13: Bee blocks

Crazy week here this week but I did get Jayne's bee blocks finished.  She will add embroidery to them for the bird's legs, feet, and eye.  She handed out the grey dot fabric for the bird, and offered fabric swatches to inspire the color palette.
 

I chose her orange option because I have a lot of orange in my stash. The pattern calls for orange to be used for the beak and crest. I used a very yellow-orange to contrast as much as possible with the orange background, but I think there's still not enough contrast. A little outline stitch embroidery in yellow will solve that problem.  
 
These blocks are about 3/4" larger than she needs all around because she asked for extra seam allowance.
 
On Wednesday I went with some girlfriends to Paducah to shop at Hancock's of Paducah and visit the quilt museum.  I did some serious damage at Hancock's, but in my defense I had a list of what I was looking for and I pretty much stuck to it, except for some nice pale background fabrics from the sale table. We had a great day! Come back Sunday for Stash Report; I have some major fessing up to do!
 
Linking up today with Finish it up Friday over at Crazy Mom Quilts and Can I Get a Whoop Whoop over at Confessions of a Fabric Addict. Check out all the wonderful inspiration!

Monday, October 21, 2013

Design Wall Monday 10/21/1: Placemats & runner

Making progress...
Ready for binding.

 
Linking up with Judy at Patchwork Times; check out everyone else's design wall over there.
 

Sunday, October 20, 2013

Stash Report 10/20/2013

My name is Jan and I'm a Fabriholic.

I bought fabric this week. Sometimes you just have to take advantage of opportunities that present themselves.  I spent Friday with a friend who sells fabric, and bought these from her:

I don't have specific, immediate plans for these, but the white and the black will be great for bindings. The black & tan blender looks pretty versatile, and can work with both modern and traditional fabrics.

So, 3 yards in.

I finished the top and the backing for one of the quilts for my book proposal, and the top for another, so I'll have yardage to count out this month. The table runner and two placements are ready for binding, so I'll be able to count those out too. I'll tally up the totals at the end of the month.

This week I'm going to Paducah with some girlfriends for a girl's day out road trip. We're going to visit the museum and Hancock's. I have a shopping list for Hancock's, so for sure I'll be adding fabric to my stash this week.

Check out how others are managing their fabric addictions over at Patchwork Times.

Wednesday, October 16, 2013

WIP Wednesday 10/16/13: Grrr - a Metameric Match

Maybe I'm a lot pickier about color than a lot of people, having worked as a colorist for many years.  My job was critiquing color samples and approving the match.

There is a color phenomenon caller metamerism.  This is when two objects match color under one lightsource but don't match under another.  It's especially common with khaki and olive shades.  You may have purchased khaki pants in the fluorescent-lit store and noticed when you got them home they looked more pinkish in your indoor incandescent light.  A layman's term for this is flare - your khaki pants flared red.

I found solids to go with this cute Riley Blake print called SCOOT at a nearby national chain store.  I'm using them to make a D9P.   Here are the blocks started so far, ready for cutting.

In the store, under fluorescent lights, the green was a good hue match to the dark green in the print. 

Yesterday was a gloomy day here and I had the lights on in my sewing room, which I usually don't need to do in the daytime.  I found that the green turned olive; it flared brown. Grrr...  
 
Oh well, too late now; it'll have to do anyway. Like I said, maybe I'm too picky.  It'll probably turn out fine. 
 
Linking up with WIP Wednesday over at Freshly Pieced; check out all the creativity over there!

Monday, October 14, 2013

Design Wall Monday 10/14/13: EQ projects

Nothing on my design wall today except the table runner that I'm still working on. You've already seen it, and it's boring to look at, even for me.  Such ho-hum colors, but they go with my kitchen. Redecorating the kitchen is not in the plans right now!

So instead, we'll play in EQ today.

I've been asked to think about designing a project for a two-part or mystery workshop with a modern vibe.  I'll need to talk more with the person making the request to find out how interested in the modern aesthetic these participants really are, and what their skill levels are.  I have a feeling they're all experienced, traditional quilters to whom some of the modern fabrics are intriguing, but who may not be ready for all the negative space and/or wonkiness that characterize some modern quilts.

Some random EQ doodles; please comment.
Modern Squares
60 x 72"
one block, two colorways;
using all one fabric collection plus white.
Skill level easy
 
Depth Perception
80 x 80"
one block with paper pieced parts;
pieced sashing.
Four solid fabrics.
Skill level intermediate
 
Linking up with Judy at Patchwork Times; check out everyone else's design walls over there.

Sunday, October 13, 2013

Stash report 10/13/13

Nothing in this week and a bit used for pillow covers and bee blocks. I'll total up the ins and outs at the end of the month.

I'm contemplating a purchase. I have this cute print in my stash:
"Scoot" from Riley Blake Designs


I want to make a Disappearing Nine Patch, but I need dark orange, blue, and green to go with it. I have a rust but it's too dark; I don't have any suitable blue or green. I want solids, so I think I need to get some Kona Cotton. 
 
I'll look locally and see if I can find what I want, and then order whatever else I need.  So I guess next week I'll have to 'fess up to some acquisitions.
 
Linking up with Judy at Patchwork Times - check out how everyone else is managing their stash over there.

Friday, October 11, 2013

Friday Finish: Pillows for STLMQG Cares

The St. Louis Modern Quilt Guild is involved in a charitable project to provide 1000 pillows to Siteman Cancer Center in Feb. 2014.  I've helped make pillow covers with my bee, Sew Bee It, and will do so again at our next "pillow party" in November.  I've also finished several myself this week.
 
Linking up with "Finish It Up Friday" over at Crazy Mom Quilts and "Can I Get a Whoop Whoop" over at Confessions of a Fabric Addict.  Check out all the other creative finishes over there!

Thursday, October 10, 2013

Hidden Zipper Tutorial

As part of organizing the Tutorial tab above, this is a tutorial for installing a hidden zipper in a pillow cover.  These instructions are also part of the Modern Medallion Pillow tutorial which is already posted, but here are just the zipper instructions for easy reference.

This tutorial is copyright 2013 by The Colorful Fabriholic, for personal use only.  Please do not pin without attribution.

Hidden Zipper:
  • For a large 24" pillow, use a 20-22" Invisible zipper and instructions.  For small pillows, 14" or smaller, use 14" zipper and mark at 1-1/2" inch from edges of pillow in steps 2 and 4.
  • If you do not have an Invisible Zipper foot, use your regular zipper foot and stitch as close to the coils as possible.
  • Insert the zipper before joining the pillow front and back together.
  • Plan to use 1/2" seam allowances around the outsides of your pillow to keep it symmetrical, as the zipper seam allowance is about 1/2."
Invisible Zipper
1. Open zipper and press coils flat as directed in the zipper instructions.
Press zipper
2. Mark the right side of the pillow top 2" in from each side and mark the zipper to match, also right side up. (For small pillows, mark at 1-1/2")
Mark pillow front and mark zipper
3. Pin zipper to top, right sides together, matching markings. Roll excess top out of the way as it will be to the right of the needle. Stitch the zipper, keeping the needle as close to the coil as possible. Backtack at both ends.
Stitch zipper to pillow front
4. Mark the pillow back and the other side of the zipper like the front.
Mark back
5. Pin the zipper to the back, right sides together, matching marks.
Pin zipper to back
6. Stitch the zipper, again keeping the needle as close to the coil as possible. Backtack at both ends.

7. Holding the zipper tails out of the way, pin and sew the pillow front and back together from the edges to the end of the zipper stitching to complete the seam. The seam allowance will be about 1/2".
Sew remainder of seams from zipper to edge
8. By hand, just outside the opening, stitch the zipper tails together by whipping around the coils to form thread "stops" at both ends. If the tails extend past the edges of the pillow, cut them off at least one inch past the stops.

9. Close the zipper. From the wrong side, press zipper seam allowances open. The right side will now look like this:
Hidden zipper, shown open above zipper pull, closed below.


Wednesday, October 9, 2013

WIP Wednesday 10/9/13: Table Runner Progress

Well, this has been a learning experience! Here's where I'm at so far:
Table runner in progress
Using the quilt-as-you-go, sew-and-flip method has some issues....
First, although you can't see it in the perspective of this photo, the runner isn't straight; it has a slight bend in it.  If I ever do this again I'll mark lines on the batting to align the edges of the braid pieces and keep them straighter. 
Second, those are all short seams, through the batting and backing. Lots of thread tails, two per braid piece, to deal with on the back side.
Third, I should have done a much  better job of pressing the fabrics, especially the back, because once quilted I can't really press creases out of it. That backing has been folded up in my stash since back when seafoam green was popular, so I guess the fold creases are permanent.
Back of runner
Yesterday was too beautiful here to stay indoors so I worked on burying the thread tails outside. Thank goodness for the self threading spiral-eye needle!

Linking up with Work In Progress Wednesday over at Freshly Pieced; check out everyone's WIPs over there!

Monday, October 7, 2013

Design Wall Monday 10/7/2013: Table runner progress

Last week I mentioned that I need to make a table runner and placemats for my kitchen, to protect the pretty wood of the new table.
runner layout

No pattern, I'm making this up as I go along. I'm using the quilt-as-you-go, sew-and-flip method, which I've never actually done before, but I can probably figure it out, right?  :-)

I laid out the backing and batting and pin-basted them.  I think the length might be about 60-64" but I didn't measure; the pieces on the wall are longer than that but a lot will be lost in seam allowances. I'll start from the center, and when I run out of back, that's how long the runner will be.  My table is 42 inches and opens to 54" and I want a little hang-down either way.
runner back prepped
 
I added all the pieces to one end. So far so good. I started adding pieces to the other end. Uh-oh, slight problem.  The edges don't align in the center.  
runner in progress, needs alignment fixed

I'm going to have to rip out those five pieces and adjust the placement. I'm going to have to scootch the first pieces in a little more to have the correct overlap at the edges.  I guess whenever you kind of just wing it, you have to expect there might be a little glitch. This isn't too bad, only five little seams to rip.  Hopefully I can make some forward progress on this project this week.

Linking up with Judy at Patchwork Times for Design Wall Monday; check out all the creativity over there!

Sunday, October 6, 2013

Random stuff from my busy quilty week, and Stash Report 10/6/2013

Random quiltiness #1:
On Tuesday my hand Piecing Group met. I had only one of two blocks finished, and the hostess is on a deadline, so I definitely let her down.  (The arthritis/tendonitis etc. in my hands has flared up again, and I've been over-doing it, and so much hand sewing is hurting my hands.)  I did get the block finished and delivered to her today, so I'm off the hook now.
not finished on time

Random quiltiness # 2:
On Thursday several of us worked on prepping to hang the quilt show in the U-City library. First task, photograph each quilt; I think we had 66 of them. My dad's quilt made it into the show, and while it was being photographed, we took this snapshot of me with it.
me with dad's quilt
 
After photos all morning and a break for lunch, we spent the afternoon laying out the quilts to determine their placement and locations. We managed to fit them all in, in pleasing groupings within the spaces available. What a jigsaw puzzle!  I left late in the afternoon but a fresh crew of helpers came in during the evening and hung them.
 
Random quiltiness #3:
Yesterday the STLMQG met, a change from the usual schedule, but it was a particularly good meeting, with a panel discussion about writing patterns and submitting them for publication. Lots of good info that's helpful for me. Lots of great show & tell, too, including this:
Jolene's snowball quilt


One of the members, Jolene, followed my Charmed Snowballs tutorial and made this sweet baby quilt. I'm so flattered that she liked my tutorial! I think she mentioned the fabric line but I didn't write it down and I can't remember, sorry. I love how she used green for the accent color. Too cute!

Random quiltiness #4:
This afternoon the official opening program and reception for the quilt show was held. The show looks great; there are some absolutely stunning quilts in it. Here's just a random shot of the gallery.
The Quintessential Quilt 2013
Many of the guests at the program & reception are guild members and friends so it was a good time. The program was presented by Lynne Tyler, "Who Knew 5 Quilts Could be So Heavy", an entertaining and touching story about her quilting journey. Lynne blogs at The Patcherie Menagerie.

Random quiltiness #5:
Stash report: 3 yards in this week. I'll total up the ins and outs at the end of the month.  I did finish a top that I'll be able to count, but I can't show it on the blog because it's for my book proposal. 
Cute grey dot

The 3 yards in was all this cute little charcoal grey dot.  No info on the selvage; it came from Hancock's. I think it'll be pretty versatile and it was a good value. I actually took all on the bolt!

OK, I've been busy lately, with lots of events and meetings.  This week will be quieter - I hope - and a little more relaxed. My plans are to continue working on the table runner project (come back for Design Wall Monday tomorrow), bee blocks, and the Dresden Rows project, and also to continue work on the book proposal.

Linking up with Judy at Patchwork Times; check out everyone's stash reports over there.

Friday, October 4, 2013

My quilts made it into The Quintessential Quilt 2013!

The Quintessential Quilt 2013 is the St. Louis area's premiere juried and judged quilt show. It hangs in the U-City library during most of October, and it's free.

Yesterday I helped with the preparations necessary to hang the show.  It was a busy day, and when I left at 4:15 they were almost ready for the crew of helpers coming in at 6 to hang the quilts. We figured out placement of them all, which was a real jigsaw puzzle!

I'm pleased to know that my two entries made it in, Legacy and Charmed Snowballs. And as requested, Legacy is hanging near the stairs where viewers can see it closely enough to read the words on it.
Legacy

Charmed Snowballs
 
When the show is over and the quilts are returned to me, I'll get the judge's comments.  It'll be interesting to see what they have to say about my work.
 
Yesterday the show chair mentioned that the judges have asked for the artist statements to be available to them during the judging process next time. She thinks Legacy, with its words and phrases, might have contributed to their curiosity.  The words are titles of stories my dad wrote in his memoir. Story here.
 
There are some absolutely stunning, gorgeous, incredible quilts in this show (mine pale by comparison).  If you're in the STL area and you get a chance, check it out!

Friday Finish 10/4/2013: LINKED Pattern

The pattern for LINKED is now available! Skill level: Easy. Quilt size 40" x 40" as shown uses parts of one jelly roll and one charm pack, and one yard of ground color. Yardage and block counts are given for an optional larger 72" x 88" size.  See the Patterns tab above for ordering information. 
 
When I made this quilt, I first used off-white where you see the brown in the pattern. It was nice, but kind of average, expected. So I remade it using the same jelly roll & charm pack with the brown. Much more striking! I quilted them back-to-back. 
 
Please note that the pattern does NOT include instructions for back-to-back construction. It was problematic and I DO NOT recommend it.

Linking up with "Finish it up Friday" over at Crazy Mom Quilts and "Can I Get a Whoop Whoop" over at Confessions of a Fabric Addict.  Check out everyone else's whoop-whoop-worthy finishes!

Wednesday, October 2, 2013

Charmed Snowballs Tutorial


CHARMED SNOWBALLS

Free tutorial. The snowball block is in the public domain but this tutorial is copyright 2013 by The Colorful Fabriholic, for personal use only.  
Charmed Showballs
40 x 49"

Fabric Requirements:

50 assorted 5” charm squares of colorful prints

1-5/8 yard white Kona cotton

5/8 yard accent color (Wordplay by Michele D’Amore for Benartex used here)

1-1/2 yards for backing (or pieced backing to measure at least 43” by 52”)

3/8 yard for binding
Cutting:

If not using charms, cut fifty 5” squares from assorted prints.

 White:
-        Cut six 5” width-of-fabric (WOF) strips, then sub-cut 49  5” squares *
-        Cut nine 2” WOF strips, then sub-cut  200  2” squares *  **

Accent Color:
-        Cut nine 2” WOF strips, then sub-cut 196  2” squares *

*Yardage and number of strips based on 40” cuttable width of fabric. Wider fabric (42” cuttable print or 45” cuttable Kona) may yield more pieces per strip. Cut one fewer strips than number listed, cut squares, count yield, and determine whether you need to cut that last strip or not.

**If you cut your 5” white squares first and have a partial strip left over, you can use it for some of your white 2” squares.

Assembly:

1. Mark the 200 white 2" squares on the diagonal on the wrong side of the fabric

2. Place white squares at the corners of each charm and stitch on the marked lines. You can chain-piece all one corner, then all the next corner, etc. 

3.   Press seam allowances toward the charm:


4.     Open the pressed corners back out and trim away the excess fabric, 1/4" away from the stitching.  Pressing first and trimming afterward results in more accurate squares and minimizes stretching (rather than trimming first then pressing).

5.     Make 50 of these little snowball blocks.

6.  Repeat steps 1-4 to attach the Accent Color corners to the white squares. In step 4, press the seam allowances toward the corners (toward the accent color), then trim.  Make 49 blocks.

7.   Alternating color and white, lay out blocks on design wall, 9 across by 11 down, with colored charm blocks at the corners.


8.     Assemble rows, locking and matching seams, using ¼” seam allowance. Seams will lock together nicely but pinning is highly recommended to prevent slippage.  Press all seam allowances toward the charm blocks.
9.    Join the rows, locking and matching all seams.
10.     Layer, baste, and quilt as desired. Sample is quilted using a walking foot, as follows: 
  •       Quilt in the ditch vertically and horizontally.
  •       Mark with a Hera marker or other marker of your choice, across the snowball from point to point.  Be sure to start and end ¼” over to allow seam allowance for the binding. If using a Hera marker, mark and stitch one pass at a time.
  •       Complete all vertical quilting, then repeat going horizontally.  Quilting forms a kaleidoscope pattern.
First pass marked with Hera marker


     Note 1/4" at start of marking
    Note 1/4" at end of marking

    Second pass marked with Hera marker
     

Kaleidoscope pattern of quilting

11.     Attach and sew down binding.
12.     Add label or sign and date your quilt.
Linking up with WIP Wednesday over at Freshly Pieced. Check out all the other creativity over there!