Monday, August 30, 2021

Piecing and Quilting the Striped KK

Recently I posted that I was intrigued by the Kool Kaleidoscope* concept and tried it out using striped fabric. Here are the parts cut out and laid out on my design wall. 


Since then I've gotten it assembled according to the instructions from the video. Ricky recommends pressing the wedge seams open for less bulk. Even so, I found it difficult to get them to come together precisely. And spinning the seams to reduce bulk doesn't work very well with open seams. 


I'm very disappointed in how my center turned out. I kind of have a reputation as a precise piecer and I'm a bit of a perfectionist. Even following the instructions carefully and using the seam ripper a few times, this is the best I can get it. This looks bad to me. 


No wonder he recommends using a print that will camouflage the center! 

I found a fix for the problem. I appliqued a small hexie over the center and cut away the bulk from behind the applique. It looks intentional and it's much flatter. 


Here's the finished top on my wall (sorry for the slightly skewed photo): 


For quilting, I'm going with a combination of walking foot and FMQ. Since the seams are pressed open there's no actual ditch to stitch in; if I stitch in the groove there, I might break the piecing threads and the seam could come apart. So I need to stitch next to the ditch. I followed the wedge seams, the piecing seams within the wedges, and selected stripes in the fabric. I want the quilting to be soft, not dense and rigid, since this is intended as a baby quilt. 


In the curvy print areas I used a medium meander and in the background I used a small meander. 


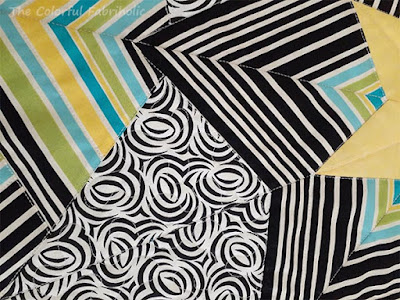
Here's a section of the back: 


Hopefully I can get this bound soon and then it will be a finish. 


*Kool Kaleidoscope free video instructions from Ricky Tims of The Quilt Show


Linking up with Small Quilts and Doll Quilts and Love Laugh Quilt

Friday, August 27, 2021

Quilted!

I had an opportunity to quilt my first quilt on the PCQ club's long arm earlier this week. A friend who's also newly trained helped me. Whatever I didn't remember from the training, she did, and vice versa, so we did okay. There was an experienced quilter in the room part of the time who advised us as well. We quilted the navy and yellow Strippy HST charity quilt I pieced last month. 


The quilting is not good, but not terrible either for a first attempt. We learned too late, after we'd already done one pass, that the panto I chose is actually for borders, not supposed to be an allover pattern, but it worked well enough. We had a little trouble figuring out the alignment when we advanced the quilt, but we got it worked out and it came out relatively even. 


Because of the high contrast in the fabrics, no matter what color thread I used it would show up a lot on half of the quilt. I chose a medium yellow; it blends with the light yellow prints but shows up a lot on the navy. 

Following a panto is harder than it looks! I have a whole new level of respect for professional quilters. All the steps to get everything loaded on the frame, and the practice it takes to follow the panto with the laser, it'll take me a lot of practice to get more proficient. I'll help my friend with her project when she does one so we both get practice. 

The back looks really good because the thread color blends well. Most of the fabrics in this quilt came from the club's stash, including this backing. 


I'll admit, using the long arm for the first time was a bit stressful. But I'm looking forward to future opportunities to quilt charity quilts for the club so I can get more practice. Because there are so many people who want to use the long arm, one can only sign up to use it every three weeks. And if you don't use it at least once every three months, you have to take the training again. Maybe next time I quilt on the long arm I'll do a freehand meander from the front of the machine instead of following a panto from the back. It would actually be faster, easier, and less stressful. 

This quilt is a donation for the club's charity efforts. I'll put the club's label on it and wash it, and it will go to the hospice we support. 


Linking up with Confessions of a Fabric Addict and Alycia Quilts


Monday, August 23, 2021

Intriguing Concept

 While making my Kool Kaleidoscope* I was intrigued by the concept. So far my KK looks like this.


It works because of the sewn strata, strips of fabric sewn into stripes. What if instead of sewing strata you used a striped fabric? 

I found one in the PCQ club's stash that could work, and something for the background. There wasn't enough of the stripe for all the rounds, so I added a black and white print and some yellow of my own. I used mostly the same templates as in my original KK above except for the outer round. 


Interesting. Using striped fabric works but if I'd had more of it I would have placed the stripes differently in a couple of the rounds. I used every available inch of the stripe and my B+W swirl print. I might play with using striped fabric in this type of kaleidoscope design again some time, if I find the right kind of stripe and companion prints and can get enough of it. 

When sewn up and quilted this will be a 36" baby quilt and the club can add it to the donations they give to the local social services agency. 


*Kool Kaleidoscope is a free video series offered by Ricky Tims of The Quilt Show. 


Linking up with Small Quilts and Doll Quilts and Love, Laugh, Quilt

Friday, August 20, 2021

Finally!!!

 Whoo-hoo!  Finally! 


Like everything during Covid, it took much longer to get than quoted due to lack of parts, but it finally arrived. Fun!


No, we don't play golf. It's just a second vehicle so one of us can use it to go to activities within the community and the other can use the car when needed "outside the walls." 


Certainly something to celebrate this week! Whoo-hoo! 


Monday, August 16, 2021

Kool Kaleidoscope Progress

Work on my Kool Kaleidoscope* continues. A couple of friends are making KKs as well, and it's fun to see how everyone's KK is coming along. Our color choices are so individual, and the Kaleidoscopes are stunning. 

Ricky's directions specify pressing the seams between the Wedges open. Knowing that 12 seams would have to come together in the center and it would be very bulky, I made a small test "center" to see how it would look. I was not happy with the result. 

I prefer to press the seams all to one side, so they would spin at the center. Pressing to one side also makes it possible to stitch in the ditch for quilting later. 

Starting with the first quadrant, all seams were pressed and the center point was squared up, with extended points from the Nose trimmed to 90 degrees. This already reduced a lot of excess fabric at the center.


The top two quadrants were seamed together, and likewise the bottom two quadrants.


Then the two halves were joined. 


I was able to spin the seams at the center to minimize the bulk, and press it as flat as possible. 


It came out okay, not perfect, but flat and not obnoxious looking. 


I can see why Ricky recommends using a print or blurry fabric that will camouflage the center. 

So here's my KK so far, Wedgies and Butts added and all the Wedges sewn together. 


Sorry for the crooked photo. It really did come out square and it lays surprisingly flat. I was afraid it would be wavy or bubbly but it really came out better than I expected. When you see the whole kaleidoscope you don't notice the seams at the center. 

Next up, borders. I went shopping last week and picked up more of the black batik and the accent colors, so now I can work on finishing the borders. 


*Free video lessons from Ricky Tims of The Quilt Show. No need to subscribe or be a member to watch and participate. Wedges, Wedgies, Butts, and the Nose are actual parts of the pattern. More info here.


Link ups: Small Quilts and Doll Quilts, Love Laugh Quilt, Quilt Fabrication

Friday, August 13, 2021

FMQ Practice: Leaves

Remember the pillows I'm making for my patio chaises? Here's the first panel, which I walking foot quilted while I was at retreat. 


These pillows were actually supposed to be for FMQ practice; that's how they came about. My neighbor who is a master quilter is pushing me to expand my FMQ skills, starting with adding motifs to a basic meander. So here's panel #2 with free motion leafy meander quilting. 


Not bad. It's certainly full of bobbles and wobbles, but overall, acceptable for its purpose. 


Here's the back side of this panel; the quilting shows up better with the contrasting thread here. 


What I learned: It's hard to figure out where to go with the meander while also thinking about the leaf motifs. The spacing is uneven and there are gaps between the quilting, so it will take some practice to learn how to travel around the quilt and fill in where needed. Sometimes I had to backtrack down the center of the leaf to get out of a tight spot, but with care, I was able to backtrack smoothly a couple of times. 


Two panels done, two to go. Hopefully I can get both pillow covers quilted and sewn up by the time the cooler weather gets here in the fall and we can enjoy lounging on our patio. 


Linking up with Confessions of a Fabric Addict and Alycia Quilts

Friday, August 6, 2021

Squirrel: Kool Kaleidoscope

I have so many projects going now it's almost stressful. So I need another one, right? I couldn't resist Ricky Tims' Kool Kaleidoscope quilt along. Check it out here, it's free and you don't have to subscribe or be a member. 

Here's my palette inspiration, my family room rug and a couple of fabrics that coordinate. (sorry for the washed-out photo)


And the fabrics I pulled, including the very last of my Kaffe Jupiter in Ochre, the most versatile print ever. What you see is all there is, less than WOF, less than 1/4 yard. I hope I can make it work. 


My fabric palette was looking a little drab so I consulted with my quilter friend across the street and ended up raiding her stash for a few more pieces, and editing out a few of the ones I had originally pulled. Here are the 5 strata I made. 


The pattern is quite clever and if you follow Ricky's directions carefully it's not difficult to create the templates. The magic happens when you start putting pieces on the wall. Here's the center and the next round


Three rounds: 


I ran into trouble with the fifth, final round. My strata stripes weren't working at all, no matter which way I tried to orient them. I ended up making a whole new strata. Much better. Here are all five rounds on the wall. 


Pretty cool! There's not as much of my precious Kaffe Jupiter showing as I would have liked, but oh well, it is what it is now. 

The next step is to plan for the background and think about borders. I definitely want to use the black batik from the strata for the background, and maybe repeat the green-black-purple from round 1. I don't have enough of the fabrics but I bought them recently from a local shop so I can go back and get more. 


If you are at all intrigued, I urge you to go to The Quilt Show and watch the videos. This is a fun project because it's a mystery how it will turn out. There's no way you can actually plan it. A couple of my new PebbleCreek quilter friends are making Kool Kaleidoscopes too, and we're having fun seeing them emerge from our fabric pulls. 


So even though it's not a finish, it's whoop worthy, so I'm linking up with Finished or Not Friday at Alycia Quilts and Can I Get a Whoop Whoop at Confessions of a Fabric Addict. 
Also Small quilts and Doll Quilts and Love Laugh Quilt

Tuesday, August 3, 2021

Keeping it Real


Yeah. 

Funny how mistakes are so obvious in photos but not in fabric. 

I'll fix that. 

Monday, August 2, 2021

July Stash Report and Goals Update

 July was certainly a busy month, and a very fun one. A little stash enhancement, a retreat, a new project...What's not to like?! 

Even though I purchased some fabric this month I also used enough to offset my acquisitions, so the stash report is still looking good for the year. One of my finishes was my batik race "yardage", which ended up being 48" wide and about 180" long. I'm using some of it for pillows for my patio chaises, and the rest will still be enough for a lap quilt or some other project. 


July Stash Report: 
IN this month: 11-1/4 yards (Shop hop - 2 yards brown batik.  Retreat - 5-3/4 yards.  35th Ave sale - 3-1/2 yards.)
OUT this month: 16-3/8 yards (Batik race, 9 yards. Star Spangled Spiral top, 7-3/8 yards.)

IN YTD: 62-5/8 yards
OUT YTD: 66 yards

YTD Net Change:  3-3/8 yards OUT

Working on several projects while I was at retreat helped with the stash report but shopping there also enabled me to acquire more fabric. I was able to finish the remake of my Star Spangled Spiral pattern to a flimsy while I was at retreat, and work on some of the blocks for my snake quilt. 


Goals Update: 

July Recap: 

1. Continue navy & yellow strippy HST blocks at Wednesday sewing; assemble top and add borders. Done, top is assembled, consensus is no borders are needed. No finished photo yet but blocks on the wall are shown below. All fabric came from the club's stash for this top. 

2. Continue hand sewing binding on How Many, (WIGSP). Progress, almost done.

3. Continue working on batik race pillow covers and practice FMQ on them. Progress, quilted one with wavy lines walking foot quilting at retreat. No FMQ practice yet. 

4. Continue prep for retreat, need to kit up snake quilt and star spiral blocks. Done.

5. Plan PCQ color challenge project and kit it up to take along on retreat. Planned and kitted up; haven't started working on it yet. 

6. Have fun at retreat.  YES!!!

Other: 1) Two long arm training sessions, then I bound the charity quilt we quilted.
2) Squirrel - I started Ricky Tims's Kool Kaleidoscope quilt along. Couldn't resist! 

August Goals: 

1. Make a backing, quilt navy and yellow charity top for long arm practice; bind the quilt. 

2. Finish hand sewing binding on How Many, (the WIGSP) and start attaching the sleeve. 

3. Continue working on Kool Kaleidoscope to a flimsy. 

4. Continue making blocks for the coral Snake Quilt.

5. Start working on the color challenge project. 

6. Practice FMQ on at least one of the remaining batik race pillow covers.


That should be plenty to keep me busy! 


Link ups: Small Quilts and Doll Quilts, Love Laugh Quilt