Monday, December 30, 2013

DWM 12/30/13: Prepping Borders

Here's what's on my design wall ironing board today: I'm prepping the borders for book quilt #1.  I should have the top finished by tonight.  Bonus - I can count the fabric used in the top in my December numbers.
 
Such pretty fabric! It's La Scala by Robert Kaufman, in a deep navy with metallic gold, perfect for a navy & white geometric quilt.
I know a lot of blog readers dislike it when a bloggers says "I can't show (whatever) because it's a secret."  Since a lot of what I'm currently working on, and will be working on for the next few months, can't be shown on the blog, I guess that means I'll be posting less frequently. 

I'll post when I can, and show what I can, until I get everything for the book finished. If I can squeeze in extra projects with visuals on the blog, I will.

Meanwhile, I'm linking up with Judy at Patchwork Times; check out everyone's inspiring design walls over there.

Sunday, December 29, 2013

Stash report 12/29/13

No fabric in this week - YAY!

I've been working on the first book quilt and the top is ready for the final border. I expect to get that sewn on tomorrow, so I'll be able to count out the yardage for the top.  I'm hoping I'll break even for the year; I know I'm pretty close.

I'll publish a full accounting of fabric in and out for 2013 next week.

Linking up with Judy at Patchwork Times; check out how everyone else has managed their stash for 2013.

Thursday, December 26, 2013

A very good Christmas

Christmas was great this year -
We spent Christmas Eve at Jackie's and had a lot of fun with the nieces, nephews, in-laws, etc. Way too much food!!! 

DS and DDIL were able to be there, too, and they came over here after the party and we had our own Christmas celebration at home on Christmas Eve night. It was great that they could come; it's so difficult with their schedules. 

DH gave me a lovely gift, a handbag we selected together a few weeks ago. It wasn't a surprise of course, but a much needed and appreciated gift all the same. The surprise came in the wrapping. Have you seen those LLBean commercials where everything is wrapped in its exact shape? Here's how he presented it:
my gift from DH

I hope your Christmas was great too and you were able to enjoy it with family.

Monday, December 23, 2013

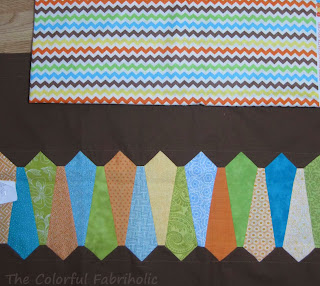
Dresden Picket Fence

As promised, here's a quick how-to for my Dresden project. I'm calling it Dresden Picket Fence.
Finished size will be about 52" x 72", after trimming the uneven sides. My top is still on my design wall today.

Tutorial copyright 2013 by The Colorful Fabriholic; please do not pin without attribution.

Dresden Picket Fence top
 
Skill level: Experienced.
 
Fabric requirements:
 - Background, 2 yards (plus 1/2 yard for binding if you want to bind in same color)
 - Colors: I used 34 different fabrics, one 3-1/2" WOF strip of each, or pieces cut from FQ. You can get 5 cut pieces from one WOF strip. So you'll need 1/8 yard of each fabric times 34 fabrics, or a total of 4-1/4 yards.
I used 11 teals, 10 greens, 10 oranges, and 3 yellows. (I used a few more but they didn't make the final layout, too dark or too pale.)
 
Cutting:
 - Colors: This is the tool I used, about $5 with coupon at JoAnn's.  From each 3-1/2" WOF Strip, cut 5 of these pieces.
Easy Dresden Tool
 
 - Background: Cut five (5) 9" WOF strips and cut three (3) 4-1/5" strips.
 
Assembly: 
1. Fold each colored piece in half lengthwise right sides together and stitch across the wide end, 1/4" seam allowance. Trim seam allowance at point and turn right side out and press. Press 1/4" seam allowance at the tail end to the wrong side.
Dresden Pieces
 
2. Arrange colors on design wall in 5 rows of 34 pieces each row, alternating points up and down.
 
3. Join Dresden pieces with 1/4" seams, overlapping and pinning so that finished edges exactly match at the seam line. Photo shows overlap at point end of yellow piece at left and tail end of yellow piece at right. Press seams open.
Overlap 1/4" seam allowance at top and bottom
 
Here are some of the sewn rows on the design wall. The rows are numbered so I can keep the color placement as planned when I take the strips down to applique them to the background. 
Dresden rows
 
4. Prepare background: Trim selvages off all WOF strips of background fabric. Cut one of the 9" strips into quarters and join one quarter to the end of each remaining WOF strip. My strips ended up about 53" long. Do the same with the 4-1/2" WOF strips.
 
5. Prep for applique:
 a) Mark a line 1-1/2" from each long edge of the 9" background strips and one long edge of the 4-1/2" strips. For marking, I stitched a line of basting, using water soluble thread in the bobbin for easy removal later.
 b) Measure the distance between your Dresden points; it should be about 3-1/8".
 c) Starting with a center background strip, mark at the line for the Dresden points. Mark the other side with the points centered in the gaps (aligned halfway between the points on the other side).
 
Marking placement for points
 
 d) Pin the Dresden points as marked, then mark the next 9" background strips accordingly.
Pinned points
 
e) Continue marking and pinning, finishing with the 4-1/2" strips at the ends.
Pinned for applique
 
6. Applique the points in place.
7. Trim away the fabrics behind the points, leaving 1/4" seam allowance. This will allow the batting to nicely fill in the Dresden pieces, preventing flat-looking points. Remove basting or markings.
Trimmed seam allowances at points
 
8. Square up and trim sides of top.
9. Layer, baste, and quilt as desired.

If you like this concept and you make a Dresden Picket Fence quilt, I'd love to see pictures of yours!

Linking up today with Judy at Patchwork Times. Check out what everyone else has on their design walls for inspiration!

Merry Christmas, everyone!

Sunday, December 22, 2013

Stash Report 12/22/13

Whoo-hoo! Thanks to Cherie, I get to count fabric out this week! (I count yardage used for tops when the top is complete, and I count backings and bindings separately.) Since my friend finished the applique on this top, I get to count the yardage for it. Thanks again, Cherie!

So, fabric out this week, 5-3/4 yards.
No fabric in this week, YAY!
I'll total up the ins and outs at the end of the month. I hope to have more I can count out by then.

This top will end up as a throw and will probably finish about 52" x 72".  I'll post a tutorial about it tomorrow.

Question for you: what do you do about counting fabric that was used in parts that did not make it into the actual quilt?  There are Dresden units in 34 different fabrics in this top. But I made Dresden units in several other fabrics that didn't make the final layout. How would you account for the fabric used in them?

Linking up with Judy over at Patchwork Times; check out everyone else's stash management efforts over there.

Friday, December 20, 2013

Thanks Cherie!

Remember this? An unmet October goal due to pain in my left thumb, which affected my ability to hand stitch.
 
My friend Cherie, who likes to do hand applique, volunteered to finish appliqueing the rows for me. Today we went to lunch, and she returned the finished top to me. It looks wonderful! Thank you, Cherie!!!
 
Her stitches are invisible and perfect (mine, not so much, they're pretty klunky).
 
I'm so grateful for the help!
 
Linking up with Friday Finish over at Crazy Mom Quilts and Can I Get a Whoop Whoop over at Confessions of a Fabric Addict. I think Cherie deserves a Whoop Whoop!
 

My Studio

I love my studio!  DH helped create it a few years ago. The room is actually one of the bedrooms in our home. It measures 12 feet long by 10-1/2 feet wide.  DH installed the shelf & basket system for my fabric stash, put in laminate flooring, and built my design wall.  I really like the laminate flooring. It's easy to sweep up threads, etc.; and the cutting table and sewing table, which are on casters, can be moved easily.

Here's what you see from the doorway. You can see my fabric storage shelves with baskets; the stuff at the top is gift wrap, rarely used supplies, etc. The closet to the right contains hanging quilts, out of season clothing, etc. that are best kept out of sight. This photo shows the cutting table fully open, but I usually keep that right leaf closed so I can move around the room more easily. The drawers under the table hold templates, scraps, drawing materials, miscellaneous supplies, etc. The design wall is out of the picture to the right, and the sewing machine is out of the picture to the left. Sorry about the lousy photos; it's cloudy here today so I had to use the flash.
Studio, view from doorway

 
Here's the opposite view, from the corner you can see above.  What you can barely see in the foreground is my ironing table. The cutting table leaf is folded down in this picture. The clutter on the table is pretty typical. The sewing machine is out of view to the right of that red chair.
View from far corner
 

Here's the design wall, and the stepladder I use to reach the top of it. This view is from the sewing machine area.  You can see why I usually keep the table leaf folded down, so I have room to move around in that part of the room.  I use the far right part of the design wall as bulletin board space, hence all the hanging stuff there. Looks like I need to clear some of it out!
Design wall
 
Next is the view from the corner where the stepladder is. This shows the sewing machine area.
Studio, view towards sewing machine
 
Finally, here's the actual sewing machine area. Again, this is pretty typical of the amount of clutter.
Sewing machine area
 
You can see a couple of handy innovations that I'll share -
- Look under the sewing table. See that clear white plastic shoe box? That's my chain-piecing catcher. It rests on the rail of the sewing machine table and catches my chain piecing to prevent it from landing in the dust on the floor among the electrical cords.
- Do you see that black and silver thing under the plexiglass at the left? That's a lantern-style flashlight (the light spreads out sideways).  With the light underneath, I can use the plexiglass as sort of a light box to trace small things.  
 
Thanks for joining me on the tour; I'm linking up with Vicki Welsh over at Field Trips in Fiber for the Real Studio Tour. Check out everyone else's workspace over there.