Friday, April 29, 2016

Black & Tan Quilt Finished

Whoo-hoo! I managed to get it done, just in time to link up with the OMG linky party over at Red Letter Quilts! 
Black & Tan Quilt for Hands2Help 2016

My priority goal for April was to get this Hands2Help quilt finished and bound, ready to send off to Happy Chemo. You can learn more about Hands2Help over at Confessions of a Fabric Addict.

The black & tan quilt is lap size, 58" square before washing. The fabrics used were entirely from stash, including the backing and binding. I quilted it on my domestic machine using the walking foot for SID around the sashing, and FMQ for a medium meander within the blocks. It's definitely not modern, but I've always liked this color combination.

This quilt is ready to be sent off to Happy Chemo for H2H, and I hope it brings a little comfort to someone.

grab button for RedLetterQuilts

Sunday, April 24, 2016

Post-Paducah Stash Report

I was bad. Very bad. But I had such a good time!
Not only did I have a good time acquiring stash all week, I got to hang out with friends, meet some of my blog readers, and share my Cut and Shuffle Quilts story with show attendees. It was a fabulous week!
Me in the Author Booth. 

I may have gone a little overboard with the fabric purchases.
Or not.
I ended up adding 40-1/2 yards. My total amount spent breaks down to $6.28 a yard including the tax. I'll take a hit to my stash report for those prices any day, if the fabrics are some that I like and can use.

So, stash report: In this week: 40-1/2 yards. Out: 0. I may have a finish to count this coming week, so I'll tally up the totals for the month and the year at the end of the month.

All right, enough with the words, now, let's get to the pictures! First up, some general stash enhancement. I didn't have a plan for specific purchases, but I looked over my stash ahead of time and took photos of some color groups that were lacking. I told myself I would not buy any orange or any green - my green basket overfloweth. However, who can resist a bias stripe for bindings, and a half-yard of Kona teal at $3.97/yard?
Miscellaneous Stash Enhancers

I'm lacking in blues so when blue was the color of the day, I found these. My friend thinks the one in the middle looks like a dress, which made me think of a Diane von Furstenberg wrap dress.
New Blues

On pink & purple day, I found some corals and magentas. Each day, I found good stash basics and neutrals among the flat folds.
Mmmm - Magenta, and Some New Neutrals

Coral is my favorite color. I may have gotten carried away....
Coral Collection

I didn't clip swatches of anything and carry them with me as I shopped, I just chose what I liked. But somehow a palette emerged. So much for not buying any greens. That pale aqua on the far right is Tula Pink elephants.
Sweet Palette

I did in fact buy some greens for a specific purpose. A deep accent color, because deep shades are hard to find. And four yards of backing for a planned project that I haven't even started yet.
Backing and Accent

And who can resist the FQ packs at Nancy J's? Not me. The Kaffe & batik below called to me, as well as the pastel FQs in the sweet collection above.
Kaffe FQs

Last but not least, some Grunge and Painters Canvas. Most of these are for a planned project and a couple are just because I couldn't resist. That raspberry was too delicious to pass up!
Grunge and Painters Canvas

I treated myself to some non-fabric splurges, too. A replacement sunglasses case/wallet; a coffee mug, and handbag handles.
More Paducah Goodies

All in all it was a great trip, and good karma was very much with us. Although rain was forecast for Weds. & Thurs., we never got more than a sprinkle and never had to open the umbrellas. No parking hassles. No major problems, and the little annoyances were either fixed or no big deal. My friend was even able to get a hotel reservation for next year already!

But seriously, I think I did enough stash damage for awhile. I'm going to have to get busy and sew up all this new fabric! Linking up with Patchwork Times and Molli Sparkles.

PS - We saw some beautiful quilts in the show, too, bit I didn't take pics.

Monday, April 18, 2016

Hands2Help quilt in progress

It's not on my design wall, but it's still in progress....

Ready to pin baste, which means some crawling around on the floor. And laying flat to reach the center. Ugh, my least favorite part of the process. I need to get this pinned today or tomorrow so I can get it up off the floor before I leave for Paducah.

This quilt is destined for Happy Chemo, one of the Hands2Help charities this year, organized by Sarah at Confessions of a Fabric Addict.

I had previously dedicated the quilt below to Happy Chemo as well. Then came a need within my own local bee, a young mother starting chemo here in STL. Should I send this quilt away to another city where it will be given to an unknown chemo patient, as publicly committed on my blog? Or should I give it to someone here that I know, for the same purpose? I emailed Sarah and asked her, and the quilt was given to my local friend. This is Positively Radiant, and while I know my friend not feeling exactly radiant right now, I hope the spirit uplifts her, and that she will eventually emerge from her ordeal healthy and radiant once again.

I'm linking up with Sarah at Confessions of a Fabric Addict for Hands2Help Progress, and with Judy at Patchwork Times for Design Wall Monday.

If you're going to be at the AQS show in Paducah, I'd love to meet you! I'll be featuring my book Cut and Shuffle Quilts in the AQS Author Showcase, located in the bubble. I'll be demonstrating my Block Mama method from 4-6 pm on Thursday and 10 am-noon on Saturday. I'd love to meet readers of my blog, so if you can, please stop by and say hello!

Sunday, April 17, 2016

Pre-Paducah Stash Report

Nothing in this week. That's about to change - Paducah here I come!
Out this week, 3 yards for the Framed Nine Patch sample.
Framed Nine Patch  
Tutorial Part 1 and Part 2

Speaking of Paducah - 
If you're going to be at the AQS show, I'd love to meet you! I'll be featuring my book Cut and Shuffle Quilts in the AQS Author Showcase, located in the bubble. I'll be demonstrating my Block Mama method from 4-6 pm on Thursday and 10 am-noon on Saturday. I'd love to meet readers of my blog, so if you can, please stop by and say hello!

Linking up with Patchwork Times

Wednesday, April 13, 2016

Framed Nine Patch Tutorial, Part 2

Welcome to Part 2 of my Framed Nine Patch tutorial. If you missed Part 1 and you’re interested, you can find it here.

In Part 1 we covered fabric selection, cutting, and making the starter blocks. Today we’ll cover cutting apart the starter blocks, arranging the parts and making the top, adding optional borders, and finishing.


We left off with nine starter blocks. Each starter block should measure 13-1/2” square.
Starter Blocks

Cutting the Starter Blocks:

Accurate cutting is critical. This is definitely a case where you want to measure twice, cut once.
If you make a cutting mistake, the starter block is ruined and you’ll have to make another.  

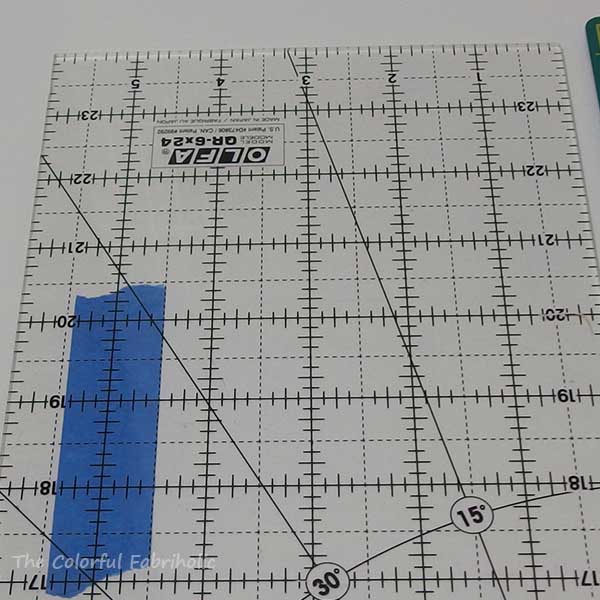
Since we’ll be cutting our 13-1/2” blocks into thirds, which is 4-1/2”, I recommend putting blue painter’s tape on your ruler at 4-1/2” wide, as a visual reminder of the correct measurement. 
Mark Ruler at 4-1/2"

Note: If your blocks are not 13-1/2” square, you’ll have to fudge a bit when cutting them into thirds so that all your pieces end up the same size.

I recommend cutting one starter block at a time and taping each block down to your mat to prevent any shifting. I don’t recommend stacking them and cutting more than one at a time because the lower layer(s) could shift. 

Here is one block ready for cutting: 
Taped and Ready to Cut
  •      First cut: 4-1/2” from the edge 
First Cut

  • Second cut: 4-1/2” over from the first, which should also be 4-1/2” from the other side of the block.

Second Cut
  • Rotate the cutting mat ¼ turn (do not move the block parts). Repeat the first cut and the second cut. The starter block should be cut into nine units.

One Block Cut into Nine Units
  •  Repeat for each starter block. Here are mine, all cut and ready to lay out. 
All Blocks Cut into Units

Laying Out the Units:

You will definitely need a design wall, floor, or other surface to lay the parts out on.

Start with the solid patches. These are the center pieces from each of your starter blocks. Place them about where the centers of your new nine patch blocks will be on your design wall. (Sorry, I forgot to take a pic of this step.)
  • Place the remaining units around the center patches so that they form framed nine-patches, scattering the colors as much as possible. 
Parts Laid Out in One Nine Patch Block
  • Lay out three nine-patch blocks or nine units across and the same number down.
  •       Continue laying out units and moving them around until you like the placement. Here is how mine looked when they were first put on the wall. As I mentioned in Part 1, I was concerned about the two yellow fabrics looking too similar, and this would affect my layout. I tried to keep the two yellows from being right next to each other, but catty-corner is okay. 
First Layout on Design Wall

o   What I think needs to be changed: I want to separate the solid orange and the dark coral that are paired up next to each other. Too many of the darkest/strongest colors are together. 
  • Here’s my (almost) final layout. 
(Almost) Final Layout

o   Take photos of your layout progress. It’s good to check for value contrast in grey scale, and it’s also good to rotate your photo to see what the quilt will look like from other directions. 

(Almost) Final Layout in Grey Scale
  •  I found a unit turned in the wrong direction when I was sewing the parts together. Check your layout and make sure your units all make framed nine patch blocks, with the frames all going in the correct direction. 
·     
      Assembling the top:    
    
      Use scant 1/4" seams. 
      You can either assemble your quilt top in rows or in nine-patch blocks, your choice. (I prefer the row method.)
  • In some cases your seams will nest at the frames; in other cases they will not. I recommend pinning them carefully at the frames to prevent slippage and assure good matching. 
  • Regardless of which assembly method you prefer, blocks or rows, press your seams in opposite directions by row, so they'll nest together when you join the rows. 
If you’re not adding borders, your F9P top is now complete.
Complete Top Without Border


Optional Borders:
  • Measure the width of your top across the top, center, and bottom, and average the measurements. (You should have 36-1/2”.)
  • Cut two of the border strips to this measurement.
  • Attach these borders to the top and bottom of your quilt, pinning at the centers and the quarters.
  • Measure the length of your top on the left, center, and right, and average the measurements. (You should have 44-1/2”.)
  • Cut the remaining two of the lengthwise border strips to this measurement.
  • Attach these borders to the sides of your quilt, pinning at the centers and the quarters. 
Finished Top with Borders

Your F9P top with borders is now complete.

Layer, baste, and quilt as desired.

Binding:
  • Cut 2-1/2” WOF strips of your binding fabric.
o   For top without borders, cut 4 strips
o   For top with borders, cut 5 strips
  •       Join strips end-to-end, fold in half lengthwise, and press.
  •       Attach to quilt using your preferred binding method.

Be sure to label your quilt!

About this method: You never quite know how it's going to come out when you pull fabrics and make the starter blocks. This quilt came out quite busy, but it works. It's certainly cheerful! The dot print would not have been my first choice for borders, but I didn't have enough yardage of any of the other fabrics. I would have preferred the same light orange print (#9) that I featured in my demo block, which would have been much less busy and would have contained the madness a bit more. 

The Framed Nine Patch looks modern-ish to me, although modern quilting wasn't a thing yet when I first came up with the idea in 2004. I think I'd like to try it in all solids with white....So many possibilities. If you make a F9P, I'd love to see it! Post it to Pinterest and send me a link!

Monday, April 11, 2016

On my Design Wall - F9P in Progress

Just a little tease today...
F9P parts on my wall. I've been playing with arranging the layout.

Part 1 of the tutorial for my Framed Nine Patch is here (two posts below if you want to scroll down). Part 2 is coming Wednesday.

Linking up with Judy at Patchwork Times

Sunday, April 10, 2016

Stash Report 4/10/16 & April Doll Update

Nothing in this week. Out this week: 3/8 yard for a doll dress.
April Doll Dress

The doll came (naked) from Goodwill but she has obviously never been played with. I get to play with her make clothes and accessories for her until Christmas, then she'll go to my niece. I cobbled together a pattern for the dress from commercial doll pattern parts and raided my purple stash for the fabric. My plan is to make one outfit or collection of accessories a month.

In other news, I posted Part 1 of the Framed Nine Patch tutorial last week; see previous post below. I'll post Part 2 on Wednesday 4/13. Part 2 covers cutting up the starter blocks, laying out & assembling the top, and adding borders. I hope you'll join me if you're interested!

Linking up with Patchwork Times for Stash Report Sunday.