A new little great-nephew is due around Oct 1. This is great-nephew number 7. Of course he needs a quilt; his brother and all his cousins all got quilts when they were born.
I found a cute whale print I know his mom will really like.
And this is what became of it:
It just needs one side of the label hand-stitched down, and a spin thru the washer and dryer, and it'll be ready for the little guy when he gets here.
His mom and dad aren't revealing his name until after he's born, so the label just says "For Baby with Love from Aunt Jan." That's been the case with all the other babies, but each child has his own unique quilt.
I'm pleased with how it turned out. This is about as close to improv as I can get. I hope they like it.
Linking up with Whoop Whoop Friday at Confessions of a Fabric Addict and TGIFF at Anja Quilts
Friday, August 31, 2018
Wednesday, August 29, 2018
The only thing worse...
than running out of bobbin thread
...is running out of thread altogether,
with only a small corner of quilting left.
Link up: Sew Fresh Quilts
Monday, August 27, 2018
Testing, Testing...
I bought this specialty ruler for adding corner triangles to blocks when I was in Paducah in April. I thought I could use it to snowball the corners of my Dresden blocks, but I found the instructions confusing. I was afraid to mess up that project so I just made them the usual way. Here's the special ruler:
Since then I made something else with snowballed corners, and I sort of figured out the ruler, but it involved making oversized triangles and trimming the block afterward. OK, faster than the original method. But could there be a way to use this ruler in combination with die-cut triangles so no trimming is needed?
I'm making 6" finished (6-1/2" unfinished) blocks with 3" triangles on opposite sides. For 2 test blocks, I cut 2 background squares and die cut 4 triangles.
The corners of the background square will have to be trimmed before the triangles can be added. I figured out where to align the ruler.
Just double checking before cutting, to make sure the triangles can be sewn in the right place.
OK, looks like if I cut there it'll work. I cut opposite corners off the background square. Looks like my triangles will line up just fine.
Sewing them with a 1/4" seam:
Looking good! After the triangles were pressed outward, the blocks measured exactly the right size without any trimming.
And the points came out nicely when the blocks were joined with a slightly scant 1/4" seam.
A successful test. I learned that I can save the time and trouble of cutting squares, marking the diagonal, and trimming away the bonus triangles when making snowball corners. If I make something with dozens of blocks, this would be a huge time saver.
Linking up with
Small Quilts and Doll Quilts
Em's Scrapbag
Love Laugh Quilt
Friday, August 24, 2018
Pickle Dish: A Finished Flimsy
Whoo-hoo!
Dr. Seuss's Pickle Dish is now a finished flimsy. This has been a long and complicated project, but so worth it. It's a big sofa quilt, 67" x 81".
I started collecting the fabrics and paper piecing the arcs last fall, so this has been in work for about 9 months so far. I don't know about you, but for me, the more care and effort and time I put into a project, the better I like it. This is one of my favorites ever.
I found a perfect backing fabric, a loose abstract grid print in the same dark teal-green and aqua as my background floral. My plan is to quilt this myself, so I'll have to spend some time prepping the backing and basting the layers together.
Meanwhile, I'm celebrating a finish!
Linking up with Whoop Whoop Friday at Confessions of a Fabric Addict and TGIFF, hosted today at Alycia Quilts
Dr. Seuss's Pickle Dish is now a finished flimsy. This has been a long and complicated project, but so worth it. It's a big sofa quilt, 67" x 81".
I found a perfect backing fabric, a loose abstract grid print in the same dark teal-green and aqua as my background floral. My plan is to quilt this myself, so I'll have to spend some time prepping the backing and basting the layers together.
Meanwhile, I'm celebrating a finish!
Linking up with Whoop Whoop Friday at Confessions of a Fabric Addict and TGIFF, hosted today at Alycia Quilts
Wednesday, August 22, 2018
WIGSP
Work in Glacially Slow Progress
I've been doing a lot (for me) of hand stitching lately, on a project that's been in work since before Feb. 2008. This is a project that my Piecing Group friends have helped me with, but now it's in too few sections to hand out any more so I need to finish it.Last week my guild had a UFO-themed social meeting. I knew some of the girls from Piecing Group would be there, so I wanted to show them how much progress I've made.
I need good light for hand piecing. I have a nice bright light on a flexible stand that I can move over my sewing table, which gives me good light for stitching.
Here's what the project looked like on the design wall back in 2015 so you can get an idea of it. Since this photo was taken, the rows have been sewn together in pairs, black pieces have been added to the ends to create side borders, and black rows have been stitched for the top and bottom borders. It will be queen size when finished.
As of last week, the bottom third is together, and the top four rows are together. Our meeting motivated me to keep pushing on this. As long as my hands aren't too painful, I'll keep on stitching a little each day. I can only hand stitch for about 20 minutes; that's about one thread length, about 1/5 of the way across a row. When my hands flare up I'll take a break, but at least I can make some progress in the meantime. I will persist!
Linking up with Sew Fresh Quilts
Wednesday, August 15, 2018
Pets on Quilts
It's time once again for the Pets on Quilts show over at Lily Pad Quilting.
This is Murphy. And this is his very most favorite spot in the whole wide world to be.
Check out all the other cute pets on quilts over at Lily Pad Quilting. Voting for Viewers Choice will start in a few days, after the link-up has closed.
This is Murphy. And this is his very most favorite spot in the whole wide world to be.
Check out all the other cute pets on quilts over at Lily Pad Quilting. Voting for Viewers Choice will start in a few days, after the link-up has closed.
Monday, August 13, 2018
The Red Project: Completing the Dresden Blocks
The Red Project has been a task-of-the-month project since last fall, usually making blocks to this point. Last month the snowball corners were added.
This month the goal is to get all the centers appliqued on and the backs of the Dresdens trimmed out. First task, prep the centers:
After cutting, gathering, pressing and starching all the centers, I removed the cardstock circles from them and lightly glue-basted them in place. They're getting the same machine-stitched applique around the edges that the blades have.
See that presser foot? That's my quarter-inch piecing foot. The open slot is less than 1/8" wide. If I align the inside right side of the foot against the edge I'm stitching down, the needle will be close to the edge and the stitches will be nice and even. Sometimes the "wrong" tool is actually the right tool for the job.
I'm liking the proportion of center circle to blade diameter. I had earlier auditioned several sizes and I liked this one best. The center circle finishes 2-1/2" and the total block finishes 14".
My friend Suzanne Marshall, applique artist extraordinaire, recommends cutting away the layer(s) of fabric from behind the applique so the batting will fill into the space. She should know, check out her website.
I'll definitely follow her advice. It's tedious, cutting the backing away from all those points.
You can see in the photo above that the red Dresden points still have an extra layer of fabric with seams. After cutting away the light background, I'm going back into each point and trimming the red to 1/4" seams. 20 points per block times twelve blocks. Good thing I have the rest of the month to get them all done. And a nice sharp pair of scissors.
Here's the back after cutting the layers away. I haven't decided if I'll cut away the center or open it and insert batting like trapunto, so for now I've left the background fabric there.
Not really much to show for a lot of time and tedious work, but it'll be worth it in the end.
Link ups:
Small Quilts and Doll Quilts
Em's Scrapbag
Love Laugh Quilt
This month the goal is to get all the centers appliqued on and the backs of the Dresdens trimmed out. First task, prep the centers:
After cutting, gathering, pressing and starching all the centers, I removed the cardstock circles from them and lightly glue-basted them in place. They're getting the same machine-stitched applique around the edges that the blades have.
See that presser foot? That's my quarter-inch piecing foot. The open slot is less than 1/8" wide. If I align the inside right side of the foot against the edge I'm stitching down, the needle will be close to the edge and the stitches will be nice and even. Sometimes the "wrong" tool is actually the right tool for the job.
I'm liking the proportion of center circle to blade diameter. I had earlier auditioned several sizes and I liked this one best. The center circle finishes 2-1/2" and the total block finishes 14".
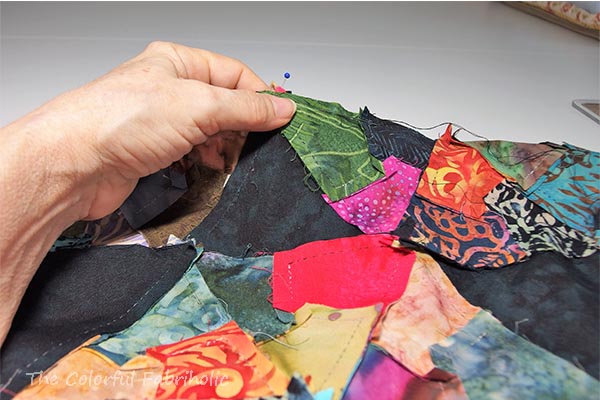
Here's the back of the block, now that the center has been added:
I'll definitely follow her advice. It's tedious, cutting the backing away from all those points.
You can see in the photo above that the red Dresden points still have an extra layer of fabric with seams. After cutting away the light background, I'm going back into each point and trimming the red to 1/4" seams. 20 points per block times twelve blocks. Good thing I have the rest of the month to get them all done. And a nice sharp pair of scissors.
Here's the back after cutting the layers away. I haven't decided if I'll cut away the center or open it and insert batting like trapunto, so for now I've left the background fabric there.
Not really much to show for a lot of time and tedious work, but it'll be worth it in the end.
Link ups:
Small Quilts and Doll Quilts
Em's Scrapbag
Love Laugh Quilt
Subscribe to:
Posts (Atom)