Sunday, November 28, 2021

PCQ Color Challenge

Every month since July I've had "Work on my Color Challenge project" on my list of monthly goals but other than packing some fabrics and taking them along to retreat in July, I haven't done anything. 

And now I'm glad I haven't. 

The challenge is to make something using Split Complementary colors. Split complementary means the colors on each side of the complementary color. In this example, the chosen color is violet, whose complement is yellow. Yellow-green and yellow-orange are the split complementary colors. 


Apparently some of the PCQ members have been struggling with the challenge, so a color class was held recently. They published a recap, and one of the class examples was so similar to what I had planned, same color combo and similar pattern, that I was afraid if I made mine as planned it would look like an un-original copy of the example. 

Back to the drawing board. I still liked my chosen color combo and I had fabrics in my stash that I could use, but I needed a new plan. I found inspiration in a photo by Paul Gill in a recent issue of Arizona Highways magazine. 


I think what's been giving people trouble is the color wheel illustrations that show pure, bright hues, no variation in tint, tone, or shade. In the photo, there is blue in the lichen-covered rocks, but it is very subtle and greyed down, in values ranging from sparkling light to deep dark. The split complements of blue are yellow-orange and red-orange. In the photo these leafy colors range from light to dark, and although they look like bright fall foliage, they're all toned down compared to the pure hues in the color wheel. 

So I revised my palette and I'm using these fabrics:

I've started planning and cutting. You'll have to wait to see what I'm making, but you won't be at all surprised. 


Link ups: Small Quilts and Doll QuiltsLove Laugh Quilt

Friday, November 26, 2021

Sock Monkey Plus Flimsy

Another donation quilt; this one will go to the local family services agency. 

As always, there's a need for quilts for older boys, so here's one that's not babyish. At 44 x 56" it's a good size for a grade school or middle school age kid. 


The sock monkey fabric is ageless, right? DH thinks so - he likes it! I snuck in some reclaimed shirt fabrics to keep it masculine. 

I found flannel in the club's stash to cobble together a backing. I'm scheduled to use the long arm in mid-December and I'm hoping to FMQ a meander all over it from the front of the machine rather than following a panto. We'll see. 


Link ups: Confessions of a Fabric AddictAlycia Quilts

Sunday, November 21, 2021

Not Out of My System Yet

I'm still obsessed with the Kool Kaleidoscope concept. First there was my original in autumn colors, made using strata per Ricky Tims's directions. Then there was my green striped one, using striped fabric instead of pieced strata. The striped fabric worked surprisingly well.

So well, in fact, that I wanted to experiment with another striped KK. While on vacation in September I bought a pink stripe and a couple of companion fabrics to play some more with the concept. 

At the time I didn't realize that a painterly stripe doesn't work as well as a rigid stripe. Because the stripes vary in width, they don't always match up perfectly. But I was so far into it by the time I figured that out that I decided to just live with the variations and imperfections. It's still pretty cool...


The pink tonal print was an oldie from stash, but it works really well here. 

I tried something different with this version. The outer piece of each Wedge, before attaching Wedgies and Butts, is the same fabric as the background. This emphasizes the star or hexagon shape more instead of a round-ish 12-sided shape. 

I like where this is going, stripey imperfections and all. 


Link ups: Design Wall Monday at Small Quilts and Doll Quilts; Monday Making at Love Laugh Quilt.


Thursday, November 18, 2021

Better Photos of HOW MANY

 As promised, I was finally able to take some better photos of HOW MANY.  On a - rare - overcast day I borrowed a quilt stand, enlisted DH's help, and took photos. 

Turns out, this quilt is very hard to photograph well. To get any detail in the black, the light portion is blown out, and to see the colors in the light part, the black loses any detail. This is the best photo of the bunch. 

I'm entering HOW MANY into the AQS Paducah show in the Group category. They require a full on shot and a detail shot. My detail shot turned out pretty well. Custom quilting by my friend Sandy. 


For entries into the group category AQS requires a photo of the group of participants as well. Here we are, proudly showing off the finished top, after our group worked on hand piecing it for several years. 


I need to get my AQS Paducah show entry in this week. Wish me luck! 


Link ups: My Quilt Infatuation, Confessions of a Fabric Addict, Alycia Quilts, Wendy's Quilts and More

Monday, November 15, 2021

Snake Quilt Update

 Only 10 more blocks needed., 5 double arcs and five singles. 

So I'll just keep plugging away at them. I'm still loving these colors. 


When I get the rest of the blocks made I can play with the block placement to make sure the same fabric isn't too close to itself. And I can decide what kind of loopy effect I want; there are many potential layouts possible. 


Link ups: Small Quilts and Doll QuiltsLove Laugh Quilt

Friday, November 12, 2021

Asian Squares: A Village Quilt

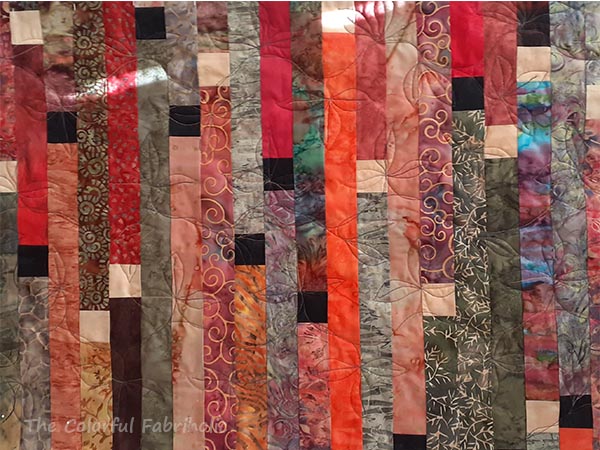
 We all know the phrase "It takes a village," right? This simple donation quilt is truly a village effort. 

A couple months ago, a deceased quilter's stash was being distributed in the PC quilting room. At the end of the event, there was a baggie of 6" squares of Asian prints left that apparently no one wanted. While cleaning up, George said he'd take them and cut them up for dog bed stuffing. Wait! No! They're too pretty to just become dog bed stuffing. I said I'd take them and put them together in a simple checkerboard for a hospice quilt. 

I didn't find a light fabric in the club's stash for the alternate squares, but I did find one in my own stash that was actually left over from 2014 from one of my book quilts. It's a tiny Asian geometric print with metallic gold, perfect for the light alternate squares, and I had enough. I'm so glad to finally find a use for this! I cut the squares and kitted them up for social sewing. 


I was sewing pairs together in the quilting room one day and a PCQ member, Irene, came up to me and asked what I was working on. I showed her and told her the story about the baggie of squares. She replied that she remembered that baggie. She had actually taken that baggie of Asian squares earlier and took out a few that she could use, and returned the rest. She was glad someone was using the rest, and she offered to help me on the long arm when I was ready to quilt.

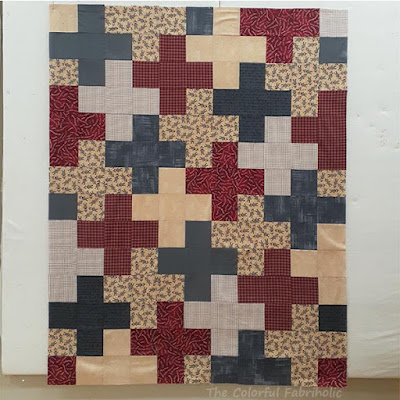
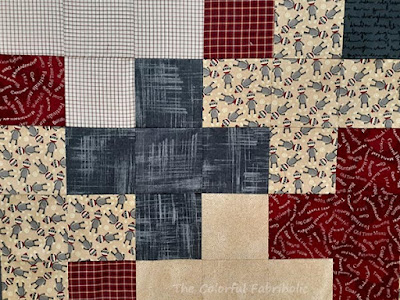
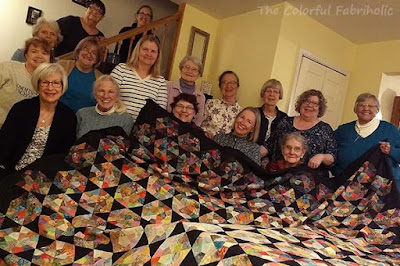
When I had pairs together I put them on the design wall in the quilting room, and the girls suggested moving them around to get a pleasing layout. Four or five people helped, and we ended up with a layout where the blue prints flowed among the earth tone prints. Thanks to all who helped. 

I was able to find a border fabric in the club's stash; thank you to whoever donated it. The colors, Asian theme, and metallic gold are perfect and there was just enough for a 3" border, bringing the size of the top up to about 54 x 65 inches, a good size for a hospice quilt. 


One of the girls who regularly goes to social sewing offered a backing fabric from her personal collection of Japanese fabrics. It's perfect! Gold metallic geometric print on a deep maroon ground. She generously contributed enough for the backing, with the off-cuts used for the binding. Thanks, Hiromi! 

My scheduled time to use the long arm finally arrived. The day before, I went over to the room to choose a panto, select a thread color, and wind bobbins. The girl who trained me on the long arm was there and she helped me choose the thread color, a light sage that blended well with everything. We looked at several beiges and golds, but the sage was actually much more harmonious. Thanks, Debbie, for your suggestions and help. 

The day of quilting Irene came and helped. She's an expert, and I couldn't have done it without her. There's so much to remember about how to use the machine, and it had been awhile since my initial training. I do feel more confident now and I'm grateful for the extra help. 

So this "nothing special" quilt that will be donated to hospice is truly the product of a community of quilters. As they say, "It takes a village." Thank you to all the helpers and donors who made this quilt happen! 


Link ups: Confessions of a Fabric Addict, Alycia Quilts

Monday, November 8, 2021

Patio Pillows

 Okay, so it's not a Design Wall Monday post but I can't resist celebrating the completion of my patio pillows. Just FYI, the design wall looks the same as it did last time, with snake blocks on the wall. 

The patio pillow project (say that three times fast!) started out as something for practicing free motion quilting, and it certainly was effective in doing that. I feel much more confident in tackling FMQ now. I'm certainly not very skilled, that will take lots of practice, but I'm no longer paralyzed by "I can't" anymore, either. 


I like the pops of color the pillows add to our patio. Our patio is covered and it faces northeast which is excellent in this climate. We get a lot of sun early in the morning but not in the afternoon. The batik fabrics will fade from the bright sun, so we'll have to bring them into the house when we're not using them. I have a basket for them in a corner near the patio door. 


Each of the four panels is different. The first is wavy lines, quilted with the walking foot. No FMQ practice here because I wanted to try out this wavy line concept. 

The second was simple leaves along a meander. I can FMQ a pretty good meander, and a friend loaned me a book about how to add motifs to a meander to expand your repertoire. After some practice on a muslin sandwich I quilted this. 

The third panel was spirals.

And the fourth one is leafy vines. This one is my favorite, but it took a lot more planning of the placement of the leaf clusters.  This would be hard to do allover on a larger quilt and get the placement okay. 

The last step was trimming them to size, adding zippers, and sewing them into pillowcases. Ta-done!

Just in time for temperate weather, and we can use them all winter because it's very pleasant to enjoy the sun in the wintertime here.