Sunday, April 3, 2016

March Stash Report and Goals Recap

When the end of the month falls in the middle of the week, it's kind of awkward for posting the monthly recap on Sunday (linking with Patchwork Times). So, a few days into April, here's the March recap.

Stash Report: 
March IN: 4-1/4 yards (2 yds wide backing;  2 yds low volume & 1 FQ from Merrily's sale)
March OUT: 5 yards (2-1/2 yds backing & 3/4 yd binding for Positively Radiant; 1 yd backing & 1/2 yd binding for coral F9P; 1/4 yd for bee blocks)

YTD IN: 13-3/8 yards
YTD OUT: 41-1/4 yards
YTD Net Change: 27-7/8 yards out
Whoo-hoo! Lots of wiggle room for fabric acquisition in Paducah!

Coral Framed Nine Patch

Positively Radiant

Goals:

March Recap
1. Quilt and bind Framed Nine Patch UFO (for baby gift). DONE
2. Piece backing for Busy Pink Plus top. DONE. Renamed this quilt Positively Radiant.
3. Quilt and bind Positively Radiant. DONE
4. Keep up with bee blocks. DONE
Other - Designed a block & wrote a tutorial for it for Paintbrush Studio's New Block Blog Hop.


April Goals:
1. Layer, baste, quilt and bind black & tan quilt for Hands2Help
2. Write tutorial for Framed Nine Patch
     a. Make new sample, with in-process photos
     b. Post part 1 on Apr. 6
     c. Post part 2 on Apr. 13
3. Make new Cut and Shuffle Quilts block demo samples for AQS Author Demo Booth, Paducah
4. Make one doll outfit
5. Keep up with bee blocks
6. Have fun in Paducah!

Black & Tan project to be finished in April

Come back tomorrow for the story about the doll outfit and more on the AQS Author Demo Booth in Paducah.


Saturday, April 2, 2016

One Monthly Goal

Heidi over at Red Letter Quilts encourages goal setting and prioritizing by hosting One Monthly Goal. I always have several goals each month, but for April I'm prioritizing this one: layer, baste, quilt and bind this black & tan quilt.

This will finish at 58 x 58", lap quilt size, and is destined for Hands2Help/Happy Chemo. Since I quilt using my domestic machine, this will give me a chance to practice FMQ with the stitch regulator on my new machine.

The colors and prints are masculine; sometimes it's harder to find good masculine fabrics except for recycled shirtings. I've had a thing for neutrals lately, and I really like these together.

My other goals for April include posting a two-part tutorial for my Framed Nine Patch quilt, keeping up with bee blocks, and having fun in Paducah. But definitely, finishing the black & tan quilt is my priority OMG for April.
grab button for RedLetterQuilts

Tuesday, March 29, 2016

Paintbrush Studio New Block Blog Hop: Beary Goosey Block

Welcome to my stop on the Paintbrush Studio New Block Blog Hop! Paintbrush Studio (formerly known as Fabri-Quilt) has generously sponsored this new block design blog hop by providing FQ cuts of the Ocean Sunrise color palette to all participants. Each designer creates a block and writes a tutorial for it, which you can see by visiting all the posts. Then all the blocks will be used in donation quilts. Stephanie @Late Night QuilterCheryl @Meadow Mist Designs, andYvonne @Quilting Jetgirl are hosting this project. 

The Beary Goosey block is for the intermediate level sewist. Some experience with flying geese, HSTs, and bias seams is recommended, although this block would be a great skill-builder for a confident beginner.

My block uses four of the six colors in the palette, Midnight, Bordeaux, Peach, and White. Prewashing the fabrics is recommended to preshrink the fabrics and remove any excess dye.


Instructions are written for one block which will finish at 12" (12-1/2" unfinished). All seams are 1/4". 

Cutting and Prep:
-          Midnight:
o   Cut 1 (one) 6-1/2” square
o   Cut 2 (two) 3-7/8” squares and mark each on the diagonal
-          Bordeaux:
o   Cut 1 (one) 7-1/4” square
o   Cut 1 (one) 4” square
o   Cut 1 (one) 3-7/8” square and cut on the diagonal for two triangles
-          Peach:
o   Cut 2 (two) 3-7/8” squares and mark each on the diagonal
o   Cut 1 (one) 3-1/2” square and mark on the diagonal
-          White:
o   Cut 1 (one) 6-7/8” square and cut on the diagonal for two triangles. Set one aside; only one is needed for the block.
o   Cut 1 (one) 4” square and mark on the diagonal


The Beary Goosey Block is assembled in quadrants.
           
1.   Midnight Quadrant:
a.     Snowball the corner: Place the marked 3-1/2” peach square together with the large Midnight square. Stitch on the marked line. (For a bonus HST which is not used in this block, stitch again ½” away from the first line of stitching.)
b.     Cut ¼” outside the sewn line (or between the stitching if making the bonus HST) and press the corner out.

2.     Flying Geese Quadrants:
a.     Place two 3-7/8” peach squares on large Bordeaux square as shown and stitch ¼” on each side of the marked diagonal line.
b.     Cut on the line between the stitching and press the points out. 

c.     Align a 3-7/8” Midnight square on each unit and stitch ¼” on each side of the marked diagonal.
d.     Cut on the diagonal and press the corners out; trim. You now have two mirror-image pairs.

e.     Sew matching pairs together to form block quadrants.

3.     Geese in the air quadrant
a.     Make HST: Place the 4” white square together with the 4” Bordeaux square. Sew ¼” on each side of the marked diagonal. Cut between the stitching lines. Press one HST open and square up to 3-1/2”. (Set aside one HST, not needed for one block).


b.     Sew wings onto HST: Align one Bordeaux triangle as shown, stitch and press the point outward. Then align the other triangle and stitch. Press and trim.

c.     Sew large white triangle to Bordeaux triangle assembly, press outward, and trim. If any dark seam allowances show under the white, carefully trim them away. 


Final Block Assembly:
            1. Lay out block quadrants as shown. Be sure that the Midnight triangles of the flying geese units are next to the Midnight quadrant.
            2. Sew quadrants into rows. Press toward the white and Midnight quadrants. Join rows together; press.

Ta-Done! 

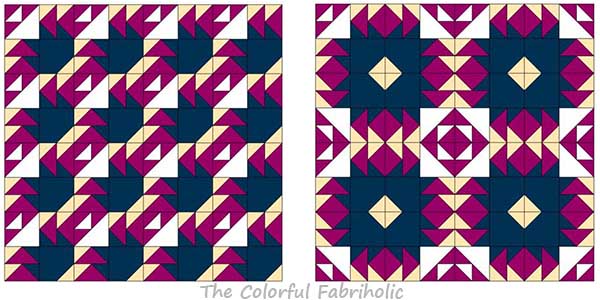
You can create some really interesting and unique layouts using the Beary Goosey Block. Some secondary surprises happen when you rotate the blocks different ways. In some cases the peach triangles come together to make even more Flying Geese.  Here are illustrations of a few layouts. 
Left: Paws in the corners;   Right: Diagonal set

Left: Straight set;   Right: Paws together

Left: Streak of lightning;   Right: Spinning 
(note the peach pinwheels where four blocks come together)

I hope you enjoy the Beary Goosey Block and what you can do with it! Check out the other designers participating in the Paintbrush Studio blog hop: 
Monday March 28: Host: Yvonne @Quilting Jetgirl
Tuesday March 29: Host: Cheryl @Meadow Mist Designs
Today: Host: Stephanie @Late Night Quilter 
and check out today's bloggers listed below: 

Vicki @Orchid Owl Quilts
Shelly @The Carpenter’s Daughter Who Quilts
Amy @13 Spools
Geraldine @Living Water Quilter
Robyn @Hoops & Thimbles
Jan @The Colorful Fabriholic - you are here!
Sharla @Thistle Thicket Studio
Margo @MY Quilts and Crafts
Jinger @Trials of a Newbie Quilter
Kathryn @Kupitis
Jane @Jolly and Delilah
Josi @Avocado Quilts
Deanna @Stitches Quilting
Lori @SewPsyched!

Be sure to enter the giveaway, 6 half-yard cuts of the Ocean Sunrise palette from Paintbrush Studio, details at Quilting Jetgirl. 

Thanks, Paintbrush Studio, and thanks, Yvonne, Cheryl, and Stephanie! 
2016 Paintbrush Studio New Block Blog Hop


Monday, March 28, 2016

DWM 3/28/16 & Catching Up

On my wall today: First Saturday blocks, a BOM series from my LQS. We're eight months into the current series, so there are eight of the main blocks (the stars) and eight of the alternate blocks.

The main block is challenging; those side units have a lot of bias seams and points to align with other points. This is not a block to rush to put together the night before (or the morning of) the meeting!

I like the color palette, which is inspired by the Roman road. I seem to be alternating between very bright projects and neutral projects lately.

I missed posting a stash report yesterday. Last week I used 2-1/2 yards for the backing of Positively Radiant. No yardage in. I'll post a March stash report recap and goals update this coming Sunday. After all, there's still a couple of days left in March to add to or reduce the stash....

In other exciting news, I'm participating in the Paintbrush Studio New Block Blog Hop and I'll be posting my block, with tutorial, on Wednesday this week. Meanwhile, check out the details and today's block designers with host Yvonne at Quilting Jetgirl. Be sure to sign up for the giveaway, a half-yard bundle of the Ocean Sunrise palette.

Linking up with Judy at Patchwork Times.

Wednesday, March 23, 2016

Updates and a Finish

Updates:
My little surgery last week went well and I'm back to sewing and normal activities. Thank you for your kind thoughts and all the good wishes you left in the comments.

The last finish I posted was my Framed Nine Patch (F9P) and I offered to post a tutorial if anyone's interested. Several people left comments expressing interest, so I will put together a tutorial as follows:  
  • Wed. Apr. 6: Fabric selection, cutting, and parent block assembly.
  • Wed. Apr. 13: Cutting the parent blocks into pieces, layout, and reassembly of blocks. Also optional borders.
The F9P finishes at 36" as shown or 44" with optional borders. Either way it's small, a good size for a baby quilt or table topper. Skill level: easy for someone skilled in accurate cutting and scant 1/4" seams.
Framed Nine Patch (F9P)

A Finish:
Since I've been back in the sewing room, I was able to finish the quilting and binding on "Positively Radiant."
Positively Radiant, front

It finished at 51" x 60", lap size for an adult or sofa size for a tween. It will go to Hands to Help, Happy Chemo.

The top used up some partial fat quarters & scraps and made small dents in some of my Kaffe stash. The back is pieced from leftovers. The bold binding is extra wide to hold in all that riot of color and pattern.
Positively Radiant, back

The angle of the sun & shadows makes it look like there's only quilting in one direction, but the quilting is actually a crosshatch grid through the diagonals of the pieced squares. I used a medium pink thread. Here's a detail of the back.

And just because it was a pretty day and this is such a vibrant and cheerful quilt, a couple more photos.
 
 
Link ups: Let's Bee Social at So Fresh Quilts, Whoop Whoop Friday at Confessions of a Fabric Addict, Friday Finish at Crazy Mom Quilts

Wednesday, March 16, 2016

Quilting in Progress

I was able to get the busy pink plus quilt layered and pin basted and I've started on the quilting. I'm quilting a simple diagonal grid. It's easy to eyeball it since these squares are only 3 inches, so no marking is needed. I'm using the even feed feature on my new machine, and I think I've got the presser foot pressure figured out. No puckers so far!

I'm halfway done with the quilting and the basting pins have been removed. I'll fill in the alternate lines between these to complete the grid. This quilt will have a soft drape when it's done because the quilting won't be too dense.

Although I'd like to finish and bind it this week, I know I won't be able to because I'm having a little minor surgery on my wrist tomorrow so I may not be doing much sewing or quilting for the next few days.

Preeti from Sew Preeti Quilts came up with a wonderful name for this quilt - Positively Radiant. I love it! Thank you, Preeti.

Linking up with Let's Bee Social at Sew Fresh Quilts

Monday, March 14, 2016

Back to the Busy Pink Plus Project

Next up on my list of goals for this month is to get this one layered, pin basted, and quilted. It's still on my design wall from a couple weeks ago, and you can see the binding I'm auditioning peeking out on the right.

The backing is ready. I just have to clear floor space so I can spread everything out and pin, pin, pin. Not my favorite part of the process, but an essential one.

I'm participating in Hands to Help again this year, hosted by Sarah over at Confessions of a Fabric Addict. This quilt will go to Happy Chemo. I think I'll name it Positive Vibe in hopes that it sends some comfort and cheer to the recipient.

 
Linking up with Judy at Patchwork Times; Check out the other design walls over there.