Friday, June 13, 2014

Finally Finished: Dresden Rows

Dresden Rows

This has been in the works for nearly a year, due to all sorts of issues: selecting the background, problems hand-appliqueing the points, changed priorities due to deadline projects, quilting challenges, and thread issues. Special thanks to my friend Cherie for helping to applique the points to the background when I found it too painful. All the problems have finally been resolved and it's finished!  You can read about the top here and the quilting here. I finished the quilting using Superior Threads monofilament thread, very fine and soft; I really like it and will use it again.

So, after all that, I'm pleased with how it turned out. It finished at 49" by 71", a good size for a sofa throw. Love that binding!


The backing is perfect! I found it after I had pieced all the rows for the top, so the backing fabric did not establish the palette. But it sure complements it well! 
 
A close up of the quilting: Meander in the background, chevrons in the rows. 
 
The photo shoot was well supervised.


Linking up with Friday Finish at Crazy Mom Quilts and Can I A Whoop Whoop at Confessions of a Fabric Addict. Check out all the lovely finishes over there!

Wednesday, June 11, 2014

WIP Wednesday - My MM Challenge Blocks: A Fiddly Process

Small is cute, right?
So this is the little block I'm using for my Michael Miller Fabrics challenge. It finishes 6" square.
Michael Miller Challenge Block
 
Those orange bands are 1/2" wide; each wedge is 3" long.  These 6" blocks are very fiddly to assemble. I developed the block in EQ and printed out template pieces for it.

Here's my process:

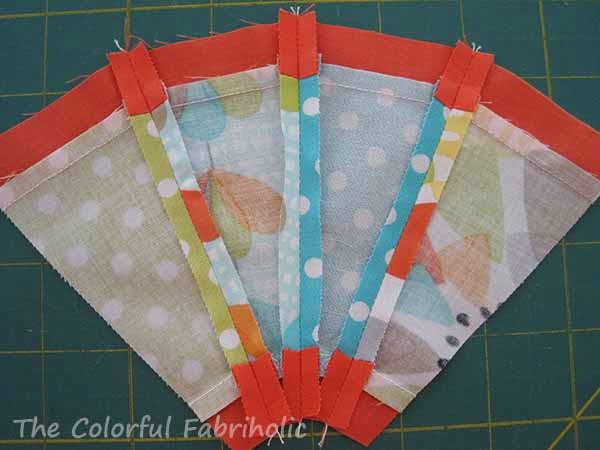
I started with 3-1/2" cut strips of print fabrics, and added 1" cut strips of orange to each side. I combined the template pieces for the orange and the wedge into a compound template* and cut orange-trimmed wedges. This was much easier than trying to cut and assemble those tiny pieces of trim on the narrow end of the wedge!
Strip with trim, cut with template


I sewed wedges into pairs, then into fours, and pressed the seams open, making a quarter-circle arc.
Wedges sewn together

I cut 6-1/2" squares of the grey background.  Then I cut them to shape with these templates* by tracing the shaped line and cutting with scissors. I added notches to aid in matching seams. (*See more about templates below; these are glued to one layer of template plastic.)
Templates for background
 
I pinned the background piece to the wedges, matching the notches to the seams, and pivoted at the seams as I sewed.
Background pinned to wedges
 
Pivot at match points. Tucks visible
in photo are not stitched and will open flat.
 
I wanted all my seams pressed toward the orange, to fill it in and create dimension there while keeping the background flat. The seams naturally wanted to be pressed toward the background, so to make them go toward the orange, I pulled the last few stitches of each wedge seam apart.
Pull seams apart

When pressing, the seam allowances overlap a bit at each point.
Press with overlap at points

Here's the front, with the seam allowance pressed toward the orange:
Front, pressed

Next I pulled open the seams at the small end and pressed the seam allowances under 1/4".  If you try this, don't use steam, and use tweezers or something other than your fingers. Ouch!
Press small curve seam allowances under

I glue-basted the corner background in place and hand-appliqued the small end of the wedge onto the background.
Hand applique

14 blocks later, I was able to play with layouts. Check out Monday's post, below, and let me know which layout you prefer.

These little blocks were fiddly because they were so small. If they were 12" blocks they'd be much easier!  Maybe I should have added seams in the background and paper pieced them....oh well, hindsight.

Amazing designs can be created using blocks with an arc. In my gallery tab, check out Loop in Motion and Celtic Lullaby, both of which use blocks with arcs in them.

* Templates: I've often made my own templates and I've had good success with this method:
-Draw or print out the block and the template at actual size. Add 1/4" seam allowance if not already included.
-With glue stick, attach the paper template to template plastic.
-With rotary cutter and ruler, or scissors if needed for curves, cut out the template. A single layer template is fine for tracing onto fabric to cut with scissors, but a thicker one is needed for rotary cutting.
-Glue the single layer template to another layer of template plastic and cut it out again. With care you can use this double-layer template for rotary cutting.
-If you want it to be sturdier for rotary cutting, glue it to a third layer of template plastic and cut it out again.

Linking up with WIP Wednesday over at Freshly Pieced; check out all the quilty inspiration over there!

Monday, June 9, 2014

DWM 6/9/14: Which Layout?

For Design Wall Monday today I'm asking for your input. I'm using this little block for my MQG Michael Miller Fabrics challenge:
my challenge block, 6"
 
I'm making a table runner, 2 blocks wide by 7 blocks long, which will finish at 12" by 42". Here are several layouts. Please tell me in the comments which one you like best. Thanks!
 
Layout 1
 
Layout 2
 
Layout 3
 
Layout 4
 
Linking up with Judy at Patchwork Times - see what's on everyone else's design walls over there. 


Sunday, June 8, 2014

Stash Report 6/8/14

Whoo Hoo!  Nothing in this week!
Nothing that I can count used yet, either, but I'm working on my MQG Michael Miller challenge using some of these fabrics:
Michael Miller Challenge Fabrics

Come back tomorrow for Design Wall Monday - I'll show you my progress so far and ask for your input on layout.

Linking up with Judy at Patchwork Times; check out the other stash management progress over there.

Thursday, June 5, 2014

Vacation

Not much blogging or sewing going on lately...
 
Because I was here:
on the Gulf Coast
 
I guess now that I'm home I'd better get back in the sewing room....
 

Linking up with Live a Colorful Life for Really Random Thursday


Monday, June 2, 2014

DWM 6/2/14

Not much on my design wall today because I've been away for a few days. Beach vacation. What can I say - some things take priority over quilting and blogging!

Here's what's on my design wall: backing for a small quilt. The top measures 40-1/2" wide so WOF should suffice for the backing, right? This orange fabric is exactly 42" including big selvages, so it's just barely wide enough. But the backing is all from stash so I'll be able to count it out on my next stash report. The binding is prepped & ready, too. I need batting, so I'll have to find a coupon. A queen size batt will yield four of these small quilts if cut carefully.

Linking up with Judy at Patchwork Times. Check out everyone else's design walls over there - I'm sure they're all much more inspiring than mine!

Sunday, June 1, 2014

May Stash Report & Goals Update

May Stash Report:

This week was a good week for the stash; no new fabric came in and 2-1/4 yards were used for this little top. (Some of the orange patches were left over from cutting too many for the CSQ Charity quilt, so only the ones actually cut for this top were counted.)

May Stash Totals:
IN: 16.25 yards
OUT: 7.6 yards
Month net change: 8.65 yards added

YTD IN: 127.5 yards
YTD OUT: 81.4 yards
YTD Net Change: 46.1 yards added
Since my goal for the year is to break even, I guess I'd better get busy and use up some stash!

GOALS UPDATE

May
1. Print & organize all book materials.  DONE
2. Deliver all book materials to publisher. DONE
3. Quilt Dresden Rows.  Started; need more monofilament thread.
4. Keep up with bee blocks. DONE
5. Work on Michael Miller Challenge.  Started: Designed; bought add'l fabric.
6. Design baby quilt. Not done.
Well, about #6 - The specific baby quilt that needs to be designed isn't done, but I did create the CSQ Charity quilt and wrote the pattern for it. Do you think that counts?

June
1. Complete Michael Miller Challenge. 
2. Finish quilting Dresden Rows.
3. Design & start on the special baby quilt.
4. Keep up with bee blocks.
5. Optional: Design CSQ 30-Something challenge. Celebrating the 30 year anniversary of Circle in the Square Quilters, the challenge is to create anything related to 30. So far I'm not feeling inspired....

Every month I include "Keep up with bee blocks" as a goal, and every month I accomplish it. Should I continue to list it as a goal? Since bee blocks are for someone else, I feel a responsibility to get them done timely. So unless something happens to prevent me from doing them, I'm going to get them done. But, they do take time, and sometimes a little fabric. Should I continue to list them among my goals?

Linking up with Judy at Patchwork Times for Stash Report Sunday.