Wednesday, October 31, 2018

October Stash Report and Goals Update

October has been a busy month, but it sure feels like I did a lot! What I haven't mentioned on the blog here is that I was on vacation for a week, a road trip through Tennessee to the Great Smokey Mountains, Asheville NC, and Kentucky bourbon country. Seeing the Biltmore mansion was on my bucket list. Other than travelling, let's see what I got done this month and how the stash report looks.

October Stash Report: 
IN this month: 11 yards (STLMQG Retreat - 1 yard.  QOV star print, 10 yards.)
OUT this month: 20 yards (Propeller top (my blocks only) 2-1/2 yards.  Sports Plus top, 3-1/2 yards.  October N4Nb quilt, 2-1/4 yards.  CSQ baby quilt, 2-1/4 yards for top, 1-3/8 yards for back, 3/8 yards for binding.  Org Tute N4Nb quilt, 2-1/4 yards.  Backing for Snake QOV, 5-1/5 yards.)

IN YTD: 116-5/8 yards
OUT YTD: 126-1/8 yards
YTD Net Change:  9-7/8 yards OUT

Since my goal is to break even or reduce the stash for the year, I'm doing fine. A local shop is having their FQ sale next week, so I'm sure there'll be some additions to the stash in November.

CSQ Operation Shower Baby Quilt

Goals Update: 

October Recap: 
1. Prep and pack for STLMQG retreat. DONE, and had fun while there!
2. Piece at least one donation quilt top at retreat from parts already prepped. DONE - finished two tops, Propeller and Sports Plus. 
3. Finish baby quilt for Operation Shower for CSQ. DONE
4. Make another Nurses for Newborns quilt. DONE
5. Set blocks together for the Red Project. One row seam to go; it's due Saturday, so I have time to finish. I'm counting this DONE. 
6. If time permits, prep backing, layer and baste Pickle Dish. Not done.
7. Keep up with bee blocks. DONE

Other:
1. Ordered fabric for a new QOV and pieced a backing for the Snake QOV made with friends.
2. Planned a blog post about how I organize my projects for piecing and pieced an extra N4Nb quilt to illustrate it; quilted and finished the extra N4Nb quilt.
Extra N4Nb quilt made to illustrate my

Retreat was so much fun and I got two tops pieced for donation quilts:
Propeller top pieced at retreat, bee blocks made by 
Sew Bee It friends

Sports Plus donation quilt top pieced at retreat


November Goals:
1. Make one last Nurses for Newborns quilt for November; due Nov. 10.
2. Prep backing, layer and baste Pickle Dish.
3. Make another Operation Shower baby quilt for CSQ.
4. Add first border to Red Project top.
5. Look at UFOs and determine what to work on and/or what to do with some of them.
6. Deliver donation quilts to their respective organizations.
7. Hand sew on WIGSP Piecing Group project.
8. Keep up with bee blocks

That should keep me busy. The sewing room is a bit of a mess so I need to spend some time tidying up in there, too.

October Nurses for Newborns quilt
made from scraps from grandson's big boy bed quilt


Link up: Sew Fresh Quilts
Monday, October 29, 2018

DWM 10/29: The Red Project

My goal for this month is to get the blocks all sewn together into the center of the quilt top. So far I have the blocks sewn into rows and the bottom two rows sewn together. As shown on the wall here, this part of the top will finish at 70" x 70".

This project is kind of special to me, and I'm taking care in the construction of it. I'm pleased with these points so far; three more rows of them to go. 

I need to get the rest of the rows sewn together by Saturday for this month's AFS meet-up with my friends. Next month the goal will be to add the first border.


Link ups:
Small Quilts and Doll Quilts
Em's Scrapbag
Love Laugh Quilt

Friday, October 26, 2018

Finished Demo Sample

The little top I made as a demo sample for my post about my organization habits is now a finished quilt. For that post, scroll down or click here

A bit of Franken-batting, backing left over from something else, some crosshatch quilting and machine binding, and now I have a finish.

This demo sample is small, 24" by 36", the size requested by Nurses for Newborns. I've been making one N4Nb quilt each month, but the October quilt was already finished. This one's a bonus!

(To those who left comments on my organization post, thank you. If I didn't reply, it's because you're a no-reply blogger but I appreciate your visit and your comment.)


Linking up with Confessions of a Fabric Addict

Wednesday, October 24, 2018

My Organization Habits

Edited Nov. 12, 2018 to link up with Tips and Tutorials Festival hosted by Yvonne of Quilting Jetgirl and Cheryl of Meadow Mist designs

Um... I'm kind of known for being organized.

While at STLMQG's retreat a couple weeks ago, some friends noticed how I had a Plus quilt all kitted up and prepped for piecing, and how easily it went together with all the patches in the right places.


They asked, and I gave an impromptu demo about how I prepped and organized everything, and how I kept it in order while sewing. I mentioned this in the blog afterwards and asked if anyone was interested. The response was positive, so here's the story of my organization method.

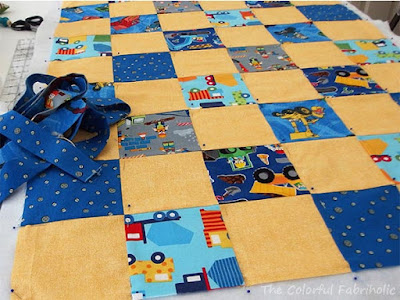
In order to create this post I raided my scraps and cut patches for a 24" x 36" Nurses for Newborns quilt. The small size enabled me to do it quickly; many of the patches were already cut, left over from past projects. Here are the patches laid out on the wall, 8 columns and 12 rows.

What I realized while prepping for this post is that I am a creature of habit when it comes to piecing. I have particular ways that I use consistently, for taking the pieces off the wall, aligning them for piecing, and re-stacking them to keep them aligned. My method works for either patches like in this one-patch quilt, or for blocks.

If I'm working at home and can leave everything on the wall until I'm ready to sew it, I just put a safety pin in the upper left corner block. If I'm kitting up a project, I label the columns and rows. The few minutes it takes to do this pays off in smooth going later.


Starting with the left column, I take all the patches (or blocks) off the wall from top to bottom. I lift up the top one, place it on the second one, lift them both, place them on the third one, and so forth down the column. The result is a stack that's in the same order and oriented in the same direction as the patches were on the wall from top to bottom.

When I'm sewing at home I do this for the first two columns, then for each additional column as I'm ready to sew it.

When I'm kitting up a project, I stack each column as described above. I clip the stack together with the clip at the top, so I'll know which way is up when I'm ready to sew them. I didn't realize I had made such a habit of this, but it definitely works for me.

When I'm ready to sew, I place the stack for the left column on my left thigh and the stack for the next column on my right thigh. Another habit that works for me. Here I've removed the clips for sewing.

I flip the top patch on the right over the left, like turning the page of a book, so the patches are right sides together but still correctly oriented. Once correctly oriented together I can align them for stitching.

Sew, repeat for the second patch in the stack, etc., chain piecing until the entire stack is sewn.

The bottom of the stack is the bottom row of the quilt, and is the last pair sewn. When I cut the chain piecing apart, I place the second-from-the-bottom on top of the bottom pair, etc. This results in a new stack that's in the same order from top to bottom as the pieces were originally on the wall. This step  is critical to keeping everything in order.


I continue in the same manner for the next stack.

Again, chain piecing...

... and restacking the rows from the bottom up as I cut apart the chain.

Continue until all the stacks have been done. As the rows become longer, the stack on my left thigh drapes down to the floor. This method works for assembling rows of blocks as well as individual patches.

The rows are done but nothing has been pressed yet. If I'm working at home and the rows are not numbered, I put them back up on the wall so they don't get out of order.

I'm in the habit of pressing odd rows to the left and even rows to the right, so the seams will nest. If the rows are not marked, I stick a pin in the far left of each row so I don't get the row turned around while pressing. I press each row as needed and either put it back on the wall or use it right away.

Another habit - I start at the bottom. The reason for this is that it's really easy to flip the next row down over the bottom row and align it for sewing. As more rows are joined, the large bulk of the quilt top grows upward, but it's still easy to flip and place the next row. Here the bottom 8 rows have been pressed and sewn, and the remaining rows have not been pressed yet.

A few more row seams, and soon we have a finished flimsy!

I did not realize until planning and writing this that the things I consistently do while piecing are actually habits that make things easier for me. What quilty habits work for you?


Link up: Sew Fresh Quilts

Friday, October 19, 2018

CSQ Baby Quilt - A Friday Finish

The traditional guild I belong to, CSQ, is making baby quilts for an organization that supports military families called Operation Shower. They provide amazing baby showers to expectant families of service members.

Baby quilts and donation quilts are right up my alley, so I'm already working on my first one for them. A couple weeks ago I showed the top, featuring these cute fabrics. Since Operation Shower may not know how many baby boy quilts or girl quilts they need, I figured a gender-neutral palette would be good.

Well, now the top is a finished quilt, all quilted, bound and labeled.

I had almost enough of the stripe for the backing. The last bit of the geometric print extended the length to just enough. This quilt is about 39 x 45", a good baby quilt size.

The quilting is just SID around the inner border, and a simple medium meander everywhere else. After a spin through the washer and dryer, it'll show the texture better, but you can see some texture already.

The labels were screen printed onto muslin by a member of our group.

There wasn't quite enough of the green dot left for binding, so I found an orange strip in my scrap bin that would work and spliced it in. This quilt used up all of the stripe and all of the remnants of geometric print, light orange, and green dot in my stash, and almost all of the dark orange. Whoo-hoo, now I can think about doing some fabric shopping to refresh my stash!

I'll hand this quilt off to the person coordinating the baby quilt drive when I see her in a couple weeks. I'm sure this won't be the last quilt I make for Operation Shower!


Linking up with Whoop Whoop Friday over at Confessions of a Fabric Addict

Wednesday, October 17, 2018

October N4Nb Quilt

The Nurses for Newborns quilts are due November 10. I've been making one per month since the project was announced in February, but I still need to get October's and November's done.

The fabrics for October's quilt are leftovers from my grandson's big boy bed quilt, plus a yellow from stash.

Some quick easy piecing, just squares, but I forgot to take a pic of just the top. Here it is, pin basted, ready for quilting.

The batting is cobbled together from leftovers, too. These little quilts are great for using up batting cut-offs from larger projects.

I used up most of the fabric scraps from the big quilt, but there was just enough left to eke out the binding.

Some straight line quilting (don't you love a Hera marker?!) and, voila, we have a finish. (Sorry about the too-bright photos - it was sunnier outside than I realized. The colors in the photo above are truer.)

The back also is pieced from leftovers, but there wasn't quite enough of the one so I spliced in a strip of the other. Oops, it's hanging upside down.

October's Nurses for Newborns quilt is ready for a spin through the washer and dryer, then it can be turned in with the rest of them in November.


link up: Sew Fresh Quilts

Monday, October 15, 2018

Something Bugs Me

Do you see it? Does it bug you too?

Look closer at the top and the bottom.

Ahhh, fixed. Much better.

So what was the problem and what did I fix? I didn't like the "missing" ends of the diagonals at the top and the bottom. Before: see the big space at the bottom of the second column in the photo below? It seems like another block should be there.

Fixed by adding another partial block to extend the visual diagonal.

I'm much happier with the result. I'm glad I found some fabrics in my stash that would work!

Sometimes you just have to see something on your design wall to know if it's working or not.


Link ups:
Small Quilts and Doll Quilts
Em's Scrapbag
Love Laugh Quilt

Friday, October 12, 2018

What I Worked on at Retreat

So Monday, after being at Sew Me for three days, I was almost too tired to write a blog post, so I just showed the bee blocks I made for my friends. Then Wednesday I recapped all the fun I had. Today I'll show the projects I worked on.

First, this one with propeller blocks made by my bee friends, shown here on the design wall as I was prepping for retreat. 

All the rest of the blocks needed were cut and labeled.  After I pieced them, I was able to join all the blocks into columns.

And laid them out on the floor in the hallway.

As you can see, the blocks are offset to create the diagonals, so borders are needed at the top and bottom to fill in the spaces. I was too tired at 11:00 at night to figure out the measurements, so I packed it up and came back to it the next morning.

A sideways view. You can see it laid out with the filler pieces. A couple of blocks will get cut off, one at the top and one at the bottom (sides, in this pic).

And all sewn up!

On to the next project. Sports Plus was planned and kitted up after I came back from Paducah last spring.

Since it was all organized, labeled and ready to go, it didn't take long to sew it together. It will finish at 48 x 56. I forgot to take a picture at retreat, so here it is on my wall at home.

It's a donation quilt, and quilts for older boys are always needed. I bought FQs of some of the sports prints and added other fabrics from my stash.

Several people asked at retreat what size I cut my squares and how I organize/label/pack a project like this for sewing later. I ended up giving an impromptu tutorial. The pieces are cut at 4-1/2" square to make best use of a fat quarter. With careful cutting you can get 16 pieces plus a leftover 2-1/2" strip from one FQ. If anyone is interested in my organization method, leave a comment and I'll write a separate post about that.

Last but not least, I made some headway on this project.

Last year I got a die cutter and I cut a bunch of 4" triangles. I sewed the HSTs together at last year's retreat, then arranged them on the wall after I got home. Here's sort of what the layout will look like, but there have been a few tweaks since.

This year I was able to start sewing the HSTs into rows. However, I soon discovered a problem, so progress was very slow. I only got this far (shown on my wall at home) when it was time to clean up and leave.

Last year I had pressed all the HSTs with the seam allowance going toward the dark side. But with this layout, there are many places where the seams wouldn't nest and would stack up, making it bulky and hard to match the points. So I needed to press the seams open, but I needed to keep the blocks in the right order and in the correct orientation. That meant working on only one stack of HSTs at a time, and placing them very carefully on the ironing board and restacking them so they'd come out in the same order. Slow going! I still have five stacks to re-press and add to the rows.

All in all I'd say it was a very productive retreat, including bee blocks for my friends Marie and Judy. I'm glad I had my projects all kitted up and didn't have to think too much about measuring and cutting.


Lots of projects and a lot of fun to whoop about, so I'm linking up with Whoop Whoop Friday over at Confessions of a Fabric Addict, and Friday Finish at Crazy Mom Quilts.