Monday, July 30, 2018

Design Wall Monday: A Whale of a Baby Quilt

Great Nephew #7 is on the way, due around the end of September. Because I'll have some grandma stuff going on in September, I want to get the baby's quilt done by the end of August, so if he comes early I don't have to scramble.

I'm using a cute whale print and three sizes of blocks, 9", 6", and 3" HSTs.


After making a few more HST's, I can start to play with layout on the design wall.

Getting there; not final yet but the concept is as I envisioned. A few more tweaks and I can start assembling this top.

The final size will be 39" wide by 45" long. I have enough of the whale print for the backing. I'd like the same navy for the binding, but I've used up all I have, so I'll probably use the medium blue Grunge for the binding. I have just enough lime green for piped binding if I decide to use it.

Hopefully I can tweak the layout and get the top assembled this week.


Link ups:
Small Quilts and Doll Quilts
Em's Scrapbag
Love Laugh Quilt

Friday, July 27, 2018

July N4Nb Quilt

I totally forgot to take WIP photos of my July Nurses for Newborns quilt. Actually it went together quickly this time.

For participating in Hands 2 Help, I received a bundle of Amy Smart's scraps. They were clearly all one collection, and mostly 4-1/2" squares or strips. I don't know what the name of the collection is because there wasn't any selvage info. The cute aqua and red prints reminded me that I had charms left over from a Scrumptious charm pack, and the colors and prints coordinated nicely.

A couple of extra prints from my stash were added, including a red floral that worked perfectly for the back and binding. The nurses prefer darker colors since these little quilts are used on the floor for tummy time.

Simple serpentine quilting over all the seam lines will help it crinkle up nicely after it's washed. (I did prewash the red backing; I hope the charms and scraps don't bleed).

One more sweet little N4Nb quilt done! STLMQG is collecting them in November, so I still have four more months to make them.


Linking up with Confessions of a Fabric Addict

Wednesday, July 25, 2018

Baby Whales

Great nephew #7 is on the way, due at the end of September. It's time for me to get going on a baby quilt for him. His mom likes blues and teals, and the baby's room may have a nautical theme, so I chose this super cute whale print...

 ...and some coordinates to go with it.

Some play in EQ7 resulted in a plan, and the blocks are started. Some big ones, 9". I specifically wanted a block with a large area to feature the print without chopping it up too much. There will be eight of these.

And some medium ones, 6". There will be eighteen of them. There will also be thirty-some 3" HSTs, which I haven't started yet.

I think this is the beginning of something cute. And it's a fun new project for me to work on. I hope to get it finished by the end of August so it'll be ready when the baby comes.


Linking up with Let's Bee Social at Sew Fresh Quilts


Monday, July 23, 2018

On My Design Wall: Pickle Dish Borders

One of my goals for this month is:
    - Add first borders to Pickle Dish top. Draft, cut, and start piecing second borders (to be paper pieced).

You know I've been paper piecing the second borders; I've posted about them a couple of times. Now the border strips are finished.

And then it occurred to me, when I take the paper off, those strips will be really stretchy. As planned, they measure 60-1/2 inches.

Just to be safe, I decided to add the inner and outer borders to both sides of the pieced strips before attaching to the quilt, that way the inner and outer borders will control the length of the pieced strip. I double checked the measurements of the quilt center. It should have been 60-1/2" but I found that it was 61-1/4".  No problem. I selectively removed a few scattered papers from the pieced border and eased it to 61-1/4". Then I joined the inner and outer borders and removed the rest of the paper.

Voila, top and bottom borders ready to add to the Pickle Dish quilt center.

The colored wedges will point toward the center, leading the eye into the quilt. The outer borders are an inch wider than the inner borders. Next month my goal will be to sew these and the plain side borders onto the top, to complete the flimsy.

Meanwhile, I'm thinking about backing. I have some of the Rifle Paper Company print left but not enough. If I want to use it for backing I'll have to order some more and it'll be a different dye lot. I looked on-line at images of the rest of the collection and I didn't see anything else I want to use. If I order more of this print I'll have to figure out how to handle any mismatch. Suggestions?


Link ups:
Small Quilts and Doll Quilts
Em's Scrapbag
Love Laugh Quilt

Friday, July 20, 2018

Friends and Fabric

Last week I had the pleasure of meeting up with friends from the quilting world. Julie Sefton, aka "Quilt Diva Julie" who blogs at Me and My Quilts, Exploring the Possibilities, was in St. Louis for a trunk show and workshop with one of the guilds in town. This is the first time I've met her in real life.
L-R: Me, Julie, Cherie, Kevin

Julie is the author of Build-A-Barn, No Pattern Construction.  She's friends with Kevin the Quilter and with Cherie (Quilted Jonquil) who was one of the members of Julie's "Secret Society of Barn Builders."
Julie's book, available from her blog

Julie's trunk show was terrific; she brought 40 quilts. She loves color, the more saturated the better, and her quilts all have a fun cheerful vibe. My favorite is her recently finished Spotted Winkle.

Kevin and I met up with Julie at a local fabric shop that just happened to be having it's FQ sale going on that day - FQs for $1.09 each. At that price, I stock up for making donation quilts. And, who am I kidding, for general stash enhancement. My stash report will take a hit this month.

Some warm colors:

Some good kid prints:

Some stash basics:

And some low volumes:

All good useful additions to the stash, and some of them will definitely find their way into Nurses for Newborns quilts or other donation quilts. 

In addition to my purchases, Julie very generously gifted me some yardage from her stash that she suggested I could use for backings for donation quilts. Thank you, Julie! 

I have met some of the nicest people through blogging. It's so fun to meet people in real life that I feel like I already "know" from their blogs.  I enjoyed your visit, Julie, and I hope we get to meet up again!


In other quilty news, the 12 Days of Christmas in July blog hop continues, hosted by Sarah at Confessions of a Fabric Addict. Check out all the posts for some clever gift and decor ideas while there's still plenty of time to make them before December. 


Wednesday, July 18, 2018

The Red Project: Prepping for Snowball Corners

I've been working on Dresden plate and checkerboard blocks each month for awhile, and I share my progress with my Alternative First Saturday friends to keep me accountable for moving forward. Prior to July First Saturday I finished the last Dresden block.

I put all the blocks on the design wall to take photos to show the girls my progress:

The next step in the process will be to snowball all the corners. Since I'm using several different blues, I don't want the same blue touching itself at any corner. So, as long as the blocks were on the wall anyway, I went ahead and worked on the layout. 

First I checked to make sure the same red wasn't touching itself in any of the corners. Then I added the cut pieces of blue I'll use for the snowballs, distributing the different prints around among the blocks. What a difference the snowball corners make! They reduce the blocky square effect you see in the photo above, and create strong diagonal movement.

The squares are just folded and pinned to the wall.

I labeled the blocks with their location numbers so I can take them off the wall and get them back in the right order later. I'll work on getting the snowball corners stitched in time for August First Saturday. After that, I'll applique the center circles to all the blocks for September First Saturday. Meanwhile, with everything labeled, I can take the blocks off the wall to use the wall for something else.

It's good to see visible progress on this project other than just individual blocks. Thanks, AFS friends, for keeping me accountable.


Linking up with Let's Bee Social at Sew Fresh Quilts

Monday, July 16, 2018

Dr. Seuss's Borders

The borders for my Pickle Dish quilt are coming along. I've got nearly 40" of each done now, towards a total of 60-1/2" each.

The length has become awkward so clipping them in the middle helps.

My husband thinks my Pickle Dish quilt looks like something from Dr. Seuss. I guess it's the combination of the color palette and the stripes. So I'm naming this quilt Dr. Seuss's Pickle Dish.

Hopefully I can get these paper pieced borders finished this week.

In other quilty news, Sarah at Confessions of a Fabric Addict is hosting the 12 Days of Christmas in July blog hop again this year. My post was yesterday (scroll down) but you can check out all the posts through the links at Sarah's post here.


Today I'm linking up with Small Quilts and Doll Quilts, Em's Scrapbag, and Love Laugh Quilt.

Saturday, July 14, 2018

12 Days of Christmas in July Blog Hop

Sarah over at Confessions of a Fabric Addict is hosting the 12 Days of Christmas in July blog hop, and once again I'm pleased to participate. Also participating today is Joanne of Everyone Deserves a Quilt. Visit all the other posts each day via the links over at Sarah's, and check out her 12DCIJ quilt along, too.

Have you ever needed a little something extra to include with a gift? Or a cute package topper? I have. So this year I'm making Christmas tree themed pot holders for "the girls."

These are inspired by this tutorial by Amy Smart of Diary of a Quilter. Check out her tutorial to make the trees. The only change I made was to start with 10" squares so my pot holders would end up square.

Some fabrics from stash:

Quick improv cutting:

Sewn together:

Fussy cut backing, so cute: 

Double batting, a little decorative stitching for the quilting, 
then trimmed to 8" and bound: 

Result: quick and easy pot holders, ready  - ahead of time! -  for gifting.


Be sure to visit everyone on the 12 Days of Christmas in July 
blog hop for some great gift and decor ideas.
 12DCIJ2017.jpg

Speaking of decor items, last year for 12DCIJ, I posted about a life size Christmas Tree wall hanging with real ornaments. It was my most popular post ever, as was the tutorial. If you're interested, you can check it out here.


Thanks for visiting, and enjoy the inspiration from the other bloggers. Thank you, Sarah, for hosting this event!

Friday, July 13, 2018

Plan C Top Finished

Fabrics for Plan C

With all the issues with fabric combinations and choices, yardage quantities, and layout problems for my Heart Builders tops, I ended up making three tops for them. 

Plan A was to use just the fabrics they sent and make one top: 
Fabrics provided by Heart Builders

Plan B was to use their focus fabric and a different light blue background, because there wasn't enough of the light blues they sent for the background I needed here.
Plan B Top

Plan B Part 2 was to use the light blue fabrics they sent, with some other fabrics from stash. Unfortunately as I tried to lay them out, the darks didn't play nicely with the light blues. I had a lot of large dark triangles left over. 
Fabrics for Plan B Part 2

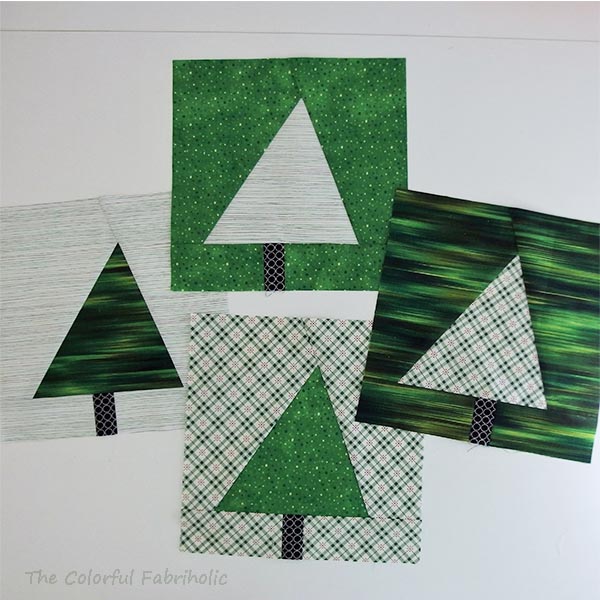
I didn't want the cut parts to go to waste, so Plan C was hatched. Adding a third dark, and some more lights, improved the palette. In the right proportions, with the right layout, these high-contrast fabrics work well together. The dark stripe, the ombre stripe, and the white linen stripe are recycled shirts. I especially like how the ombre stripe reads as a dark, but because it's such a bold pattern, it adds so much more interest than a solid-ish fabric would.
Voila, Plan C Top! 
Plan C Top. 44" x 60"

I like how Plan C turned out. It's actually my favorite of the three!

When Heart Builders sent the fabrics, they specifically requested a top for older boys. Apparently they get many more girly and little boy tops than they do tops for older boys, so that's their greatest need. 

I've contacted Heart Builders and now I'm waiting for them to send me the address where to ship these tops for quilting. Eventually the finished quilts will go to kids who are experiencing some sort of health crisis or upheaval such as transition into foster care. 

I'm happy to send three tops instead of just one. I'm counting these tops toward my lifetime personal goal of making 100 donation quilts for kids. I'm almost up to 50 now, I think.


Linking up with Whoop Whoop Friday at Confessions of a Fabric Addict


Wednesday, July 11, 2018

Plan C for Heart Builders

When these fabrics didn't all play nicely together in my Plan B Part 2 top for Heart Builders, I came up with a solution, but it left me with a lot of dark indigo crosshatch and ombre stripe triangles.

Some low volume triangles were left over, too. I didn't want all that fabric to go to waste. Time to come up with Plan C.

The problem with Plan B Part 2 was too much value contrast, in the wrong proportions. Occasional dark triangles scattered among the lights wasn't working. High contrast isn't necessarily bad; it all depends on how it's used. I just couldn't get the deep darks to work while I needed to feature those light blues.

Actually, strong value contrast can be a really good design element when it's used in the right proportions and with attention to balance. Thus, Plan C:

The ombre stripe is a recycled shirt. So is the navy stripe, and the white linen stripe. The grey herringbone is a recycled bed sheet. They play nicely together, and with the leftover low volume prints. They'll work for an older boy. Come back Friday and I'll have a finished top to show.

Heart Builders sent me fabrics to make one top. They're getting three. Other people will quilt these tops and bind them. Then the quilts will be given to kids whose life circumstances are in some kind of difficult transition. I'm happy to send three tops for a good cause.


Link Up: Sew Fresh Quilts

Monday, July 9, 2018

Slow Going...

...But Persistence Equals Progress

The paper-pieced borders for my Pickle Dish quilt are coming along. Slowly. These strips are about 15" and each will need to be 60", so I'm only a fourth of the way along.

Paper piecing these borders is effective, but I've made so many mistakes that I've had to rip almost as much as I've sewn. Wrong side up to start. Then several times I've added the next wedge wide ends together. So many times that I now have a note on my sewing machine to remind me, the wide end needs to line up with the narrow end of the previous wedge.

Ripping out mistakes from paper piecing is tedious. The easiest way I've found is to use a very sharp surgical blade type seam ripper and just touch it to the threads between the paper and the fabric, peeling the fabric away from the paper as you go.

Hopefully I can make some more progress on these borders this week. With much less ripping.


Link ups:
Small Quilts and Doll Quilts
Em's Scrapbag
Love Laugh Quilt