Monday, February 27, 2023

Plan C

 Earlier this month I posted about the project I'm working on at social sewing, my Chisel project using pieces cut with the AccuQuilt chisel die.

Plan A didn't work when I discovered that some of my chisel pieces were cut face up and some face down so they didn't all spin in the same direction. I came up with Plan B which would use the chisel pieces in columns with alternating left-right placement. Here's the EQ drawing for Plan B: 

EQ Plan B

Not wonderful, but the best I could come up with in EQ. However, notice that all the placeholder fabrics in the EQ drawing are blenders or batiks, nothing with a bold print. 

This layout absolutely did not work in my fabrics because it was way too busy. I didn't even take a photo, it was so bad. My fabrics include several bold prints in both the lights and the darks. With such a random layout and busy collection of fabrics, it was awful to look at. 

So, on to plan C. Plan C is like my original Plan A which makes stars. All the fabrics are cut facing the same direction. 
EQ Original Plan A

This means I can only use half of the chisel pieces I cut and I'll need to cut more going in the same direction. I was shooting for a twin bed size quilt but that's not going to happen. What I've ended up with will be a large throw. 

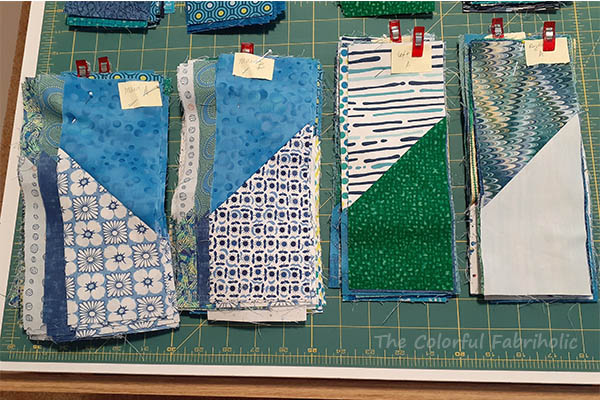
After more cutting and piecing chisel units at social sewing last week, I put the blocks and units on my design wall at home to figure out the placement.

See what I mean about busy prints? At least with this layout the value contrast makes the stars stand out which helps give it some sense of order. 

The blocks for the center were mostly sewn, but because I had to cut more different fabrics I unsewed some of the blocks and assorted in the new fabrics. Then I laid out the units for the border blocks. It was easier to do on the design wall than to make blocks and then try to lay them out with the same fabric not too close to itself. The border blocks have a dark piece substituted for one of the light pieces so the beginnings of new stars don't fall off the edge of the quilt.

As one of my social-sewing-and-lunch-bunch buddies said, this project has certainly been a learning opportunity for me. Yes, it has! This iteration will finish at 72" square, a large throw that can go to the hospice we support. 

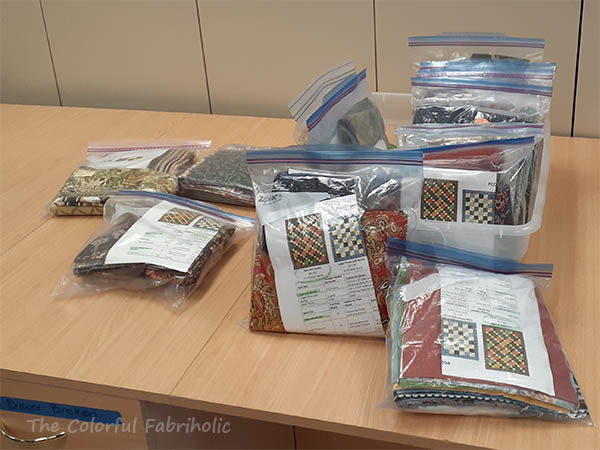
I'm left with a pile of chisel blocks and units that spin in the other direction, not enough for another large throw like this, but at least a medium throw. I'll kit them up with an EQ printout and either save them to finish later or donate the kit. I've had enough of this project!!!

No social sewing this week, there's a class in the room that day. Just as well, I'm having guests arriving Saturday and I need to clean, get groceries, and convert my sewing room to a guest room. Busy week!  

Monday, February 20, 2023

Community Service Sewing

 On Saturday, PCQ had a Community Service sew day, open to everyone, but mostly attended by committee members. We had 16 kits ready to sew. Everyone was invited to use one of our kits or bring a charity project of their own, perhaps one of our kits from last year that they had previously started. 

The kits were based on this prototype and this pattern: 


We had good attendance, a full house! Because we're focusing on larger quilts, twin bed size, we encouraged people to buddy up with a friend. Or they could work on a kit themselves if they wanted. The girls selected kits and those who wanted to, teamed up. 

We sewed until about 1:00; with snacks and chocolates available. Because we all know chocolate goes well with sewing! Normally we would have had the whole day for a Community Service sew day, but the room got double booked. We had to clear out for a beginner class whose members would be arriving at 1:30 to get set up. The reduced working time is another reason we encouraged teams to buddy up.

The room has one large design wall. Jackie and her partner made quick work of their four patches and were able to lay out their top on the wall. Theirs is a pretty kit; the borders are the same chocolate, teal and gold floral print as the four patches.

Knowing we'd need more design wall space, I brought a large flannel-backed table cloth which we spread out on one of the cutting tables. I've used it before as a portable design wall, and it worked well for laying out. Hiromi and Ruth teamed up. Their kit had a lot of pretty peach and terra cotta shades in it; their border is that brown floral. 

The availability of fabrics in the club's stash with sufficient yardage for the borders is what drove the palettes for each kit. The committee chair and I pulled fabrics for the borders several weeks ago, and I cut all the borders. Then members pulled the remaining fabrics to coordinate. We ended up with about 16 kits, maybe 17. Only two pairs of kits had the same border fabrics. Big thank you to whoever started to make curtains and gave up! 

Since I did all the cutting for the borders for the kits, plus much of the other cutting, I knew there was a kit that was cuter than the rest, featuring a blue daisy print plus a white and blue batik in the four patches that came from my own stash. I nabbed that kit to work on. I was able to chain piece the four patches fairly quickly. Then I laid everything out on my table cloth.

Obviously some of the solid squares need to be moved around. By this time it was time to clean up to leave, so I rolled up my portable design wall to keep the blocks in place. I can hang the whole thing on my home design wall, move blocks as needed, and kit up the rows for next time. 

The March Community Service sew day will be a continuation of this project. We have 4 or 5 kits still available for anyone new who joins us. Like February, our March sew day got double booked with the beginner class, so again we'll only have a half day to work. Anyone or team who doesn't get their top finished by then can work on it at home. Sometimes snowbirds take an unfinished top with them when they return home for the summer, or leave it at their PC house and work on it when they come back in the fall. No worries, no deadline. 

The quilts we're making from these kits are all twin bed size and will go to Natalie's House, New Life, or Magdalene House. Natalie's House is a group home for girls ages 6-16 transitioning into foster care. New Life is an agency for abused women and families that has casitas where they can live for a few months while they get their new lives in order. Magdalene House is a halfway house for women being released from prison. In all cases, the recipient of the quilt gets to take it with them
 when they move on. 


Linking up with Design Wall Monday at Small Quilts and Doll Quilts

Friday, February 17, 2023

Cube Challenge a la Escher

My M. C. Escher-inspired Cube Challenge project is finished. Back from the quilter, bound and labeled, in plenty of time to meet the Feb. 28 deadline. 

It's too big to photograph on my outdoor wall, so I can only show an indoor shot of the whole thing. The quilt is perfectly square; it's the photo that's askew. 

Alycia  quilted it for me and she did exactly the kind of quilting I asked for. Line work in the Y shapes and an allover paisleys in the background. Perfect!

It definitely meets the criteria for the challenge. The woman in charge of the challenge gave it a big smile and a nod of approval when I showed it at our guild meeting this week. 

When I was piecing it I hadn't decided yet whether it would be for the bed or would hang in our foyer. I gave my husband the choice before I ordered the batting for it. He chose to have it on our bed so I ordered wool batting. I wouldn't have anything else for a bed quilt; wool batting is so drapey and light weight. But I'd use something firmer and less stretchy for a wall quilt. As you can see in the top photo, this quilt works perfectly on our bed, and after the challenge show it'll live there permanently. 

The challenge quilts will be on display in PebbleCreek's Creative Arts Center in March. Two display windows and lots of quilts, so only a portion of mine will be visible. But I can definitely say I met the challenge! 


Link ups: Alycia Quilts, Confessions of a Fabric Addict, TGIFF, My Quilt Infatuation

Friday, February 10, 2023

Provence Prints JRR

The jelly roll race quilt I was working on last week is finished and ready to be donated. The jelly roll was an older collection in Provence-style prints. The front of the quilt is nothing special. As is always the case with JRR quilts, the prints just landed wherever.


JRR front

The back is actually much prettier than the front. It started as two colorways of the same print, also from the same designer but an earlier collection. 

With some careful piecing and alignment, the back came out prettier than the front. If I say so myself, I'm pleased with how well I was able to get the top centered on the backing when I long-armed it. 


Since I only had a yard of the white ground print, I had to piece it across the middle. Can you see where I seamed it? 


Neither can I, and I know where to look! I got lucky, the repeat was in just the right place, and with some careful glue-basting, I was able to perfectly match the print. The vertical piecing looks harmonious, too, although I lost the scalloped edges of the border prints where the yellow and the white came together. 

Since I like the back so much better than the front, I put the required PCQ label on the front in the least conspicuous corner, so now this is a pretty quilt with a pieced backing. 

It's a donation quilt for the local family services agency or hospice. I'm sure someone will like it. 


Monday, February 6, 2023

Chisel Project for Social Sewing

 After I finished my Four Patch Shuffle top, I needed a new project to piece at social sewing. I have the Accuquilt Chisel die and I've been wanting to play with it, so I spent some time working on ideas in EQ8. I've also been wanting to make something in a palette of blues, teals, and cool greens, always a successful palette when done scrappy. 

Here's the initial concept in an EQ rendering: 

The chisel die makes 9" blocks so I planned a twin size quilt. The top as shown is 63 x 90" and I planned to add another 3" strip of chisel units to each side to bring the width up to 69".

I counted the number of light and dark pieces I'd need, pulled fabrics, and started cutting. I got everything cut in a couple hours. 

And then I discovered the problem. 

When the chisel die is used with the fabrics wrong sides together as it comes off the bolt, the die cut pieces are mirror image of each other. There's a left pointing shape and a right pointing shape. In the EQ illustration above, all the shapes are the same. Only the blocks are rotated. 

Since I'd already cut hundreds of chisel pieces, at this point I had two options. 

1) Make two small quilts, one with pinwheels rotating clockwise and the other rotating counter clockwise.

2) Change the design to something that could use both shapes of chisel pieces.

Back to EQ, I changed half of the blocks to feature chisel pieces going in the other direction. In the original layout, the pinwheels became odd shapes. I don't care for this; it looks like a mistake. I know they say if you make a mistake, repeat it several times and it becomes a design choice. Um, no thanks.

After more play in EQ, this is the best option I ended up with.


 Yes, it's busy, but nothing else works with the cut pieces I have and I don't want to waste them. It's a donation quilt and I'm sure it will look fine on someone's bed. 

So at social sewing I've been piecing pairs together, and when enough pairs are together I'll put them into blocks. 

There are right-facing blocks and left facing blocks for the quilt center, different pairs for the top and bottom rows, and different pairs for the left and right columns. The top, bottom, left and right blocks are colored differently to create the look of a border. In order to make this work, the quilt will finish 72 x 90", all blocks, no actual borders. 

A trick I've learned when making controlled scrappy quilts, where I don't want the same fabric touching itself in the final layout, is to sew the same two fabrics together, then the same fabrics into a block, That way I can move whole blocks around in the final layout without any of the fabrics in them touching itself. Sometimes due to my fabric quantity I wasn't able to always do that, but I'll scatter the odd pieces as much as possible and I don't think it will matter in the end. At social sewing I'll continue sewing pairs together and assorting them into blocks. 

It'll be awhile until I can get this top to the point of putting it on the design wall and laying out the blocks. No social sewing this week; I have something else going on. 


Link up: Small Quilts and Doll Quilts


Friday, February 3, 2023

January Stash Report and Goals Update

January was a busy month, but I really don't have many blog-worthy photos to show for it. A lot of my time was spent cutting for charity quilts and kitting them up. 

One of the things I got done in January was a jelly roll race top, blog post and photos coming when I get the quilt finished. I never counted the jelly roll as yardage into my stash so I'm not counting it out. Also, I've used a combination of my own and PCQ's stash for a charity sew day teaching sample, so I'm only counting my own fabrics used. Even so, January was a great month for stash usage to kick off the year. Let's see how I did. 

January Stash Report: 

OUT this month and YTD: 12 yards (4 patch variation teaching sample top, my fabrics, 3-1/2 yards. Backing for jelly roll race, 3 yards. My fabrics donated to charity quilt kits, 5-1/2 yards)
IN this month and YTD: 0

YTD Net Change: 12 yards OUT

Four Patch Variation top, teaching sample for 
PCQ Charity Sew Day

Goals Update: 

January Recap: 

1. Continue quilting Candy Land. Progress

2. Continue piecing Four Patch Shuffle. Top is finished, although half of the blocks are turned in the wrong direction. It's fine as is so I'm not changing it. 

3. Publish tutorial for Four Patch Shuffle. Yes, with the blocks illustrated in the correct direction. Tutorial here.

4. Work on plans for prep days and sew days for PCQ charity projects, which includes making test tops and writing patterns. Yes, finalized the February pattern and teaching sample, and I cut some or all of the parts for at least 16 kits. 

Other:
 - Started a new project to work on at social sewing using the Accuquilt chisel die.
 - Pieced a jelly roll race top and a backing to go with it; quilted it on PCQ's long arm.
 - Bound and labeled Cube Challenge after it came back from the quilter. 

Four Patch Shuffle top


Kits for PCQ Charity Sew Day


The jelly roll race quilt and my Cube Challenge will get their own blog posts with photos soon. Meanwhile, here's a sneak peek of the quilting, by Alycia Carmin of QuiltyGirl:


February Goals: 

1. Bind jelly roll race quilt. 

2. Continue quilting Candy Land. 

3. Continue piecing Chisel project at social sewing.

4. Continue working on plans for prep days and sew days for PCQ charity projects.

5. Make a table topper for new sewing room cabinet.

6. If time permits, make a small Mariner's Compass wall hanging for a specific wall space in my sewing room. 

7. Quilt something on PCQ's long arm.

Much of my time in February will again be spent working on prep for PCQ charity patterns and sew days, which I enjoy doing. In addition to finishing the prep for the February sew day, I need to work on the pattern for the March project and help the committee get started on the March kits. February's a short month and I have some non-quilty things going on, so we'll see how much of this list of goals I can get through.