Friday, October 29, 2021

LCT: Not Finished, But the Quilting Is Coming Along

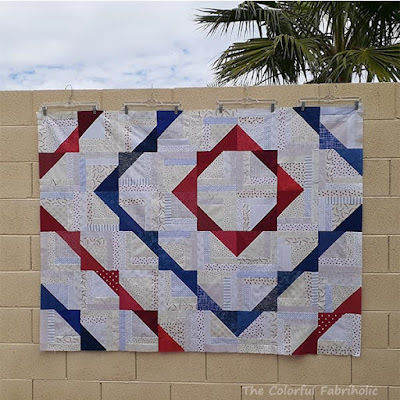
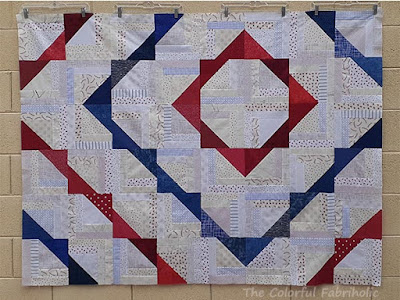
 I found wide backing that I like for my white-based Log Cabin Triangles quilt. It took awhile for my order to get here, but it finally arrived and now the fabric has been washed and pressed. 


At 54 by 72 inches, this quilt is much too large to baste on top of my cutting table, so I moved the furniture out of the way and basted it on the floor in my sewing room. Crawling around on the floor is certainly not my favorite part of the quilting process, but since I want to spiral quilt this one, it needs to be well and securely basted. I use ordinary straight pins, because my arthritic hands don't like safety pins and the straight pins are easier to remove during quilting. 


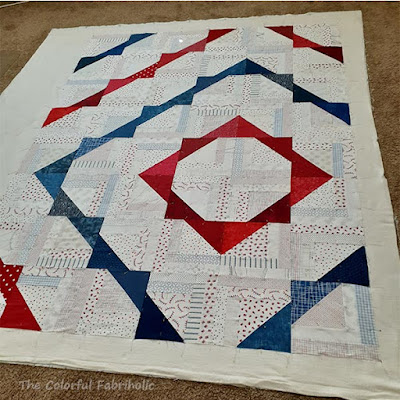
Round and round... I mark the center with a template, then use a gauge on my walking foot to align the quilting. I'll come back and free motion the marked center later. Going clockwise, each round will get closer and closer to the edge of the quilt. The spacing here is 1-1/2" apart, the same as the width of the logs.  


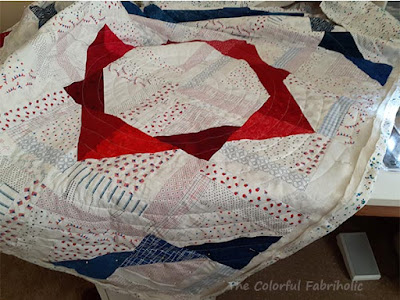
Since I start the quilting in the center of the block layout, not the actual center of the quilt, as I go around the quilting gets to one edge sooner than the other edges. I've learned, having done enough spiral quilting, that that's a very good time to check the bobbin. That's where the progress is in the photo above. 

Lots more rounds - partial rounds now, since I'm off one edge - to go. After awhile I'll get to another edge, then the quilting will get easier because I won't be wrangling the whole thing. Last, I'll echo the spiral lines with the same spacing to fill in the corners. 

So, not a finish today, but definitely progress. Maybe a finish next week? 


Monday, October 25, 2021

Snake Quilt Update

 It's been awhile since I've shown any progress on my Snake quilt. I've been working on the blocks at social sewing on Wednesdays when I haven't been working on something else. I put the blocks back up on my design wall to see how far along I am. 


Slowly but surely the blocks are coming along; it looks like I'm about two thirds done. There's no deadline for this project, so I can work on it when I like, and move on to something else when I get tired of it. 


Linking up with Small Quilts and Doll Quilts and Love Laugh Quilt

Friday, October 22, 2021

WIGSP: The Very Last Stitches, Finally Finished

 Whoo-hoo! My hand pieced Work In Glacially Slow Progress is now a finish. Label, sleeve, and hand-stitched binding and all. I put the very last stitches in the sleeve earlier this week. 

It's much too big to photograph on my back yard wall, but I'll get a full photo of it sometime. Meanwhile, here it is FINISHED, draped over my sofa and coffee table.


Wool batting, beautiful drape.


My friend Sandy quilted it for me, with several different motifs in the hexies and continuous curves in the triangles. 


I'm really pleased with how it turned out. 


This quilt is now named How Many, and I want to thank everyone who helped make it over a 13 year span. 

Hand pieced by 33 members of CSQ Piecing Group

345 different batik fabrics in the top

126 hexies with 18 pieces each

756 pieced triangles

2268 little kite shaped pieces

420 black triangles and 56 black half-triangles including borders

2744 total pieces in the top

12 years to piece the top over 8 go-rounds of Piecing Group

Backing custom dyed by Vicki Welsh of Colorways by Vicki

About 96" x 98"


Link Ups: Confessions of a Fabric Addict, Alycia Quilts, Wendy's Quilts and More, My Quilt Infatuation

Friday, October 15, 2021

LCT Flimsy

Actually I wrote a finish post for my Log Cabin Triangles flimsy last week. Then I previewed it to proofread one more time and discovered this. What's wrong with this picture? And why did I not see this when I was editing photos???


Needless to say, I did not click Publish last week. 

Fortunately it was an easy fix, so let's try this post again this week. Much better. 

I like the white background prints in this one. It makes it different than all the other LCT quilts I've made that had ivory and beige low volume prints. 

At 54" by 72", this is a nice throw size. 

Now I need to order backing for it. I'll spiral quilt it like all my other LCQ quilts. 

I'm hoping to share this pattern with my PCQ friends. Meanwhile if you'd like to make LCT blocks for any charitable purpose, the tutorial is here: LCT Block Tutorial


Link ups: Confessions of a Fabric Addict, Alycia Quilts

Monday, October 11, 2021

Planning Another Project for Social Sewing

But first, a housekeeping note: 

Sometimes when people leave comments, the comments don't come into my email as they're supposed to. Therefore I don't see them until I go into Blogger to moderate and publish them. Because they don't come into my email, I am unable to reply to them. Likewise, I'm unable to reply to comments that come from No-Reply commenters. Please know that I enjoy all the comments you leave, even if I can't reply to you, and I appreciate your visits to my blog. Thanks for allowing me to share my quilting journey with you. 

                                                ~ ~ ~ ~ ~ ~ ~ ~ ~ ~ ~ ~ ~ ~ ~ ~ ~ ~ ~ ~ ~ ~ ~ ~

Now onto our regularly scheduled Design Wall programming.

Last week I was working on a simple patchwork of Asian squares, and at social sewing on Wednesday I got the borders added, backing pieced (Thanks, Hiromi!) and batting cut. It's all packaged up ready to be quilted, and I'm on the schedule to use the club's long arm in a couple weeks. I even have an experienced helper to coach me, for which I'm grateful. 

This week I'll need a new project to sew on at Wednesday social sewing. A few months ago Libby (Life on the Hill) sent me the cutest Sock Monkey fabric along with some other fabrics. Knowing I make donation quilts for kids, she thought I'd like it. I do! So, how to feature it and what to coordinate with it? 

I can feature it in a Plus quilt. I pulled coordinating reds, greys, and tans from my stash and threw in a couple of recycled plaid shirt pieces as well. The red text print also came from Libby and it complements the sock monkey print nicely. 


I cut the squares 5" and I have 11 columns by 14 rows, so the top should finish at about 50" by 63". That's a good size for a middle school age boy, and there's always a need. 

The most fun part of making a Plus quilt is choosing the fabrics and laying them out. After that it's just easy sewing. Once laid out, I can kit it up and take it to social sewing, where I can (hopefully!) sew it together easily. 

When I kit up a project like this, I carefully take each column off the wall in order from top to bottom and label the columns. This way everything will be in order when I sew it together. So now it's off the design wall and packed with the rest of my portable sewing stuff to carry to social sewing on Wednesday. 


Wednesday, October 6, 2021

Zippy Strippy Bags

One of the charities supported by the PebbleCreek quilt club is a family services agency that helps women and families dealing with domestic violence. One of the ways we help them is by providing Zippy Strippy bags filled with toiletries. The children are allowed to select a Zippy Strippy bag so that they have a gift to give to their mom at Christmas. 

We recently had a work day for making the bags, which was well attended. 

The facilitator, Donna, had previously kitted up the fabric strips and had all the trims available.  She was an excellent teacher and helped when needed so we got all the steps in the process. She also took photos; most of the photos in this post were taken by her. 

Here are Karen and I showing off our finished bags.

The group was able to make lots of Zippy Strippy bags that day, and the ones that didn't get finished were taken home to be finished later. 

Once I learned the process, it was easy to make the bags. There are still more kits available and more bags are needed, so I'll probably make another at social sewing. 


Link Up: Quilt Fabrication

Monday, October 4, 2021

Design Wall at Social Sewing

Recently at PebbleCreek's quilting room, someone was giving away items from a quilter's estate. Among the things left over at the end was a baggie of 6" squares of Asian prints. Someone offered to take them and cut them up for dog bed stuffing if no one else wanted them. Since there seemed to be quite a few squares in the baggie, I said I'd take them and make a simple quilt for the hospice our group supports. 

There were about 50 squares in the baggie. I planned a simple checkerboard setting, something easy to put together during social sewing when I get together with others in the room. 


Although I could have used light prints from the club's stash, since this is a donation quilt for one of their approved charities, I found something in my own stash that's even better and that I'm happy to use here. It's a gold metallic print left over from one of the Cut and Shuffle book quilts I made in 2014. Many of the Asian prints have metallic in them, so this is perfect. 


After figuring out how many rows and columns I'd need, I sewed dark and light squares together, reserving enough for the ends of rows. Then I laid out the sewn pairs and the extra pieces on the design wall in the quilting room. 


Some of the girls in the room at the time offered suggestions about which prints to move where, so much rearranging was done before I had a final layout. Then I clipped the columns together, took it all off the wall, and assembled the top. 


It came out to about 50 by 60 inches, and I'd like it to be a little bigger if possible, so I searched through the club's stash for something suitable for a border. I only found one option, a large scale Asian print with metallic in it, but we all agreed it will work.

There's just enough to add borders all the way around that are half the width of the squares, bringing the size of the quilt up to about 55 by 65 inches. I think that will be okay for hospice. 

While I was working on this, a PCQ member that I hadn't met yet came up to me and asked about the squares. Turns out, during the destashing, she had taken the baggie, taken a few of the squares that she wanted, and returned the baggie. She wanted to see what I was doing with the "leftover" squares. We had a great conversation for awhile, and I learned that she's one of the teachers who certifies newbies on the long arm, so we agreed that whenever I'm ready to quilt this donation quilt, she'll help me. It'll be reassuring to have someone experienced to help me remember what I'm doing. 

Have I mentioned lately how much I enjoy living here and being part of this group? 😀


Link Ups: Small Quilts and Doll QuiltsLove Laugh Quilt

Friday, October 1, 2021

Two Finishes

I'm celebrating two finishes today, but only one is a quilt. 

I finished quilting and binding my Kool Kaleidoscope. After running into issues with borders, I decided to leave it as is, no additional borders.


I love the concept and the process; my result here is okay. I've seen Kool Kaleidoscopes made by others that I like better. It's all about the fabric selection, and I have too many similar color/similar value orange prints next to each other. I do like the black batik with teal highlights. 


I got a bit too fussy with the quilting and it doesn't even show; I should have just done a large allover meander with one color thread in the medallion. The border has a medium meander in black thread and that's fine. Here's the quilting on the back, kind of spider web-ish. Which I guess is appropriate for October! 


The finish I'm really excited about was made by my husband, a customized pueblo ladder to hang quilts on for my family room.


Pueblo ladders are narrower, too narrow to hang bulky quilts. He built this from two pueblo ladders, an 8 foot and a 4 foot, by removing the rungs and cannibalizing the smaller ladder to make new rungs. This 8 foot ladder was originally only 8" between the uprights at the top. He spliced the rungs together to get enough width, about 14" between the uprights at the top and 18" at the bottom. I love it! It fills the space nicely and allows me to display some quilts. I plan to leave the top rung blank to show it off. 

He worked on this for several weeks and it turned out beautiful. You can't see any of the splices in the rungs, he blended them so well. I'm so glad - and lucky! - to have such a handy husband.  


Link Ups: Confessions of a Fabric Addict, Alycia Quilts, Wendy's Quilts and More, My Quilt Infatuation