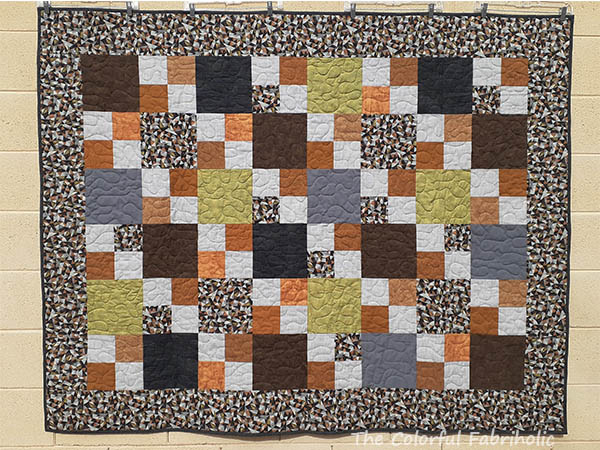
My Four Patch Shuffle top is done and may become a teaching sample and later a donation quilt. Here it's shown sideways because it's too long to fit on the wall.
As promised, I'm offering a tutorial, and here it is. Text and images copyright Jan Ochterbeck 2023.
Four Patch Shuffle
Finished Size 56” x
72” Block finished size 8”
The blocks for this
quilt are created by making simple framed square parent blocks, cutting them
into fourths, shuffling the parts, and reassembling the blocks four at a time.
Fabric Requirements
White: 1-5/8
yards
Black: 1-3/8 yards
Four Colors, each: 1/2 yard. Shown here as Yellow, Blue, Green, Orange.
Cutting
WOF (width of fabric) strips are based on 40” width and
yield 4 pieces cut 9” long, or 8 pieces cut 5” long.
·
White:
o
Cut 5 5” WOF strips.
Sub cut them into 5” squares. Total 40 squares.
o
Cut 12 2-1/2” WOF strips.
Sub cut 8 WOF strips into 9” pieces, total 32 9” pieces.
Sub cut 4 WOF strips into 5” pieces, total 32 5” pieces.
·
Black:
o
Cut 2 5” WOF strips. Sub cut them into 5”
squares. Total 16 squares.
o
Cut 12 2-1/2” WOF strips.
Sub cut 8 WOF strips into 9” pieces, total 32 9” pieces.
Sub cut 4 WOF strips into 5” pieces, total 32 5” pieces.
·
Each
Color:
o
Cut 6 2-1/2” WOF strips.
Sub cut 4 WOF strips into 9” pieces, total 16 9” pieces.
Sub cut 2 WOF strips into 5” pieces, total 16 5” pieces.
Making the parent blocks: There are two types of parent
blocks to make two sets of final blocks.
All seams right sides together, 1/4” seam allowance.
Parent blocks should measure 9” square including seam
allowances when sewn. Accuracy in making the parent blocks will ensure better
results in the final blocks.
·
Primary
parent blocks
o
Sew 5” colored or black pieces to the top and
bottom of a white square. Press seams toward the color.
o
Sew 9” pieces of the same color to the sides to
complete the parent block. Press seams toward the color.
o
Make 16 black-framed parent blocks.
o
Make 8 of each color parent blocks.
· Secondary
Parent Blocks
o
Sew 5” white pieces to the top and bottom of a
black square. Press seams toward the black.
o
Sew 9” white pieces to the sides to complete the
secondary parent block. Press seams toward the black.
o
Make 16 black-centered white-framed parent
blocks.
Cutting the Parent Blocks: Each
parent block should measure 9” square.
·
Cut each one in half vertically at the center,
4-1/2” away from the edge.
·
Then cut each one across horizontally at the
center, again 4-1/2” from the edge.
·
Resulting quadrants measure 4-1/2” square.
· Cut all the
parent blocks into fourths.
Making the Final Blocks:
Block A Yellow/Blue: Each
sewn block should measure 8-1/2” square including seam allowance.
Chain piecing is recommended. Make four of the same block at
a time from one yellow and one blue parent block and two black and white parent
blocks.
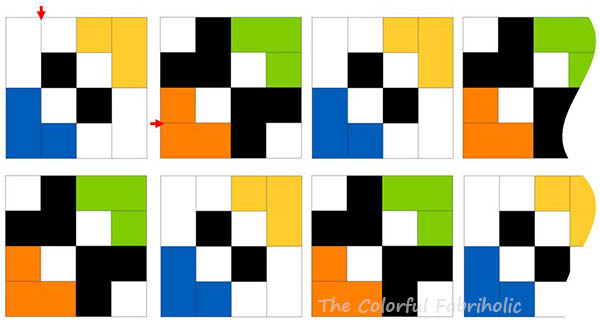
· Lay out block quadrants as shown.
o
Note direction of frame seams (red arrows); make frame seams
go the same direction within each block.
o Half of the blocks will have vertical frame seams and half will have horizontal frame
seams.
·
Matching frame seams where needed, sew top two
block quadrants together; frame seams should nest. Press seam toward the color.
·
Likewise, sew bottom two block quadrants
together.
·
Matching centers and frame seams, sew top and
bottom halves of block together four patch style.
·
Press and if desired, spin seams.
·
Repeat using all yellow and blue block quadrants
to result in 32 Block A’s.
Block B, Green/Orange:
Each block should measure 8-1/2” square including seam allowance.
Chain piecing is recommended. Make four of the same block at
a time from one green and one orange parent block and two black and white
parent blocks.
· Lay out block quadrants as shown.
o
Note direction of frame seams; make frame seams
go the same direction within each block.
o

 Half the blocks will have vertical
frame seams and half will have horizontal frame seams.
Half the blocks will have vertical
frame seams and half will have horizontal frame seams.
· Matching frame seams where needed, sew top two
block quadrants together. Frame seams should nest. Press seam toward the black.
·
Likewise, sew bottom two block quadrants
together.
·
Matching centers and frame seams, sew top and
bottom halves of block together four patch style.
·
Press and if desired, spin seams.
·
Repeat using all block quadrants to result in 32
Block B’s. There will be one extra Block B left over after top is assembled.
Quilt top assembly:
· Lay out Blocks A and B in rows of
seven. Make 9 rows.
o For best seam nesting, alternate blocks with vertical and
horizontal frame seams.
·
Alternate
placement of Blocks A and B to create light and dark visual diagonals.
·
Sew blocks into rows; press all seams toward
Block B.
·
Sew rows together; seams should nest. Press row
seams all in one direction.
Quilting and finishing:
Backing: If
pieced horizontally, 3-1/2 yards of fabric are needed. If pieced vertically,
4-1/2 yards of fabric are needed.
Batting: at
least 64” x 80”
Quilting:
Quilt as desired. Because of the strong diagonal stripe effect created by the
placement of light and dark, avoid a pantograph that features a strong diagonal
repeat which could fight with the visual diagonal.
Binding: If
cut 2-1/4” wide, need 5/8 yard. If cut 2-1/2” wide, need 3/4 yard. Cut 8 WOF
strips.
Alternate layouts:
Original Layout:
Each color is separated from the others.
Alternate Layout:
The four colors come together. This results in
more prominent diagonals.
Quilt of Valor
variation, original layout:
- Substitute dark navy or deep charcoal grey for black.
- Substitute red for both yellow and orange. Total 1 yard
needed or go scrappy.
- Substitute medium blue for both blue and green. Total 1 yard
needed or go scrappy.
Note: Be sure there is strong value contrast between the navy or charcoal grey and
the medium blue. Choose a bright red rather than a dark red.
Size as shown is 56 x 72”. Option: Add 4” borders to enlarge top to 64” x 80”. Borders will require 1-1/8 yards of fabric. Cut 8 4-1/2” WOF strips.
I had fun with this Four Patch Shuffle, which is similar to my Cut and Shuffle method, and I hope if you like the tutorial, you'll have fun with it too. (Book is out of print) If you'd like a PDF of this tutorial, leave a comment and be sure to include your first name and email address in the text of the comment.
My top will eventually be quilted and will be donated to the local family services agency.
PS - Pardon the formatting irregularities. Blogger doesn't cooperate when I copy and paste from a Word document and add pictures.
Link ups: Small Quilts and Doll Quilts, Quilt Fabrication, My Quilt Infatuation, Alycia Quilts, Confessions of Fabric Addict, Wendy's Quilts and More,