Monday, June 30, 2014

DWM 6/30/14: Embarassing

Updated Wed. 7/2 to link up with WIP Wednesday at Freshly Pieced. If you're visiting from Freshly Pieced, I'd love your input about how I can fix this.

Here's what's on my design wall today: probably the ugliest quilt top I've ever made!

I started with this collection of fabrics, but it all went downhill from there.
 
The problems have to do with value and proportion. The value contrast between the teal and everything else is much too strong. Plus, the value contrast between the stripe and the background is not strong enough.
 
Compounding the problem, I chose to make multi-fabric Churn Dashes instead of all the same fabric, and the result is choppy. Only after I had made 12 of them did I realize this.
 
So I added a few solid Churn Dashes, thinking it would help. (By the way, this is a much more accurate photo of the teal color; it really isn't as dark and blue as it looks above.)
 

The sashing print doesn't contrast enough with the background. The overall effect is that the background and the sashing are all the same value. The proportion of light and dark is off balance, with pops of too-dark against too much too-pale light.

I'm disgusted with myself because I should have known better. I should have played in EQ before wasting all this fabric (2-1/3 yards).

The only thing I can think to do to salvage it is to cut most of the outer blocks off and add borders. This changes the relative proportions of the lights and darks so it's not quite so bad, but still not great. I have enough of the stripe and the teal for borders, and I'm leaning toward the stripe. With 4" borders added to this center, it would finish at 46 x 46" for a kid's donation quilt.

What do you think? Any other suggestions for salvaging it?

Linking up with Judy at Patchwork Times; check out everyone else's much prettier projects over there.

Sunday, June 29, 2014

June Stash Report & Goals Update

Stash Report: June was actually a good month for the stash!
June IN: 2.375 yards
(1 yard bought at friend's sale; 1-3/8 received from STLMQG for Charity Pay It Forward)
June OUT: 6.125 yards
(STLMQG free table donation, scraps, 1-1/4 yards; Michael Miller Challenge, 1-7/8 yards; Dresden Rows binding, 5/8 yard; bad Churn Dash top, 2-1/3 yards, story tomorrow)
June Net Change: 3.75 yards OUT

YTD IN: 129.875 yards
YTD OUT: 87.53 yards
YTD Net Change: 42.345 yards IN
Since my goal is to break even for the year, I need to get busy and finish a few things so I can count more out. And of course refrain from acquiring more fabric. Yeah, right. :-)

June Finishes:
Michael Miller Fabrics Challenge, Table Runner
 
Dresden Rows
 
June Goals, update:
1. Complete Michael Miller Challenge.  DONE
2. Finish quilting Dresden Rows. Quilted, bound, labeled, FINISHED.
3. Design & start on special baby quilt. Designed & started.
4. Keep up with bee blocks. DONE
5. Optional: Design CSQ 30-Something challenge. Not done; not feeling inspired...

July Goals:
1. Complete special baby quilt top.
2. Quilt & finish girl charity quilt.
3. Work on Broken Chevron UFO.
4. Keep up with bee blocks.
5. Press Mega Medallion top & backing and give to Sandy for quilting.
6. Optional: CSQ 30-Something challenge, due Oct.21.

My July goals are pretty simple. I'm not feeling much quilting mojo these days; I guess maybe I pushed so hard for several months to get all the book stuff done that I feel less pressure now. I actually miss writing patterns, but I don't have anything suitable ready to write up right now.

Linking up with Judy at Patchwork Times; check out everyone else's stash management efforts over there.

Wednesday, June 25, 2014

WIP Wednesday: Making HSTs

I was inspired to play with Churn Dash blocks so I pilled fabrics from stash and I've been making Half-Square Triangles. They'll finish at 3" for 9" blocks.

I'm using Triangles on a Roll paper, my favorite method for HSTs. Here's the paper pinned to the fabrics. I pin it to the lighter fabric so when I press, I can press the seam allowances toward the darker fabric.
 
Here's a close-up of the instructions:
 
For 12 blocks I made 48 triangles. Here they are cut apart:
 
Nest step: tearing off the paper and trimming the ears:
 
Striped fabrics end up vertical and horizontal, but when you move the HSTs around they work:
 
 
I'll be playing with these some more this week. Meanwhile, I'm linking up with Lee at Freshly Pieced; check out the other WIPs over there.

Monday, June 23, 2014

DWM 6/23/14: Miscellaneous Parts

HSTs:

Border Parts:
 
Test Block:

The test block is totally unrelated to the HSTs and borders. It's just a tryout of an idea and a method, and it didn't work too well: wrong value contrast, disproportionate borders, and awkward finished size (10-3/4"). I used only scraps and leftover pieces, which explains the poor fabric selection. At least that's my excuse. :-)

Linking up with Judy at Patchwork Times; check out all the inspiring design walls over there.

Sunday, June 22, 2014

Stash Report 6/22/14

A good week: Nothing in - Yay! and 1-7/8 yards used for my Michael Miller Challenge project. I've started cutting other projects but I can't count them out yet; they're not far enough along.

A fellow new blogger recently asked about a pattern for the traditional Churn Dash, which inspired me to do something with Churn Dash blocks. So I pulled some fabrics from stash:

Here's the teal. This is a better representation of the color; teals often photograph too blue. All the teals in the fabrics above are green like this. Fun and modern-ish, right?
 
Did I mention I pulled from stash? Check out the date!

 
Linking up with Judy at Patchwork Times; check out how everyone else is using their stash over there.

Friday, June 20, 2014

Friday Finish: MMChallenge Table Runner

Finished!
MQG Michael Miller fabrics challenge, 12" x 42" table runner:
 
Matchstick quilting in the background and stippling in the prints:
 
 
Linking up with Finish it up Friday at Crazy Mom Quilts and with Whoop Whoop Friday at Confessions of a Fabric Addict

Thursday, June 19, 2014

How to make a Churn Dash block

A fellow new blogger asked where to fine a pattern for a plain Churn Dash block, not a nested one. The Churn Dash block is traditional and is in the public domain. 

Churn Dash block

A Churn Dash is basically a nine patch and you can easily make your own pattern. I suggest a finished size that's divisible by 3, such as 6", 9" or 12" finished. Let's use 12" finished for this example. (Block will be 12-1/2" unfinished with seam allowances.)
 
You will need 1 (one) 4-1/2" cut light square for the center.
 
You will need 2 (two) strips cut 2-1/2" wide by 19" long, one light and one dark.
 
You will need 4 (four) half-square triangles, light-dark combo.
 
Sew the strips together lengthwise, right sides together, 1/4" seam. Press the seam allowance toward the darker fabric. Square up the end of the strip, then cut across the width of the strip to make 4 (four) 4-1/2" cut squares.
 
For four HSTs to finish 4", cut 2 (two) 5" squares of light fabric and 2 (two) 5" squares of dark fabric. Draw a diagonal line from opposite corners across the wrong side of the light squares. With light and dark squares right sides together, sew 1/4" on each side of the diagonal line. Cut on the diagonal line. Press seam allowances toward the dark fabric. Square up and trim the HSTs to 4-1/2".
 
Lay out the units in the Churn Dash block and sew rows together. Press seam allowances of the top and bottom row toward the outside and middle row toward the center. Join rows together, matching and nesting seams.
 
I hope these quick instructions help!

Wednesday, June 18, 2014

WIP Wed. 6/18/14: Quilted & ready for binding

I'm coming right along on my MQG Michael Miller Fabrics challenge.
The quilting is done and my table runner is all squared up and ready for binding.
I stitched matchstick quilting in the grey background and stippling in the prints.
 
MQG Michael Miller Fabrics Challenge, detail

MQG Michael Miller Fabrics Challenge, front, 12" x 42"
 
MQG Michael Miller Fabrics Challenge, back
 
Linking up with Lee at Freshly Pieced for WIP Wednesday; check out all the inspiring projects over there!
 

Sunday, June 15, 2014

Stash Report 6/15/14

IN: 2-3/8 yards.
  • 1-3/5 yds of leftover donated fabric from guild's charitable project, to be used for any charitable project of my choice. Must be used for a donation project.
  • 1 yard of B&W print from a friend's fabric sale, because you can never have enough black & white, right? I think it will make great binding.

OUT: 5/8 yards for binding on Dresden Rows.

Still moving in the wrong direction here. I'll tally up the damage at the end of the month.

Linking up with Judy at Patchwork Times; see how everyone else is doing better at reining in their stash than I am!

Friday, June 13, 2014

Finally Finished: Dresden Rows

Dresden Rows

This has been in the works for nearly a year, due to all sorts of issues: selecting the background, problems hand-appliqueing the points, changed priorities due to deadline projects, quilting challenges, and thread issues. Special thanks to my friend Cherie for helping to applique the points to the background when I found it too painful. All the problems have finally been resolved and it's finished!  You can read about the top here and the quilting here. I finished the quilting using Superior Threads monofilament thread, very fine and soft; I really like it and will use it again.

So, after all that, I'm pleased with how it turned out. It finished at 49" by 71", a good size for a sofa throw. Love that binding!


The backing is perfect! I found it after I had pieced all the rows for the top, so the backing fabric did not establish the palette. But it sure complements it well! 
 
A close up of the quilting: Meander in the background, chevrons in the rows. 
 
The photo shoot was well supervised.


Linking up with Friday Finish at Crazy Mom Quilts and Can I A Whoop Whoop at Confessions of a Fabric Addict. Check out all the lovely finishes over there!

Wednesday, June 11, 2014

WIP Wednesday - My MM Challenge Blocks: A Fiddly Process

Small is cute, right?
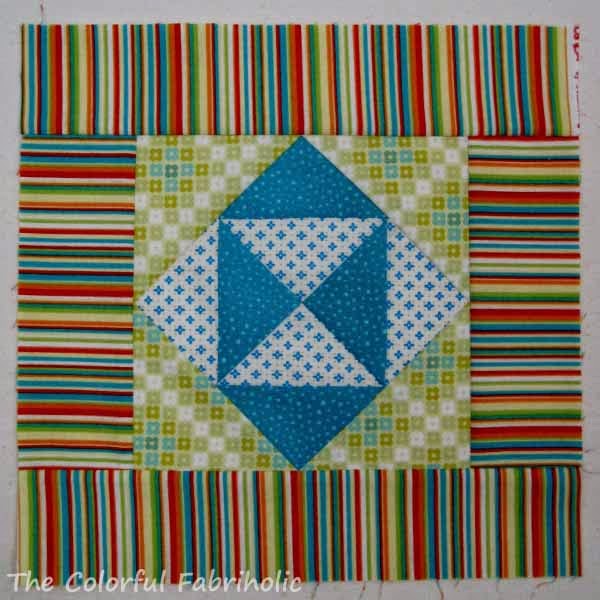
So this is the little block I'm using for my Michael Miller Fabrics challenge. It finishes 6" square.
Michael Miller Challenge Block
 
Those orange bands are 1/2" wide; each wedge is 3" long.  These 6" blocks are very fiddly to assemble. I developed the block in EQ and printed out template pieces for it.

Here's my process:

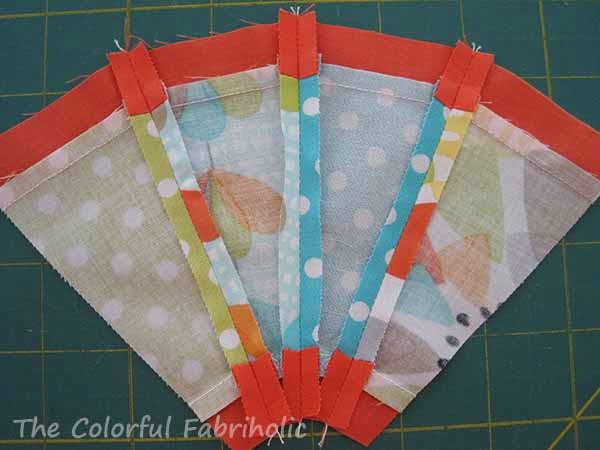
I started with 3-1/2" cut strips of print fabrics, and added 1" cut strips of orange to each side. I combined the template pieces for the orange and the wedge into a compound template* and cut orange-trimmed wedges. This was much easier than trying to cut and assemble those tiny pieces of trim on the narrow end of the wedge!
Strip with trim, cut with template


I sewed wedges into pairs, then into fours, and pressed the seams open, making a quarter-circle arc.
Wedges sewn together

I cut 6-1/2" squares of the grey background.  Then I cut them to shape with these templates* by tracing the shaped line and cutting with scissors. I added notches to aid in matching seams. (*See more about templates below; these are glued to one layer of template plastic.)
Templates for background
 
I pinned the background piece to the wedges, matching the notches to the seams, and pivoted at the seams as I sewed.
Background pinned to wedges
 
Pivot at match points. Tucks visible
in photo are not stitched and will open flat.
 
I wanted all my seams pressed toward the orange, to fill it in and create dimension there while keeping the background flat. The seams naturally wanted to be pressed toward the background, so to make them go toward the orange, I pulled the last few stitches of each wedge seam apart.
Pull seams apart

When pressing, the seam allowances overlap a bit at each point.
Press with overlap at points

Here's the front, with the seam allowance pressed toward the orange:
Front, pressed

Next I pulled open the seams at the small end and pressed the seam allowances under 1/4".  If you try this, don't use steam, and use tweezers or something other than your fingers. Ouch!
Press small curve seam allowances under

I glue-basted the corner background in place and hand-appliqued the small end of the wedge onto the background.
Hand applique

14 blocks later, I was able to play with layouts. Check out Monday's post, below, and let me know which layout you prefer.

These little blocks were fiddly because they were so small. If they were 12" blocks they'd be much easier!  Maybe I should have added seams in the background and paper pieced them....oh well, hindsight.

Amazing designs can be created using blocks with an arc. In my gallery tab, check out Loop in Motion and Celtic Lullaby, both of which use blocks with arcs in them.

* Templates: I've often made my own templates and I've had good success with this method:
-Draw or print out the block and the template at actual size. Add 1/4" seam allowance if not already included.
-With glue stick, attach the paper template to template plastic.
-With rotary cutter and ruler, or scissors if needed for curves, cut out the template. A single layer template is fine for tracing onto fabric to cut with scissors, but a thicker one is needed for rotary cutting.
-Glue the single layer template to another layer of template plastic and cut it out again. With care you can use this double-layer template for rotary cutting.
-If you want it to be sturdier for rotary cutting, glue it to a third layer of template plastic and cut it out again.

Linking up with WIP Wednesday over at Freshly Pieced; check out all the quilty inspiration over there!

Monday, June 9, 2014

DWM 6/9/14: Which Layout?

For Design Wall Monday today I'm asking for your input. I'm using this little block for my MQG Michael Miller Fabrics challenge:
my challenge block, 6"
 
I'm making a table runner, 2 blocks wide by 7 blocks long, which will finish at 12" by 42". Here are several layouts. Please tell me in the comments which one you like best. Thanks!
 
Layout 1
 
Layout 2
 
Layout 3
 
Layout 4
 
Linking up with Judy at Patchwork Times - see what's on everyone else's design walls over there.