Wednesday, April 12, 2017

A Little Camera Bag

I have a nice camera with a sturdy case, but the case is a bit too big and rigid to fit in my handbag. I take my camera to my CSQ guild and Piecing Group meetings because I take photos for our newsletter. I need a softer, more flexible pouch to protect the camera, one that's small enough to carry easily.

Here's a little zipper pouch that I use to keep all the charger cords in when I travel. Nice size, but with no interfacing or batting it's too flimsy to protect my camera.

So I figured if I made a similar pouch using two layers of batting, and quilted it, it would work for my camera.

I chose a fabric that's light enough in color to show up easily in my handbag but a print that won't look dirty; it sort of looks like mini urban camo in grey and lilac. I roughly measured the red bag and quilted up a 12" x 10" sandwich.

I left the last inch on each side unquilted, trimmed away the batting close to the last line of quilting, and pressed the raw edges under 1/2".

I found a 9" sport zipper in my stash - perfect! I pinned those folded edges around the zipper tape and sewed it in.

I turned it inside out and sewed across the ends, then added extra stitching across the zipper for reinforcement.

Then I boxed the corners, turned it right side out, and voila, I have a quick, convenient little camera bag.

Yes, it has some raw edges on the inside, but we'll just keep that our little secret, OK? Nobody's ever going to see it but me, and I don't care as long as this little bag does its job.

It's an okay fit for the camera - could have been an inch shorter, but I used the 9" zipper I had, so that determined the length (before boxing the corners).

I've already used it and I think it's going to work out well. Problem solved. It probably took longer to take the photos and write this post than it did to actually sew up this little bag!


Linking up with Sew Fresh Quilts

Monday, April 10, 2017

Organic Wavy Lines

A sneak peek - I'm almost done with the quilting and I should be able to get my Hands2Help race quilt bound and finished this week.

I like the organic wavy lines quilting - the simplicity of it complements the simplicity of the piecing. The lines are about 1 to 1-1/2 inches apart, close enough to securely hold the quilt together so it will last a long time, but soft enough to allow the  quilt to drape so it'll be snuggly, not stiff.

Before quilting: 


Linking up with: Patchwork Times, Em's Scrapbag, Love Laugh Quilt

Sunday, April 9, 2017

A Little Stash Enhancement

An LQS is having a sale, $5.99 for designer quilting cottons, so I had to check it out. A few pieces came home with me.

I discovered when I was working on Quilts of Valor that my stash is low on blues. So I found these, all from different lines but they coordinate together so well, don't you think? I added in the stripey print with mustard in it to add a light value to the mix, then added the mustard rings just because. Suddenly I have a palette that all works together. The beige stripe on the right is just a good basic to add to my low volume collection.

The shop's minimum cut on their sale fabrics is 1/2 yard and I know I'll be shopping in Paducah later this month, so I limited myself to three yards.

So, April stash numbers so far:
IN: 3 yds
OUT: 3-5/8 yds

Linking up with Patchwork Times & Molli Sparkles

Friday, April 7, 2017

KBFG to the Quilter Today

Whoo-hoo! Finally my long arm quilter, my friend Sandy, is ready for my KBFG quilt. She keeps a waiting list and I put my name on it when she quilted the last quilt for me, about nine months ago. I'll add my name to her list again now, because I'm sure I'll have something that needs to be quilted by the time it comes up.

So what is KBFG? It's a Kaffe & Batik Flying Geese top that I finished a couple summers ago. I still love it. I'm definitely keeping this for me!


Look at this backing - It's all names of colors in 2" high script. I worked for many years as a color specialist in apparel and footwear product development and part of my job was naming colors each season. How cool is that backing!!!

So Sandy and I are getting together for lunch - gyros, yum! - and then she'll take this and perform her magic on it. I can't wait to see it!


Linking up with Confessions of a Fabric Addict

Wednesday, April 5, 2017

Solstice Challenge Blocks

I've been keeping up with Pat Sloan's Solstice Challenge, making one block a week since December 21st. I've been putting my own spin on them, modifying them to suit myself: no applique, and all blocks 12" instead of various sizes. Here are the first 15, not in order; the pattern for the 16th will be posted later today.

The two most recent: Block 14 was supposed to have teardrop shapes appliqued in in the corners where I have pieced in Peaky & Spike units.

Block 15: Not sure I'm happy with this due to lack of contrast. It looks better in the photo than it does in real life.

I'm this far into the project and I enjoy making one block a week mixed in with my other projects, so I'll keep going. I'll figure out what to do with the blocks when the series is done.


Linking up with Let's Bee Social at Sew Fresh Quilts

Monday, April 3, 2017

Race Quilt for Hands2Help

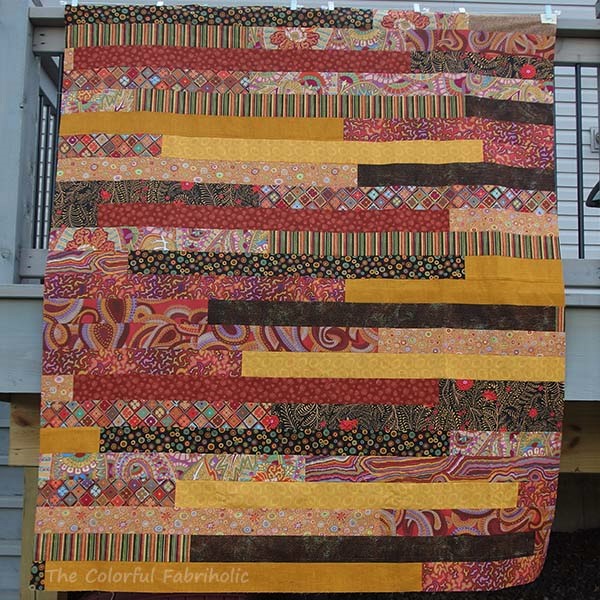
I recently pulled out an older UFO flimsy which I'll quilt for a gift for an Alaskan recipient. It's a race-style quilt, made somewhat like a jelly-roll race quilt up to a point and then modified. I decided to use the same technique and some stash to make a quilt for Hands2Help.

I pulled some fabrics and started cutting strips. I needed to add some more darks and another light to my palette because everything here looked too much the same value.

My race quilt is modified from the jelly-roll version. I cut my strips 3-1/2" wide so they finished at 3". I only partially sewed them race-style, then I chopped it up into three sections, and sewed the sections together. It finished at 60" x 72".  It took only about 3 hours to complete the flimsy from start to finish including cutting.

Here's a brief tutorial & tips for how I made my modified race quilt. All seams 1/4".

  • 1. Cut 36 WOF strips at 3-1/2" wide, plus one additional half-WOF by 3-1/2" strip. (12 fabrics, 3 strips per fabric plus the extra half-WOF strip)
  • 2. Cut off the selvages and sew the strips together end-to-end, with the half-WOF piece at one end. Make sure this is not the same print as at the other end.
  • 3. Press seams open; as you press, fold the long strip into a shoebox being careful to layer it with no twists. 
  • 4. Turn the folded stack in the shoebox onto its side with both fabric ends sticking out so you can place them right sides together. Place the shoebox on the floor near the sewing machine.
  • 5. Place ends right sides together and sew the strip lengthwise, a very long seam. As you sew, the fabric will feed out of the shoebox without any twists. When you come to the end, cut across the strip. 
  • 6. Press seam open and refold the long strip back into the shoebox. 
  • 7. Repeat step 5; you now have 4 pieces of fabric sewn together (12-1/2" wide). 
  • 8. Repeat step 6. 
  • 9. Repeat step 5 again; your project is now 8 strips wide (24-1/2"). Press seam open. 
  • 10. Your strip set is now at least 180" long. Fold it in half crosswise so it's a little more than 90" long. Lay this out on a flat surface such as a hallway floor. 
  • 11. Square up the cut ends (slide a cutting mat under the project on the floor). Measure from the cut edge to the fold to confirm your length. 
  • 12. Multiply your length times 2 and divide the result by 3. For example, if you have 93", you would calculate 93" x 2 = 186". 186" divided by 3 = 61".
  • 13. Measure this distance from the cut edge and cut across the width of the strip set through both layers. In this example, measure 61" from the cut edge and cut there. 
  • 14. The folded remainder of the strip set should now also measure the same length as the other pieces. Each piece is 1/3 of the quilt top.
  • 15. Arrange the three sections so you like the placement of fabrics next to each other as much as possible, and sew them together. Press seams open.
Your completed flimsy should measure 72-1/2" long by your cut width, in this example 61".

Sheesh, it took almost as long to explain how to do this as it did to make this flimsy! 

I hope you're inspired to make a modified race quilt for Hands2Help. Bonus: this flimsy uses 3-5/8 yards of stash! 


Sunday, April 2, 2017

March Stash Report & Goals Update

When I left off, I said I was going to take a few days off from blogging. My "few days" turned into half of March. Oh, well... life happens. (No worries, it's all good). So let's see how the stash report looks and how I did with my goals.

March Stash Report:

IN this month: 3/4 yard (STLMQG free table)
OUT this month: nothing I can count, although I used fabric for Solstice Challenge blocks and for Snake blocks with the Cave Quilters.

IN YTD: 20 yards
OUT YTD: 35-1/4 yards
Net change YTD: 15-1/4 yards OUT  -  No guilt when I indulge in some stash enhancement in Paducah!

Goals Update:

March recap:
1. Keep up with Solstice Challenge blocks. DONE, with modifications to make the blocks more to my liking.
2. Start a Hands2Help donation quilt. Started; fabrics pulled, plan in place, partially cut. 
3. Start planning a 12 Days of Christmas in July project requested by my son. Not done. 
4. Make progress on Roman Road WIP. Not touched… This WIP is on its way to becoming a UFO.
5. Make progress hand piecing my WIVSP Piecing Group project. Yes, I did a lot - for me - of hand sewing on this project this month. 
6. Keep up with bee blocks. DONE.

Other: My sister-in-law requested a gift quilt for a recipient in a northern Alaska village. We found a suitable UFO, ordered backing & batting, and I have the quilting plan in mind.

April Goals:
1. Finish Hands2Help quilt. See fabrics below.
2. Quilt Alaska gift quilt for Jackie.
3. Keep up with Solstice Challenge blocks.
4. Start planning a Christmas in July project requested by my son.
5. Make progress hand piecing my WIVSP Piecing Group project.
6. Keep up with bee blocks.

Note: I'm not putting Roman Road on the list for April because I have deadline projects that take priority. I'll have to come back to Roman Road later. Sigh... this is how WIPs become UFOs. But I really like this quilt and I want to finish it.

So here's the UFO that I'll quilt for the Alaska gift:

And since race-style quilts are fast, I've decided that my Hands2Help quilt will be a race quilt using some fabrics from stash. I need to pull a couple more lights and a couple more darks; most of these fabrics are too much the same value.

Hopefully I can do better at my April goals than I did in March. I'm sure I'll do quite well at stash enhancement, at least!

Linking up with Patchwork Times