Sunday, August 31, 2014

August Stash Report and Goals Update

August was a very good month for stash usage. But do you think I could refrain from any fabric purchases for one measly little month?! Who are we kidding. I needed a certain color of solid for a block contest submission, and while I was getting it a half yard of this nice low volume neutral jumped into my cart.
Low Volume Neutral

So, here are the stash stats for August:
IN: 0.75
OUT: 11.975
(Pillowcase for camp - 1-1/8;  Binding for Bumpity Blue - 3/8 yard;  Replacement baby quilt top & back, 3.6 yds;  Julie's Bee blocks - 1/8 yd;  MQU block - 1/4;  Striped binding for Ugly Baby Quilt, - 3/8;  30-Something top, 6-1/8 yds)

YTD IN: 137.75 yards
YTD OUT: 111 yards
YTD Net Change: 26.75 yards into the stash

Goals Update:
August:
1. Quilt & finish girl charity quilt. Done.
2. Finish special baby quilt. Finished - now called the ugly baby quilt. Also made & finished an entirely new cute baby quilt because the ugly baby quilt is not gift-worthy.
3. Finish top sample for Kristen's quilt and write instructions. Instructions written and sent but top not sewn.
4. Keep up with bee blocks. Done.
5. Work on CSQ 30-Something challenge, due Oct.21. Top finished.
6. Work on Broken Chevron UFO. Not touched

September:
1. Work on CSQ 30-Something challenge, due Oct.21.
2. Work on Broken Chevron UFO.
3. If it's back from the long-armer, bind and finish Mega Medallion in time for Sept 16 CSQ UFO Challenge meeting.
4. Finish top sample for Kristen's quilt.
5. Keep up with bee blocks.
6. Work on project for publication.

Linking up with Judy at Patchwork Times.

Monday, August 25, 2014

DWM 8/25/14

Updated 8/27: Linking up with WIP Wednesday at Freshly Pieced.

Nothing on my design wall today...

The replacement baby quilt is finished - baby can come any time now! But, of course, it would be better if baby waits until due date, two more weeks. Mom says she's ready any time!

The Ugly Baby Quilt is bound and will be donated. I had to find something from stash that would work, because I used the previously prepared print binding for the cute baby quilt. I had no more of the critter print, no more of the blue, and not enough of the orange used in the ugly baby quilt, so I found a stripe that works well enough. 3/8 yards used from stash.
UBQ with Binding

These blocks and more were on the wall but now they've been pieced into a top for my guild's 30th anniversary challenge. These blocks used batiks from stash, so when I figure out how much I actually used I'll be able to count some stash out. However, they didn't make a dent in my batik stash. I have a lifetime supply of gorgeous batiks!
Batik Blocks for 30-Something Challenge

This week I hope to get the backing pieced and the quilt layered and basted, and hopefully start the quilting. I found these two fabrics in my stash, which together are enough for the backing. The beige batik is used in the top, and the map print is a favorite that was used in DH's quilt a few years ago. I plan to keep this quilt for me to use on the sofa in the family room, so these fabrics are perfect.
Backing for 30-Something Challenge

Linking up today with Judy at Patchwork Times; check out everyone else's design walls over there for some great quilty inspiration!.


Sunday, August 24, 2014

Stash Report 8/24/2014

Moving in the right direction!

IN: Nothing! Yay!

OUT: 3.6 yards for the replacement baby quilt top and backing (binding counted earlier) and 1/8 yard for Julie's bee blocks. Scroll down to previous post to see the baby quilt.

I'll tally the totals at the end of the month, but I'm still way in the hole for the year. Still hoping to break even, but that means I have to get to work on some projects from stash and some UFOs.

Check out everyone else's stash management efforts over at Patchwork Times.

Friday, August 22, 2014

A Finish and a Tutorial: Chain of Love Baby Quilt

Ahh, so much better:
If you remember the story of the ugly special baby quilt from last week, here is the result of the revised effort. (Scroll down to the previous post if you want to see more about the ugly special baby quilt.) I'm so much more pleased with this.
Special Baby Quilt - "Chain of Love"

All finished and labeled, ready for baby
 
Detail
 
 
Linking up today with Friday Finish at Crazy Mom Quilts and Whoop Whoop Friday at Confessions of a Fabric Addict.
 
 
This is fast and easy, using a simple chain block and some sashing. How about a tutorial?!
Copyright 2014 by Jan Ochterbeck. For personal use only. Please do not pin without attribution.
 
Chain of Love Baby Quilt
44” x 44”
Skill Level: Easy
Chain of Love Baby Quilt
 
Fabric Requirements:
All fabrics at least 40” cuttable width (excluding selvages).
Cutting and piecing directions are given for directional (one-way) fabric.
·        Focus Print:                                                      3-1/4 yards. Used for top, backing, and binding.
·        White:                                                               5/8 yard
·        Color 1 (orange) and Color 2 (aqua):          1/4 yard each
·        Colors 3 (green), 4 (blue) and 5 (teal):        1/4 yard each per EQ7; you may be able to get by with 1/8 yard each
  • Batting: 48" square
Cutting:
·        Focus Print: For optimum fabric usage, the backing and binding will be cut first.
o   Cut a 50” length of WOF yardage for backing.
o   Cut a lengthwise strip 10” wide including selvage by 50” long, also for backing.
o   Cut 3 (three) lengthwise 2-1/2” by length of remaining yardage strips for binding (no selvage).
o   Cut 6 (six) 4-1/2” x 16-1/2” strips on the crosswise grain for sashing.
o   Cut 6 (six) 4-1/2” x 16-1/2” strips on the lengthwise grain for sashing.
o   Cut 8 (eight) 2-1/2” x 8-1/2” strips on the crosswise grain for blocks.
o   Cut 8 (eight) 2-1/2” x 8-1/2” strips on the lengthwise grain for blocks.
·        White:  
o   Cut 8 (eight) 2-1/2” WOF strips.
o   Sub cut from each strip, 2 (two) 12-1/2” lengths and 2 (two) 4-1/2” lengths, for a total of 16 (sixteen) 2-1/2” x 12-1/2” strips and 16 (sixteen) 2-1/2” x 4-1/2” strips.
·        Colors 1 and 2 (orange and aqua)
o   Cut 2 (two) 2-1/2” WOF strips of each color
·        Colors 3, 4, and 5 (green, blue, and teal)
o   Cut 1 (one) 2-1/2” WOF strip of each color.
o   Sub cut each strip into 16 (sixteen) 2-1/2” squares.  
Assembly:
All seams are ¼” unless otherwise noted.
Make Four-Patches:
·        With right sides together, sew orange and aqua strips lengthwise. Make two. Press seams toward the orange.  
·        Place the strips right sides together with opposite colors atop each other. Make sure the seam is closely abutted and press the strips together.
·        Cut off selvages; carefully cut 2-1/2” sections across the width of the strip, squaring up as needed. Cut a total of 13 (thirteen) stacked units.
·        Keeping the units stacked and making sure seams are well matched, sew together along one length. Open units and press seams to one side.
·        Make a total of 13 (thirteen) four-patches.
Block Assembly:
·        Chain-piece the following:
o   To each end of 8 (eight) 4-1/2” strips of white, add a green square.
o   To each end of 8 (eight) 8-1/2” strips of print, add a blue square.
o   To each end of 8 (eight) 12-1/2” strips of white, add a teal square.
o   Press all seams toward the strips (away from the colored squares).
 
·        To left and right sides of 4 (four) of the four-patches, sew a white 4-1/2” strip. Press toward the strip.
·        To the top and bottom of the resulting partial block, sew the white/green units, matching seams. Press seams toward the strip.
·        Sew 8-1/2” print strips to the left and right sides of partial block; press seams toward the strips.
·        Sew print/blue units to the top and bottom of the partial block; press seams toward the strips.
·        Sew 12-1/2” white strips to the sides of the partial block; press seams toward the strips.
·        Sew white/teal units to top and bottom to complete the blocks. Press seams toward the strips.
·        Examine blocks for any places where colored seam allowances or threads show through the white or print on the face of the block, and carefully trim away as needed to prevent show-through.
 
Top Assembly:
·        Lay out sashing strips so the grain/print direction goes in the direction you want.
·        With right sides together, sew a print 16-1/2” sashing strip to the left side of each block. Sew a sashing strip to the right side of two of the blocks. Sew the blocks into rows. Press seams toward the sashing.
 
·        Sew four-patch units to one end of 6 (six) sashing strips and to the other end of 3 (three) of the sashing strips. Join the sashing strips into rows. Make three rows. Press seams toward the four-patches.
 
·        Sew rows together; press seams toward the sashing.
·        Examine top for threads and show-through and trim as needed.
 
Finishing:
Assemble back:
·        With right sides together and aligning print direction, match selvages of backing fabric and sew, using a 1” seam allowance.
·        Cut away selvage, leaving at least ¼” seam allowance, wider if selvages permit.
·        Press seam open and fully press backing.
Layer backing face down, batting, and top face up and baste.
Quilt as desired. Sample is quilted as follows:
·        Using a walking foot, stitch in the ditch along all sashing seams.
·        Stitch along the diagonal across all blocks.
·        Stitch 1/8” from the edge all around the quilt.
·        Mark dots at edges of long strips in each block at 2” intervals. Quilt a diagonal grid across each block by stitching from point to point, using the patch intersections and marked dots as guides. Where necessary, stitch over the previous SID in the sashing seam to get to the next grid point to avoid a lot of starts and stops.
 
·        Using a darning or free-motion foot, FMQ or meander in the sashing.
·        Bury all thread tails.
Binding:
·        Join strips lengthwise and trim seam allowances to ¼”; press seams open.
·        Fold binding in half lengthwise wrong side together and press.
·        Square up quilt by trimming a scant 1/8” outside the outer edge of the top and squaring up corners.
·        With right sides together, attach binding to front of quilt with a generous ¼” seam, mitering corners.  Join ends using your preferred method (I use The Binding Tool).
·        Hand or machine sew the binding down to the back.
Label:
Every quilt should be labeled. Add a label of your choice to the back. Note: label can be inserted into the binding seam before the binding is sewn down to the back if desired.


Monday, August 18, 2014

DWM 8/18/14: The Continuing Saga of the Special Baby QUilt

Last week I worked on the special baby quilt, which is for a specific soon-to-come baby. Baby Max will be mom & dad's second child. Mom's a vet tech and dad's an outdoorsman, so this cute forest critter print is perfect for them.
Fabrics for Special Baby Quilt

I knew I'd have to be careful about the bold contrasting colors against the delicate print. As you can see in the photo, a small proportion of accent color complements the print, but too much would overwhelm it.

I designed a layout that would feature a lot of the print, and allow the accent colors to be highlighted in a medallion pattern.  Here it is, FMQ'd but not bound. (Sorry for the poor color - it's gloomy here today and the outdoor photo doesn't do the print justice,)
Ugly Special Baby Quilt

I don't like it. The bold colors are still too overwhelming for the delicate print. It's not cute. It's not even attractive! I'm not proud of it and I don't want to gift it.

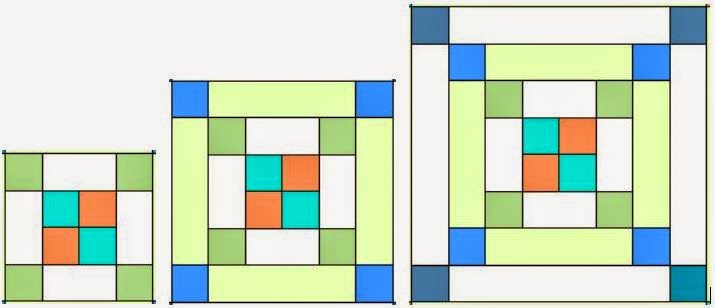
I spent some time playing in EQ and decided on a chain block design with white in it, and several accent colors including lighter levels of color as well as the key shades matched from the print. Lighter levels add interest and make it more juvenile, and white makes it softer and more restful to look at. I used the print sparingly in the blocks and used it for the sashing and border. The greater variety of values and the choppier chain block design work much better.
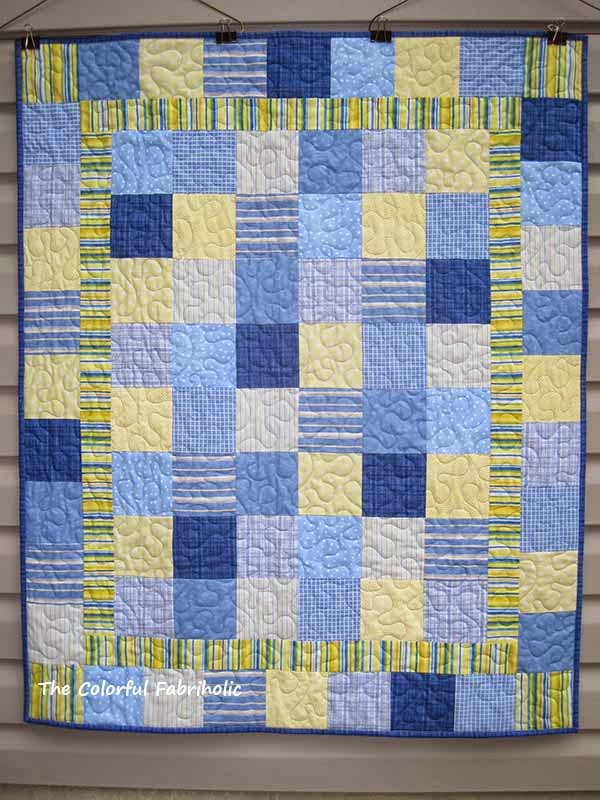
New Special Baby Quilt

I've started the quilting. The blocks will be quilted with a simple all-over diagonal grid. The grid will fill in the white and print sections of the block and further define the block shape. The print sashing & borders will get a loose meander, not as tight as the FMQ in the ugly quilt.

Fortunately, I had enough of the critter print for the backing, and I had already prepped the binding but didn't use it on the ugly quilt. When I bought the 6-yard cut of fabric at a sale, I didn't think I'd ever use that much, but I'm sure glad I had it all because there's only scraps left.

I'm much more pleased with the new version. I'm hoping to get it quilted and bound within the next couple of days. The baby's not officially due until Sept. 9 but is expected to come early, as in any day now.

Although I've been quilting for over 20 years, I still learn something with every quilt I make. This summer I've been learning a lot - the hard way - about value and proportion and contrast. What I've learned is that delicate, pale ground prints that have dark colors used sparingly within them do best with choppy piecing and several values of accent colors, not just one or two darks that match the print. Valuable lesson!

Maybe the ugly quilt top could have been salvaged with custom quilting such as feathers, etc. in the negative space. That would have been way beyond my FMQ skill level and I don't have time to put it on my long armer's waiting list. As is, I'll eventually bind it and put it in the donation pile.

Linking up today with Judy at Patchwork Times.


Sunday, August 17, 2014

Stash report 8/17/14

No fabric in this week.
Nothing I can count out yet, either.

I worked on quilting the special baby quilt this past week. I know why I was procrastinating: I don't like this design. I am not proud of it and I don't want to give it. So I'm making another baby quilt for the intended recipient, using the same cute forest critter fabric. So far it's much better. More tomorrow.

Linking up with Judy at Patchwork Times - check out everyone's stash reports over there.

Friday, August 15, 2014

Too Late

Updated: I waited for my SIL to call back with the address to send it, but when she called, she told me that Uncle D had died.


A Comfort Quilt:
Sadly, extended family member Uncle D is in poor health and is now on Hospice. I am sending a comfort quilt to Uncle D and his wife Aunt M.

Medallion Quilt

1/4 of Medallion Quilt Showing Fabrics

Center of Medallion Quilt

Simple medallion design, 60" x 60"; pieced in 2005 from stash fabrics which were already several years old then. Fabrics used were inspired by a class in color and fabric selection given by Louise at The Quilted Fox. Long arm quilted in 2006 by Sandy Etheridge.

Yes, back then I had a stash of country blue, barn red, and mauve, as well as border prints due to the influence of Ginny Beyer. I also had an appreciation for four corner symmetry due to the then-new use of hinged mirrors to visualize the design.

I've always liked this quilt but it has never been used because it never went with my décor. It's been hanging in a closet ever since it was finished. Now it's going to a new home where I hope it can offer some comfort to the recipients.

Linking up with Confessions of a Fabric Addict and Crazy Mom Quilts.

Monday, August 11, 2014

DWM 8/11/14 - What I'm working on this week:

Yesterday I worked on new First Saturday blocks. The Quilted Fox started a new BOM series this month with a "Fox in the Forest" theme. I really like this. I love the colors; they go great with the décor in my family room. Each month there are kits for a Main Block (the leaf) and two Alternate Blocks. At the end of the year we'll have 36 blocks for at least a 72" quilt, depending on the setting options.
QF First Saturday Blocks

Must do this week: get the special baby quilt quilted and bound. It's pinned and ready to go but I'm still dithering over how to quilt it. I need to quit procrastinating and just do it. It will be a combination of walking foot and FMQ meander quilting in pale green thread to match the background (which looks a bit washed out in this photo). The backing is the same forest critter print as the front, with more of the same for binding.
Special Baby Quilt Ready for Quilting

Also in work, my 30-Something challenge, due in October, to commemorate my guild's 30th anniversary. I'm only showing part of it here. I'm still playing with color layout; it will flow from light in the center to darker around the edges. I really need to get going on this if I'm going to finish it in time.
Layout in Progress
 
Looks like I have plenty on my plate for this week!

Check out Patchwork Times for more quilty inspiration.


Sunday, August 10, 2014

Stash Report 8/10/14

Whoo-hoo!!!
No fabric in this week.
3/8 yard used for binding for the blue baby quilt.
Finally moving in the right direction!

Check out the other stash reports at Patchwork Times.

Friday, August 8, 2014

Friday Finish Photos on a Gloomy Day

I was hoping to take some good outdoor photos of the two little quilts I finished at retreat last weekend. Yesterday it rained all day. Today it's dreary and gloomy out. I thought I caught a glimpse of the sun so I went out to take photos, but it's still dreary. I should have taken the photos earlier in the week but I didn't plan ahead. Oh, well...

First up, the blue baby quilt. I don't know if I'll donate this or if I'll have a purpose for it; I'll wait and see.
Blue Baby Quilt
 
This one will for sure be donated - it was made for that purpose. I still like the colors, although I've done so much with orange lately that I'm ready for another color. Someone at retreat mentioned that the colors look better live than they do in photos, and I agree. There are tiny hearts of pink, orange, and lime green in the white print.
Girl Charity Quilt Front
 
Girl Charity Quilt Back
 
And a glamour shot, just because...
Charity Quilt

My Helper
 
 
Linking up today with Whoop Whoop Friday over at Crazy Mom Quilts - check out all the quilty eye candy over there. 


Monday, August 4, 2014

So Much Fun at Retreat!

There were six of us, 4 quilters and two scrap-bookers. We were there from Friday noon to Sunday late afternoon. We had a great space with lots of room, plenty of table space, plenty of room for all of our gear plus the ironing station. We had music, movies, the Cardinals games on the radio, plenty of food, and great conversation.
Workroom at retreat
 
Getting Set Up
 
I got a lot accomplished. First, I put the binding on this little blue baby quilt that was already quilted. Since I machine-finish all my bindings, that went pretty quickly. (Sorry for the indoor, poorly lit photos)
Blue Baby Quilt
 
Next I worked on quilting and binding this girl charity quilt (for donation to CSQ's charity quilt drive). I had it already layered and pin-basted, so I marked it and quilted it using the walking foot. I was able to get it bound and finished.
Girl Charity Quilt
 
Then I worked on some machine applique dots and some framed squares using batiks. I love batiks, but I haven't used them much lately! Late on Sunday, when I had the blocks together, I laid them out on a flannel-backed tablecloth, and one of the girls helped me move blocks around for better color placement. I'll put them all up on my design wall at home and work some more on the layout. This photo is before we started moving the colors around. Obviously the color placement needs adjusting in some places: there are several background batiks, and too many of the darkest ones are clustered together.
Design Floor - Blocks Laid Out
 
I had such a good time! This retreat was held at a Girl Scout camp, where our hostess was on duty as the Supervisor. Since her duties did not require 100% of her time, she was able to spend time sewing, and she invited us all to keep her company. Our hostess has been invited back by the GS event organizer for next year, so I hope we get to do this again! Thank you, Chrissy!
 
Linking up today with Judy at Patchwork Times; check out everyone else's design wall - or floor - over there for inspiration.


Sunday, August 3, 2014

July Stash Report and Goals Update

A good month for the stash, more out than in.

July IN: 7.125 (LQS sale - 3; Sample for Kristen's Quilt - 1-3/8;  fabric for Kristen - 2-3/4)
July OUT: 11.5 (Add'l for Churn Dash top - 3/4;  Special baby quilt top, back, binding - 4-1/4;  Flying Geese workshop samples - 1;  Girl Charity Quilt back & binding - 2-1/8;  Sent to Kristen - 3-3/8)
July net change: 4-3/8 yards out

YTD IN: 137
YTD OUT: 99
Net change: 38 yards in. 

Think I can still manage to break even for the year?  Can I really be that disciplined?!! Really???  I'm planning to go to a retreat in October at Missouri Star Quilt Co. I don't think so.

JULY GOALS UPDATE:
1. Complete special baby quilt top. Done plus back and binding made.
2. Quilt & finish girl charity quilt. Not done but basted & taken to Aug. 1-3 retreat at Girl Scout camp.
3. Work on Broken Chevron UFO. Not touched.
4. Keep up with bee blocks. Done.
5. Press Mega Medallion top & backing and give to Sandy for quilting. Done.
6. Optional: CSQ 30-Something challenge, due Oct.21. Designed and top started.

Additional accomplishments:
1. Reconstructed ugly Churn Dash top into DCD
2. Designed quilt for Kristen, pulled/acquired fabric, and cut pieces for my sample. Found fabric for hers and sent it to her.

AUGUST GOALS:
1. Quilt & finish girl charity quilt.
2. Finish special baby quilt.
3. Finish top sample for Kristen's quilt and write instructions.
4. Keep up with bee blocks.
5. Work on CSQ 30-Something challenge, due Oct.21.
6. Work on Broken Chevron UFO.

Mega Medallion quilt top ready for quilting

Linking up with Judy at Patchwork Times; check out the other stash management progress over there.

Friday, August 1, 2014

All Ready

Everything's packed and the car is loaded up for retreat. I'll be leaving this morning. Looking forward to a fun weekend of sewing and hanging out! I have lots of projects to work on, everything from piecing to machine applique to quilting to binding, so I surely won't be bored!

One project I'm not taking along is the special baby quilt. The parts are all ready: the top is complete, the back is made, the binding is prepped. I haven't figured out how I'm going to quilt this one yet, so I need to think about it. But since all the top is finished and the rest of the parts are done, I'm linking up with Whoop Whoop Friday over at Confessions of a Fabric Addict. Here's a sneak peek; I just love that critter print:
Special Baby Quilt