
Since it's easier to show than to tell, here's a tutorial of how I do it. I'm binding my Dancing Plus II quilt, which is getting a dark binding, so I hope everything shows up well enough in the photos for you to see it.

In this method the binding is applied to the back of the quilt and brought around to the front, glue-basted down, and edge-stitched from the front. The binding finishes about 1/2" wide on the front. The stitching is visible along the edge of the binding on the front of the quilt, and next to the binding on the back.

Cut binding strips 2-1/2" wide and prepare binding as usual.
1. After quilting, trim the excess batting & backing 1/8" away from the edge of the top fabric.

2. Working from the back side of the quilt, determine a starting point and walk the binding around the edge of the quilt to make sure none of the binding join seams will fall at the corners, because you don't want the bulk there in the corner miters. Once okay, pin the binding to the back of the quilt at the starting point.
Tip: from the back, gather up most of the center of the quilt and secure it with a big rubber band or tie a string around it. This leaves the edges free but keeps the weight of the quilt mostly at the center, so the weight stays on the table and doesn't drag the quilt down. It looks sort of like an octopus.

3. Stitch the binding to the back of the quilt using a 5/16" seam allowance (heavy quarter inch, not quite 3/8 inch).

4. Miter the corners as usual as you get to them, and close the ends of the binding using your preferred method. Here you can see the binding attached, ready to bring it around to the front.

5. Press the binding away from the quilt back.

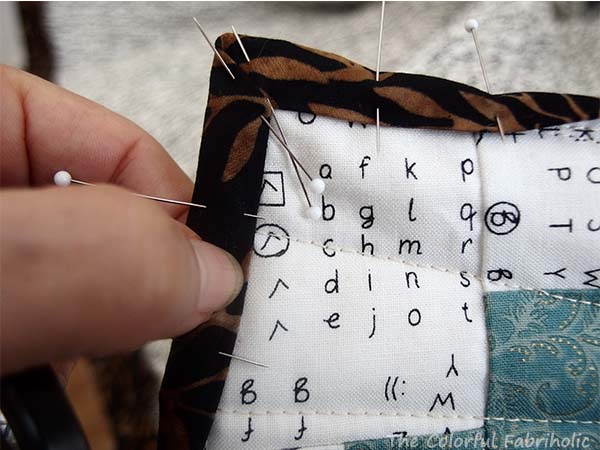
6. Bringing the binding to the front, miter the corners and pin them securely. The binding should fully cover the line of stitching where you attached it. See where my thumbnail is here? You should be able to feel the ridge of the binding on the back along there. Make sure your binding fully covers that ridge.
7. Clip (or pin) the binding along one side of the quilt so the binding covers the stitching. Here the clips are about 4" apart.

8. Using a wash-out glue suitable for fabrics,* apply a very thin line of glue under the binding. I usually work on the spaces between 2 or 3 clips at a time.

9. Press to set the glue. As you press, make sure the binding fully covers the stitching.

10. Repeat for all four sides of the quilt, until the binding is completely glue-basted in place. Leave the corner miters pinned. You can now handle the quilt as much as you need to; with glue-basting, the binding is not going to shift.

11. Octopus the quilt again, from the front this time.

12. Edge-stitch the binding down from the top. Use thread that matches the binding in the needle, and thread that matches the backing in the bobbin. Go slowly and stitch right next to the edge of the binding. Here, the center guide on my presser foot is at the edge of the binding and my needle is set one step to the right.

13. Backstitch about 3 stitches when you start and as you go around each corner, but keep the stitching from going too deep into the corner of the binding. You can continuously go around the whole quilt, or if you prefer you can do one side at a time, starting and stopping at the corners.

Here is what the front looks like finished; you can see the stitching just along the edge of the binding.

And here's the back as well; you can see the stitching next to the binding.

After the binding was attached to the back of the quilt, it took me 55 minutes to glue-baste it, but I was stopping frequently to take the photos for this tutorial, including looking at them on my laptop to make sure they were okay. Then it took me about 20 minutes to sew the binding down all the way around, again including time for taking and viewing photos. Without photos it probably would have taken me less than an hour to glue-baste and sew down this binding. This quilt is 66 x 81".
* Glue: I have had good success with Roxanne Glue Baste-it and with Elmer's School Glue (no affiliation in either case). Be sure whatever you choose will wash out. Apply the very thinnest possible line of glue and make sure the binding fully covers it so it doesn't get on your iron.
I hope this explanation of what works for me is clear enough. If you have any questions, please leave a comment.
Linking ups: Patchwork Times, Em's Scrapbag, Love Laugh Quilt
Thank you for the tutorial. I have tried the machine method before, but didn't use glue. I especially like that you gave examples of glue that works.
ReplyDeleteHugs
I love this method, I had hand stitching and I've found this way works the best for me. I did try where you sew it to the front first and then sew in the ditch to catch the back binding, but I found sometimes I missed small spaces. This way works so much better.
ReplyDeleteThanks for the clear tutorial....I learned two things...how to octopus my quilt and how to glue baste :)
ReplyDeleteGreat photo tutorial and explanation! I do the same but have never glue basted; I just use the clover clips to hold in place. I can see how handy the glue basting would be!
ReplyDeleteThank you so very much for sharing this tutorial! I know tutorials require more time! I have never glue basted before - except for EPP. I should try this out!
ReplyDeleteExcellent tutorial. I generally do this sans glue basting and octopussing. I will try this method next time I do a quilt. It looks better than mine. One question -- what do you do with the unsewn corners? Thanks for the tutorial.
ReplyDeleteGreat tips! I use glue basting for the quilt sandwich, but never thought to use it for the binding. That "octopus" tip is awesome too!
ReplyDeleteThanks for taking time to take the pictures and write this tutorial. Very interesting... :-)
ReplyDeleteWhat a great tutorial! I really appreciate all the details you included--words and pictures.
ReplyDeleteGreat tutorial. I do most of my binding by machine also.
ReplyDeleteI am going to HAVE to try that rubber band trick!! Thanks for sharing.
ReplyDeleteBest tutorial I have ever read! Thank you SO much! Debby at rsvp15atshawdotca
ReplyDeleteThanks for sharing this tutorial. I've not tried to do a binding all by machine. It's on my list of things to try.
ReplyDeleteThanks for the easy to read and most pleasant glue binding basting so far. Thanks for taking the time to share.
ReplyDeleteEarly in my quilting career (not too long ago), I settled on sewing to the back and bringing to the front where I could control the stitch down on the binding edge. Otherwise, it is hit or miss, and I was never going to sew by hand. Sharon Schambers video introduced me to glue basting. I now use fusible web for my binding, which I like a little better than glue. It really gets the corners precise, and I just put one metal binder clip on the corners for additional security. I use a teflon pressing cloth to protect my iron form either glue/webbing.
ReplyDelete(I glue baste nearly all my seams as I rarely press anything open.)
I fashioned a quilt suspension system so that I am not fighting so hard to get my quilt shoved through the 7.5" throat space on my Bernina. It has made all the difference. Makes quilting/binding so much easier. Your rubber band trick is nifty.