
If you remember the story of the ugly special baby quilt from last week, here is the result of the revised effort. (Scroll down to the previous post if you want to see more about the ugly special baby quilt.) I'm so much more pleased with this.

Special Baby Quilt - "Chain of Love"

All finished and labeled, ready for baby

Detail
Linking up today with Friday Finish at Crazy Mom Quilts and Whoop Whoop Friday at Confessions of a Fabric Addict.
This is fast and easy, using a simple chain block and some sashing. How about a tutorial?!
Copyright 2014 by Jan Ochterbeck. For personal use only. Please do not pin without attribution.
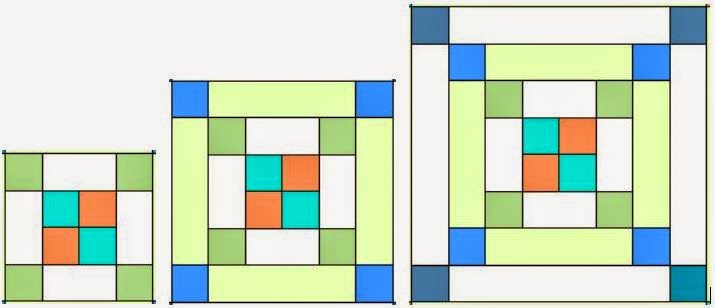
Chain of Love Baby Quilt
44” x 44”
Skill Level: Easy

Chain of Love Baby Quilt
Fabric Requirements:
All fabrics at least 40” cuttable width (excluding
selvages).
Cutting and piecing directions are given for
directional (one-way) fabric.
·
Focus Print: 3-1/4 yards. Used
for top, backing, and binding.
·
White: 5/8 yard
·
Color 1 (orange) and Color 2 (aqua): 1/4 yard each
·
Colors 3 (green), 4 (blue) and 5 (teal): 1/4 yard each per EQ7; you may be able to get by with 1/8 yard
each
- Batting: 48" square
Cutting:
·
Focus Print: For optimum fabric usage, the backing
and binding will be cut first.
o
Cut a 50” length of WOF yardage for backing.
o
Cut a lengthwise strip 10” wide including selvage by 50” long,
also for backing.
o
Cut 3 (three) lengthwise 2-1/2” by length of remaining yardage strips for
binding (no selvage).
o
Cut 6 (six) 4-1/2” x 16-1/2” strips on the crosswise
grain for sashing.
o
Cut 6 (six) 4-1/2” x 16-1/2” strips on the
lengthwise grain for sashing.
o
Cut 8 (eight) 2-1/2” x 8-1/2” strips on the
crosswise grain for blocks.
o
Cut 8 (eight) 2-1/2” x 8-1/2” strips on the lengthwise
grain for blocks.
·
White:
o
Cut 8 (eight) 2-1/2” WOF strips.
o
Sub cut from each strip, 2 (two) 12-1/2” lengths
and 2 (two) 4-1/2” lengths, for a total of 16 (sixteen) 2-1/2” x 12-1/2” strips
and 16 (sixteen) 2-1/2” x 4-1/2” strips.
·
Colors 1 and 2 (orange and aqua)
o
Cut 2 (two) 2-1/2” WOF strips of each color
·
Colors 3, 4, and 5 (green, blue, and teal)
o
Cut 1 (one) 2-1/2” WOF strip of each color.
o
Sub cut each strip into 16 (sixteen) 2-1/2”
squares.
Assembly:
All seams are ¼” unless otherwise noted.
Make Four-Patches:
·
With right sides together, sew orange and aqua
strips lengthwise. Make two. Press seams toward the orange.
·
Place the strips right sides together with
opposite colors atop each other. Make sure the seam is closely abutted and
press the strips together.
·
Cut off selvages; carefully cut 2-1/2” sections
across the width of the strip, squaring up as needed. Cut a total of 13 (thirteen)
stacked units.
·
Keeping the units stacked and making sure seams
are well matched, sew together along one length. Open units and press seams to
one side.
·
Make a total of 13 (thirteen) four-patches.

Block Assembly:
·
Chain-piece the following:
o
To each end of 8 (eight) 4-1/2” strips of white,
add a green square.
o
To each end of 8 (eight) 8-1/2” strips of print,
add a blue square.
o
To each end of 8 (eight) 12-1/2” strips of
white, add a teal square.
o
Press all seams toward the strips (away from the
colored squares).
·
To left and right sides of 4 (four) of the
four-patches, sew a white 4-1/2” strip. Press toward the strip.
·
To the top and bottom of the resulting partial
block, sew the white/green units, matching seams. Press seams toward the strip.
·
Sew 8-1/2” print strips to the left and right
sides of partial block; press seams toward the strips.
·
Sew print/blue units to the top and bottom of the
partial block; press seams toward the strips.
·
Sew 12-1/2” white strips to the sides of the
partial block; press seams toward the strips.
·
Sew white/teal units to top and bottom to
complete the blocks. Press seams toward the strips.
·
Examine blocks for any places where colored seam
allowances or threads show through the white or print on the face of the block,
and carefully trim away as needed to prevent show-through.
Top Assembly:
·
Lay out sashing strips so the grain/print
direction goes in the direction you want.
·
With right sides together, sew a print 16-1/2”
sashing strip to the left side of each block. Sew a sashing strip to the right
side of two of the blocks. Sew the blocks into rows. Press seams toward the
sashing.

·
Sew four-patch units to one end of 6 (six) sashing
strips and to the other end of 3 (three) of the sashing strips. Join the
sashing strips into rows. Make three rows. Press seams toward the four-patches.
·
Sew rows together; press seams toward the
sashing.
·
Examine top for threads and show-through and
trim as needed.
Finishing:
Assemble back:
·
With right sides together and aligning print direction, match selvages of
backing fabric and sew, using a 1” seam allowance.
·
Cut away selvage, leaving at least ¼” seam
allowance, wider if selvages permit.
·
Press seam open and fully press backing.
Layer backing face down, batting, and top face up and baste.
Quilt as desired. Sample is quilted as follows:
·
Using a walking foot, stitch in the ditch along
all sashing seams.
·
Stitch along the diagonal across all blocks.
·
Stitch 1/8” from the edge all around the quilt.
·
Mark dots at edges of long strips in each block
at 2” intervals. Quilt a diagonal grid across each block by stitching from
point to point, using the patch intersections and marked dots as guides. Where
necessary, stitch over the previous SID in the sashing seam to get to the next grid point to avoid
a lot of starts and stops.

·
Using a darning or free-motion foot, FMQ or
meander in the sashing.
·
Bury all thread tails.
Binding:
·
Join strips lengthwise and trim seam allowances
to ¼”; press seams open.
·
Fold binding in half lengthwise wrong side
together and press.
·
Square up quilt by trimming a scant 1/8” outside the
outer edge of the top and squaring up corners.
·
With right sides together, attach binding to
front of quilt with a generous ¼” seam, mitering corners. Join ends using your preferred method (I use The Binding Tool).
·
Hand or machine sew the binding down to the back.
Label:
Every quilt should be labeled. Add a label of your choice to
the back. Note: label can be inserted into the binding seam before the binding
is sewn down to the back if desired.
I love the name you gave this quilt! I'll definitely bookmark this pattern to consider for future use! :)
ReplyDeleteYour "Special Baby Quilt" is lovely. This design is one of my favorites. Beautiful.
ReplyDeleteThat did it! Too cute.
ReplyDeleteOk, I do like this one better :) cute!
ReplyDeleteI love the colours!! Thanks for tutorial :)
ReplyDeleteNice revision. It looks great.
ReplyDeleteGreat quilt and thanks for sharing!
ReplyDelete