
I had the pleasure of getting back together with friends Kevin the Quilter, Cherie (Quilted Jonquil) and Dar (Dar's Patchwork Garden) recently to continue working on the snake quilt we started earlier this year. When we left off in March, we had 32 blocks done:

Now we have all 48 blocks done!!!


When I last posted about this back in March, several people asked me for a tutorial.
The snake block/quilt is a traditional pattern which Barbara Brackman discusses here, dating from the 1930s to the 1960s. In her post she mentions that she cannot find a commercial pattern for it. There is a similar quilt called Snake Trail in Denise Schmidt's book Modern Quilts Traditional Inspiration; Denise's block size, proportions, corners, construction methods, and pressing differ from mine.
The snake block is a very challenging block even for experienced quilters, and it requires templates. Here's a tutorial for how I made our templates and how my friends and I made our blocks. Our block is intentionally made slightly oversized and trimmed down for accuracy. Our block finishes at 10", and requires both paper piecing and sewing curves.

Snake Block Tutorial
Traditional block; instructions and images copyright Jan Ochterbeck 2017
Drafting
the Block and Making the Templates
Supplies:
- Graph paper – must be at least 11" square, preferably larger; okay to tape pieces together keeping ruled lines aligned
- Ruler
- Sharp pencil
- Compass
- Eraser
- Paper scissors
- Plain printer paper
- Add-a-Quarter ruler if desired (or use your regular ruler)
- Large template plastic
- Glue stick
- Access to a copy machine
Drafting:
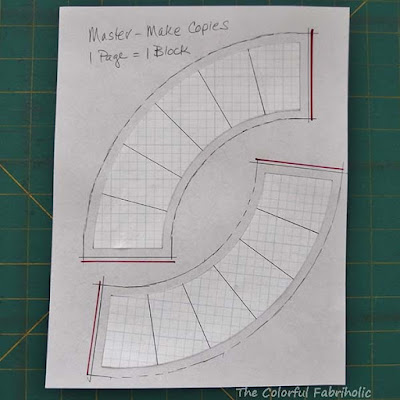
- Draw a 10" square on the graph paper.
- Make a mark on the outline 4" from each corner on all sides.
- Using the compass set at 4 inches, draw arcs in two opposite corners.
- Reset the compass at 6 inches and draw larger arcs outside the first ones.
- Note that the ends of the arcs are on the 4" marks you made earlier. If they’re not exactly at these 4" marks, redraw the arcs.
- Lightly draw a diagonal line from the same corners. Draw it more heavily within the arcs and erase the rest, but make sure marks show a little on the background and corner pieces.
- From the same corners, draw diagonals within the arcs as shown, like spokes, spaced as evenly as possible. Make sure the lines extend past the curved line of the arc because these marks serve as match points.

8. Very
carefully and accurately, cut your drawing apart to separate the arcs from the
center and the corners. Do not cut the arcs into little pieces.
-
Note: These pieces do not have seam allowances.

Making paper piecing foundations:
- Lightly glue both arcs to a piece of plain printer paper, allowing 1/2" clearance on all sides.
- Draw 1/4" seam allowance all the way around each arc, using the Add-a-Quarter ruler or any ruler that gives you an accurate 1/4".
- Make sure the lines at the ends of the arc are perpendicular to the edge.
- Tip: Add additional 1/8" to the ends, shown here in red.
- Make
copies for paper piecing; one page will make two arcs for one block.

Making templates for the background and
the corners:
- Lightly apply glue stick around the outside edges of the background piece. The moisture makes the paper stretch, so keep the glue only at the edges and work quickly.
- Glue the paper down to template plastic, making sure you have 1/2" of plastic all the way around.
- Draw 1/4" seam allowances on the plastic all the way around the paper. *

4. Tip: add additional 1/8" to the straight sides (not
the curves), shown in the photo below in red.*
5. Mark
match points where the seams in the arc will align.
6. Carefully cut out the plastic template.
7. With sharp scissor points, notch the match points, cutting about 1/8" into the seam allowance.
6. Carefully cut out the plastic template.
7. With sharp scissor points, notch the match points, cutting about 1/8" into the seam allowance.
8. Repeat
steps 1-7 for the corner piece; make only one corner template.

Tip:
It’s better to make the block slightly oversized and square it up to 10-1/2"
after it’s sewn. Therefore I recommend adding 1/8" to the outside edges of all block pieces.
This is planned in the instructions above, so the additional
1/8" is already included
on both templates and the paper piecing foundation.
* I used a Sharpie marker
for this step so the lines would show in the photos for this tutorial. Never use
Sharpie with any templates or rulers in your sewing studio. Some of the ink gets on – and stays on –
the edge of the ruler or template. Some marking pens, such as water-erasable markers, dissolve the permanent ink
of the Sharpie and allow it to bleed onto the fabric being marked. It’s
permanent. It will never wash out, and your project may be ruined. Keep all permanent markers away from your
sewing!
Making cutting guide for arc pieces
- Mark a piece of template plastic 2-1/2" x 3".
- Draw a tumbler shape: With the plastic in portrait orientation, make marks on the bottom line 3/8" in from each corner. Draw a line from the top corner to the bottom mark on each side, creating a tumbler shape.
- Cut out the plastic template on these lines.
- Cut six plastic pieces exactly this same size.
- Glue them together in a stack. Make sure the edges are exactly aligned when you add each layer. Six layers is sturdy enough to use with care with a rotary cutter (the blade will cut into fewer layers).

Cutting
Background Fabric
- The background template requires 12" of fabric, 1/3 yard. 4 background pieces can be cut from one 12" width of fabric.
- On the wrong side of the background fabric, align the graph paper lines of the background template with the grain line of the fabric and carefully trace around the template.
- Mark the match points on the fabric so they’re visible on the wrong side of the fabric.
- Cut out the background fabric, making sure the match points are visible. Be sure to keep the extra 1/8" on the straight sides.
- For a 6 x 8 block layout (60" x 80" top) cut 48 background pieces.
- If using all one background fabric, 4-3/4 yards are needed.
Corner Wedges
- The corner template can be cut from yardage, scraps, or from a 5" charm square.
- On the right side of the corner fabric, carefully trace around the corner wedge template, keeping the graph paper lines aligned with the grain of the fabric.
- Mark the match points on the fabric so they’re visible on the right side of the fabric, for matching up with the arcs later.
- Cut out the corner fabric, making sure the match points are visible. Be sure to keep the extra 1/8" on the straight sides.
- For a 6 x 8 block layout (60" x 80" top) cut 96 corner wedges. If using all one fabric for corner wedges, 1-5/8 yards are needed.
Tumblers for Paper Pieced Arcs
- The tumbler-shaped cutting guide can be used with 2-1/2" pre-cut strips of fabric to cut pieces along the length of the strip.
- Or use the cutting guide with 3" strips of fabric and rotate the template up and down for each cut for less waste.
- Stack strips or scraps and rotary cut to save time and fabric.
- For a 6 x 8 block layout, 288 pieces are needed, the more variety the better.
Sewing the blocks:
Block Components: Corner Wedges (red), Arcs (blue), Background (white)

Paper
piece the arcs:
- Cut the two arc foundations apart and work on two at a time to chain piece.
- Pre-fold the sewing lines for easy alignment of pieces.
- Put two blue pieces right sides together, wrong side to the back side of the paper foundation.
- Sew on the first line, open the fabric, and press.
- Fold back the paper on the next line; trim the fabric 1/4" away from the folded paper.
- Align the next blue piece right sides together, and sew on the next line.
- Repeat steps 4, 5 & 6 to complete the arc.
- Cut on the outer cutting lines. Be sure to keep the extra 1/8" at the ends of the arcs.
- Remove the paper.

Assemble block:
1. Pin an
arc to a corner, matching the arc seams to the marked match points,
pinning ends and match points. Sew with 1/4" seam. Sewing
with the concave arc on top is recommended to ease it onto the corner wedge.
Tip: align edges and use a pin to “stitch a seam” (see
arrows) which will prevent the ends of your arcs from swinging outward; this
helps keep the arc seam perpendicular to the edges of the block.

2. Pin
center background piece to arc, aligning ends and matching match points to seams in arc. Sew with 1/4"
seam. Piecing with the concave background on top is recommended to ease it onto
the arc.
Tip: align edges and use a pin to “stitch a seam (see arrows).”

3. Repeat
to attach center to other arc.
4. Press all
seams toward the corners, away from center background piece.
5. Square
up and trim the block to 10-1/2", making sure all the ends of the arcs are as close as
possible to 4-1/4" away from the
corners, shown by the arrows in the photo below. This assures that the arcs will line up smoothly and create the snake-like effect when the blocks are set together.

Completed block, 10-1/2" unfinished (will be 10" finished)

Note 1: If the
block comes out wavy or seems to ripple, you may have taken too scant a 1/4" seam
when attaching the background center to the arcs. Try increasing your seam
allowance by one or two thread widths to eliminate the excess waviness. Do this
before trimming and squaring up, while the block is still oversized.
Note 2: When sewing blocks together in the traditional layout, the seams will nest. Match seams and pin carefully for smooth
transition of snake-like arcs from one block to the next. For alternate layouts
such as loops, the seams of some of the blocks may need to be re-pressed to get
the seams to nest.
Note 3: If you make a Snake Quilt as a group project, I strongly
recommend that you use one set of templates for all the blocks rather than lots
of individual sets of templates. Just like everyone’s quarter inch seam differs,
everyone’s templates will come out just a tiny bit different.

Traditional Layout
If you would like a PDF of this tutorial, please leave a comment and be sure to include your email address within the text of your comment.
Linking up with Sew Fresh Quilts
GREAT tip to use one set of templates if working in a group. I'm very excited that all the blocks are pieced! I may have missed it; who is planning to sew the top together or is the group getting together again to work on it more?
ReplyDeleteWow, I admire your talent for making this difficult quilt - and then to give it away as a QOV is even nicer. You shared great directions for your method. Thank you! ~smile~ Roseanne
ReplyDeleteSew excited! I can't wait to make it! THANK YOU!
ReplyDeleteIt has been such a pleasure working on this quilt with you and the other quilters! You are a very organized and helpful teacher! How kind of you to share your hard work and research with the readers of your blog!
ReplyDeleteThis is awesome. I'm not sure that I would have thought to have everyone use the same template, but it sure makes sense. I'd love a pdf of the instructions. Thank you!
ReplyDeleteSuch a beautiful quilt!!! I love it - You guys are doing an amazing job!
ReplyDeleteI enjoy the blogs you write, the visits with "Kevin the Quilter" and now your very kind offer to share the instructions for this snake block. Thank you for it ALL. I would appreciate a pdf of your tutorial. Liz erszirogers@gmail.com
ReplyDeleteWhat a wonderful idea for a quilt! Thanks for explaining how to create templates for this block!
ReplyDeleteI'll have a hard time not placing this quilt at the very top of my list. In fact, I may be so tempted that I will start cutting pieces tonight!
ReplyDeleteI'd love a pdf and thank you for offering it.
I would love a PDFs. It is very nice of you to offer one. Thank you.
ReplyDeleteLOVE the quilt that you are putting together!! Will have to try out your instructions to see if I can come anywhere close to the beautiful results you achieved. Thanks for offering the tutorial!
ReplyDeleteCongrats on finishing all those blocks. It's going to be an awesome quilt!
ReplyDeleteThis is turning into a super quilt. I would love the pdf for the snake quilt. I'd like to try it
ReplyDeleteThis is gorgeous but way too much work for me. It makes a lot of sense to do this with some friends.
ReplyDeleteBeautiful quilt. You and your friend have done a great job.
ReplyDeleteThis is a beautiful quilt and very generous of you to share a PDF. Will we get to see the final quilting?
ReplyDeleteI'm so excited to try this block. The quilt is beautiful. Please do send a PDF. Would be much appreciated. dianequilter @ gmail . com (without spaces)
ReplyDeleteThis quilt is a stunner! I have to try a block asap!
ReplyDeleteA PDF would be greatly appreciated. THANK YOU SO MUCH!
dbrit89828 at aol dot com
I would love to have a pdf of this to work on in the RWB. Thank you.
ReplyDeletelswanekamp1@gmail.com
I would love a pdf of the tutorial of the snake quilt. Excellent directions, I have admired this quilt since i first saw it on Kevin's blog.
ReplyDeleteMy email address is rdkoenig@hotmail.com
Thank you for sharing.
I would love to have a pdf of snake quilt tutorial. Thank you so much for the chance to be able to include this in my quilt collection. Great tutorial!
ReplyDeleteHello Jan, quilter Kevin sent me here to view your inspiration on his blog today. Thank you for your brilliance and generous sharing of your skills'
ReplyDeleteI hope you have a blessed Christmas. I am so glad to know you
I like the Snake quilt and please would you send me the PDF to try it. Thank you so much for all.
ReplyDeleteHere my email address: hameledith@gmail.com
I've been wanting to make a quilt like this. I'd really love to get your PDF.
ReplyDeleteAddress is : iquietlyquilt@gmail.com Thanks a bunch. Look forward to making this quilt.
I have been searching for a pattern for this quilt. I would really appreciate your sending a pdf to jeanne.stone@cox.net. Thank you so much!
ReplyDeleteThanks for the tutorial!
ReplyDeleteLove the pattern and I am in awe of your talents as a skilled teacher and pattern writer. I am so very late to the party but I hope it is not too late to receive the PDF for this pattern. My email is sewpreetiquilts@gmail.com
ReplyDeleteI love the look of this quilt!!! Will you please send me the PDF jane@floresair.com Thank you Jane
ReplyDeleteWow. I've struggled with this pattern and would be most appreciative for the PDF. Thanks in advance. detailskeeper@gmail.com
ReplyDeleteIm curious about this variation. I looked up rattlesnake coil and came up with quite a different version. You tip is great. I will try to make version as named in fiction story " prayers for sale" some of these older quilt patterns dont seem to be for sale
ReplyDeleteI just found this and would love to have a copy. I love to make string quilts for donations. My email is: tia_4ftk9@yahoo.com Thanks.
ReplyDeleteIf the PDF is still available I would like a copy. Thank you. Bkpaddle@gmail.com
ReplyDeleteThis is a great tutorial. I'm thinking about using this for my guild monthly block. I'll refer to this pattern for sure. Is a PDF available? smellee17@hotmail.com
ReplyDeleteare you still sending PDF's for this snake fence block, would like at deblflood@hotmail.com
ReplyDeleteI love this excellent tutorial for constructing a snake block and templates! Been thinking of making my own quilt and I have a question about the height of the unfinished snake wedge pieces:
ReplyDeleteIf the corner pieces and backgrounds are each 4.5” wide (unfinished), and the snake piece wedges are 3” unfinished, that means 4.5” + 3” + 4.5” - 0.5” - 0.5” (for two seams and their allowances) = 11” unfinished block side length (10.5” finished). Shouldn’t the height of the snake wedges be 2.5” unfinished, then 2” once they’re finished? 4.5” + 2.5” + 4.5” - 0.5” - 0.5” = 10.5 unfinished block side (10” finished). Or am I missing some math, or the height of the unfinished snake wedges?
Really want to make this quilt myself, and I’ve got access to a laser cutter on campus to make my own templates, so I’m excited to start! Paper piecing the individual snake paths is brilliant.
Alex, you are a no-reply commenter so I can't reply to you directly. I hope you come back to this page and see this. You are correct, the height of the *finished* arc is 2" (2-1/2" unfinished). The template for cutting the segments is a little bigger to allow some wiggle room when paper piecing the arcs. After paper piecing them, carefully cut them so you have 1/4" seam allowance, as marked on the paper. After piecing and squaring up, the block should measure 10-1/2" (10" finished). Thank you for your kind compliments about my Candyland top.
DeleteThanks a pile for your reply!
DeleteThis is all on my mind since I spent a few hours the other weekend doing an obnoxious amount of trig to try to figure out how to make templates using a lot more math. I'm hoping to generalize this so I can make templates in Illustrator for the laser cutter. Will be happy to share if I ever finish!
The easy way would be for me to draft a template using your method then scan it, vectorize in Illustrator, then make templates that way :)
Much obliged, and greetings from Tucson,
Alex
Beautiful instructions and quilt, may I please have a pdf if available. Thank you, Kim email: Kwt31113@gmail.com
ReplyDeletebeautiful and wonder tutorial would love to have pdf, thank you - tiredmom1967@yahoo.com
ReplyDeleteGreat tutorial! Please, may I have the PDF? Sincerely, bonnithompson61@gmail.com
ReplyDeletePlease, I would like to have the PDF. Thank you. nora.dorf@gmx.net
ReplyDelete